Home » Kodi » Disney Plus Kodi Addon Installation Guide – May 2023

Disney Plus Kodi Addon Installation Guide – May 2023

Disney Plus Addon

This article will teach us how to install Disney Plus on Kodi quickly. Disney Plus is a premium video streaming service The Walt Disney company offers. Like the Disney+ add-on, we have Netflix Kodi add-on, Hulu, HBO Max add-on, and Tubi TV add-on.

Coming to the Disney+ add-on, to watch Disney+ on Kodi, you need to install the Disney+ add-on that belongs to the Slyguy repository. After that, you can stream top-rated movies and TV shows.

Attention, Cord-cutters!

I want to warn you that whatever you stream online is visible to the Government, ISPs, and Third Parties. Following are some of your details:-

IP Address: 35.172.111.47
Location: Virginia US
ISP: AS14618 Amazon.com, Inc.

You must be aware that streaming copyrighted content without a license is illegal and may land you in legal trouble.

I urge you to comply with the rules and regulations in your country, but what if you land up streaming illegal content unintentionally?

Hence, I suggest using the most secure VPN, i.e., IPVanish which has military-grade encryption. In addition, IPVanish enables buffering-free streaming, hides your IP address, Location, and bypasses the geo-restrictions and bandwidth throttling.

Special Deal: Only $3.33/Month

Following are the steps to install and watch Disney+ on Kodi.

Installation Steps

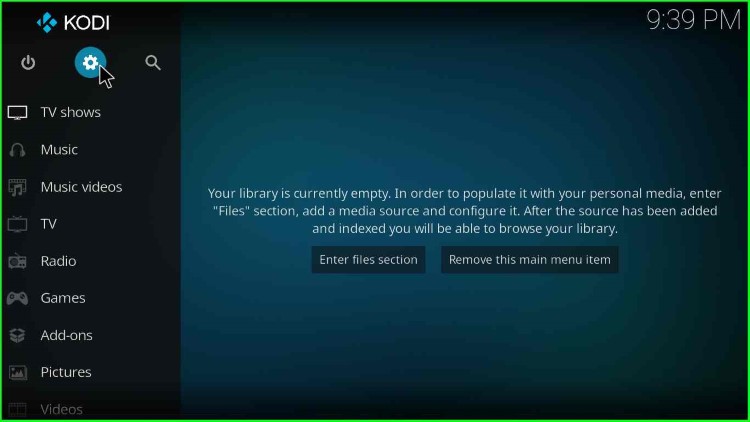
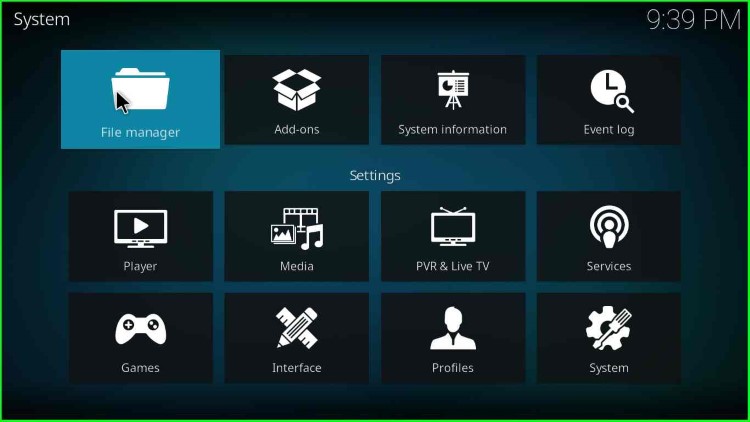
1. First, open the Kodi and click on the Settings

Kodi Settings

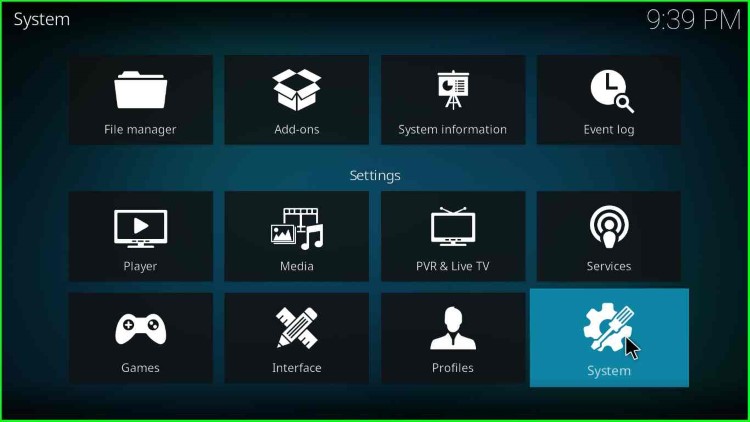
2. Click on the System icon inside it

System

3. Go back to the Kodi home page and choose the Add-ons option from the menu list

Add-ons

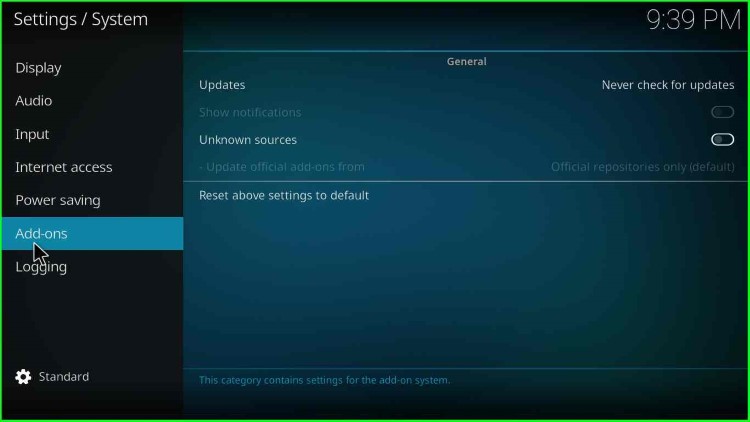
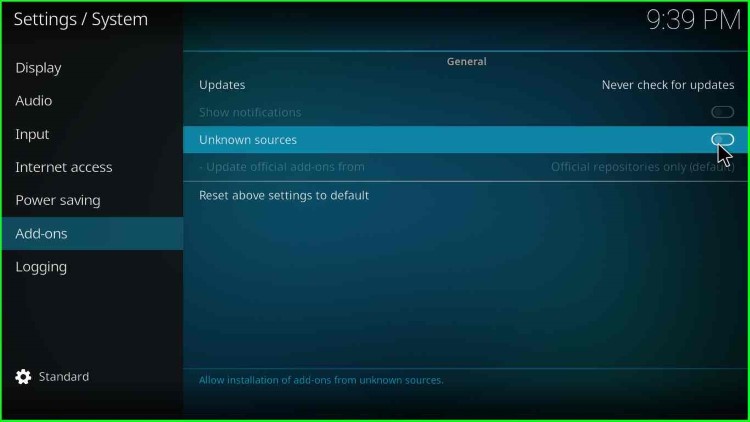
4. In the Add-on option, enable the Unknown Sources tab shown on the screen

Unknown Sources

5. After that, A warning box appears when you click on the Yes button

Warning

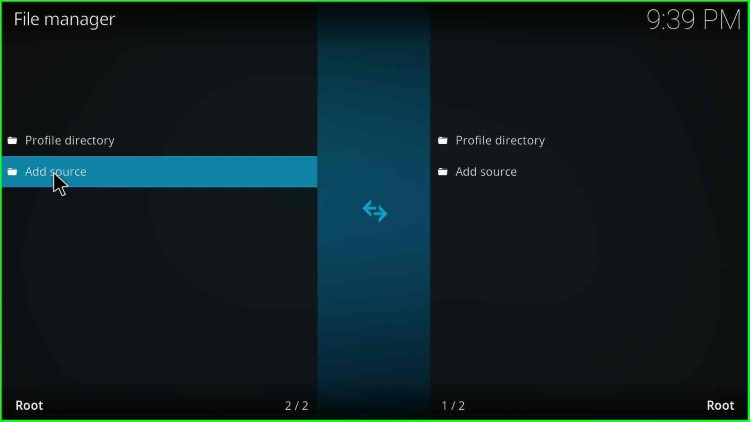
6. Then, go back to the previous page and select File Manager

File Manager

Add Disney Plus Kodi Add-on Source

7. Click on Add source option placed on the left side of the page

Add Disney Plus Source

8. Click on the <None> option

File Source

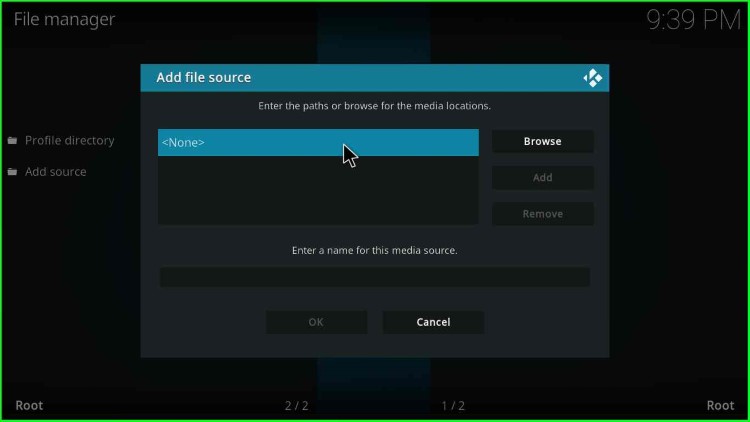
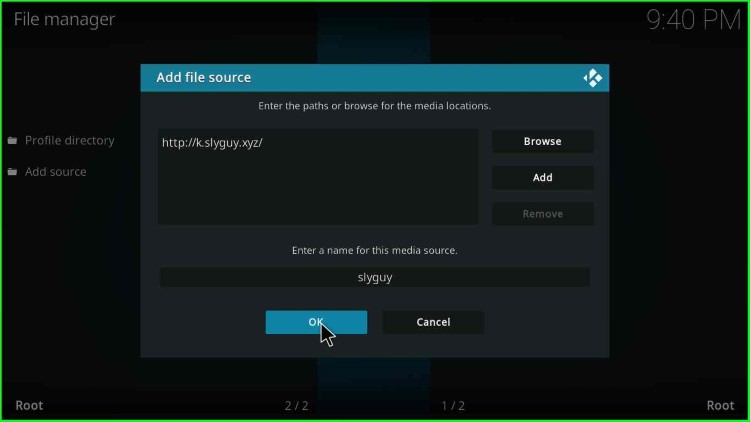
9. After that, a text box appears asking about the path of the media location

Media Location

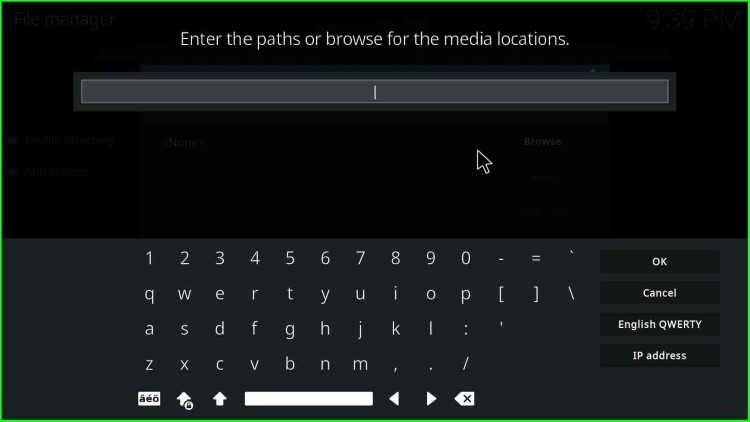
10. Enter the path as http://k.slyguy.xyz

Disney+ Media Location

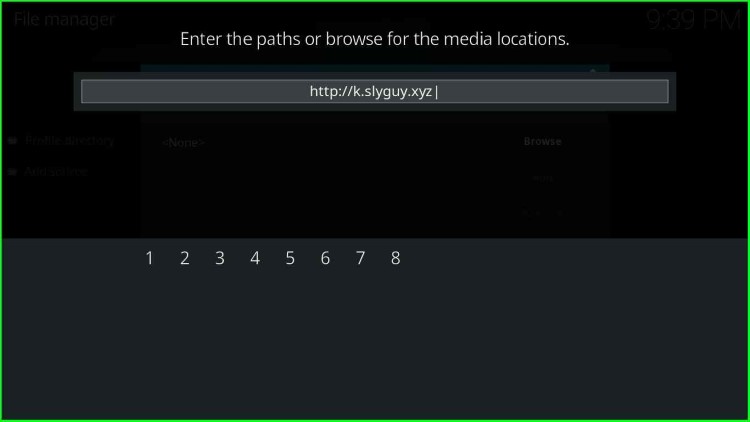
11. After entering the path, click on the OK button

http://k.slyguy.xyz

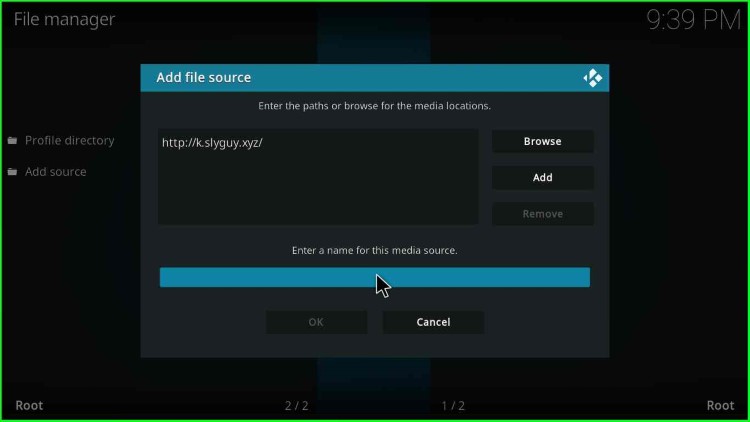
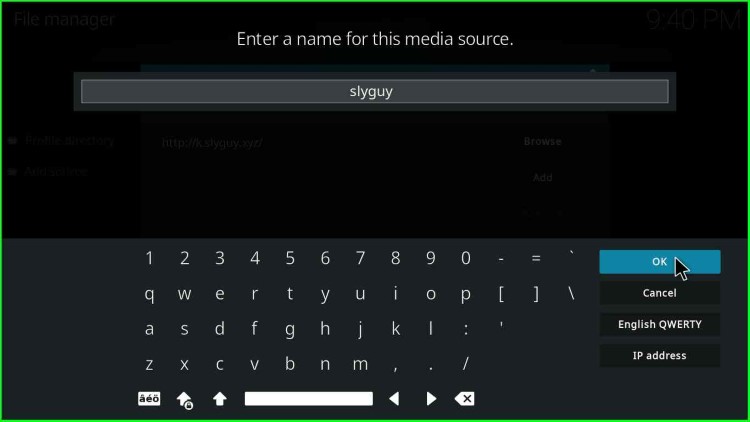
12. Enter the name of this media source

Enter media source

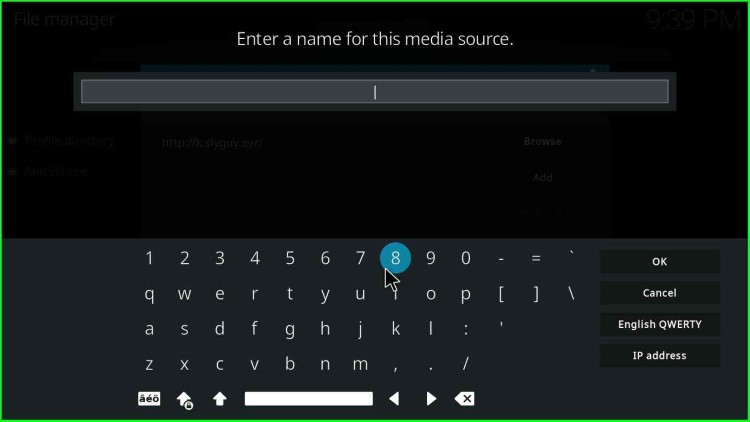
13. Enter the name slyguy and click on the OK button

Disney Plus Media Source

14. After that, A box will appear where you have to click on the OK button

slyguy

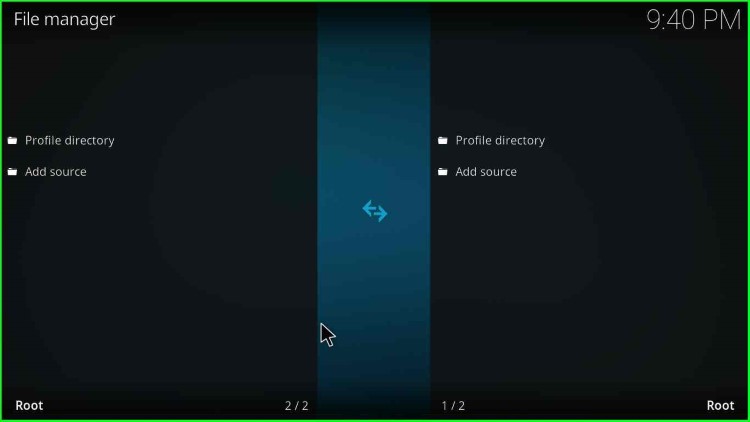
15. Then, return to the File Manager page

Add Disney+ Source

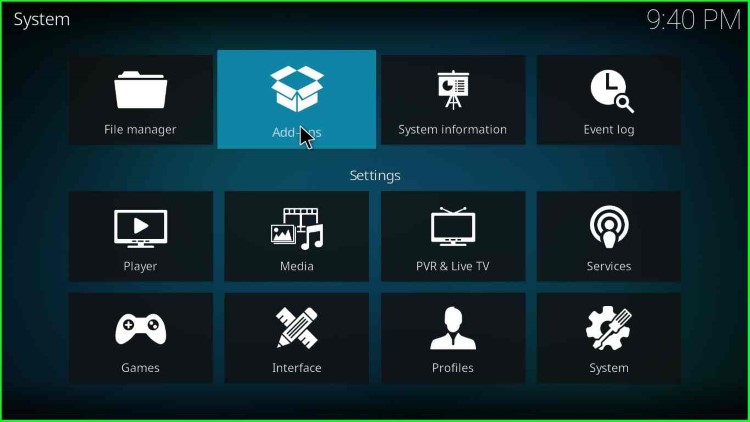
16. Go back to the System page and click on the Add-ons icon

Add-ons

Install Disney Plus From Zip File

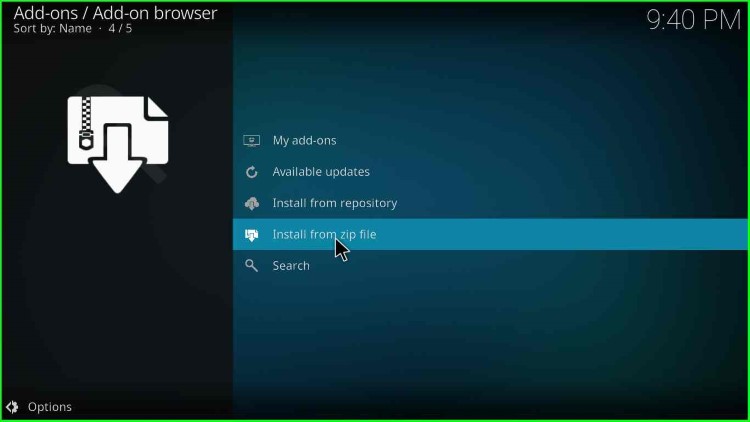
17. Click on the Install from zip file option

Install Disney+ from zip file

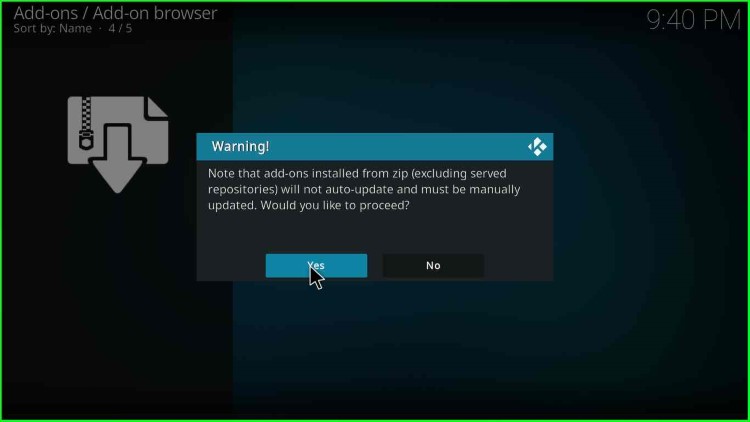
18. Then, click on the Yes button that appears on the warning box

Warning Popup

19. From the Install from zip file page, select your media source

slyguy

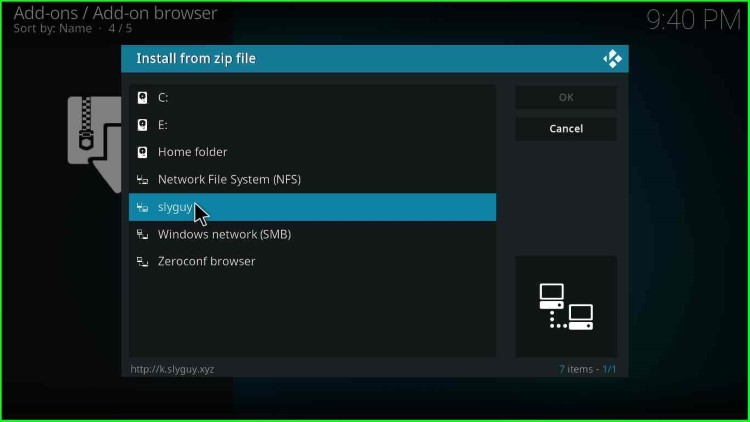
20. Choose the ‘repository.slyguy.zip.’ shown on the page and click on the OK button

repository.slyguy.zip

21. Select My add-ons from the menu list

Slyguy Repository Installed

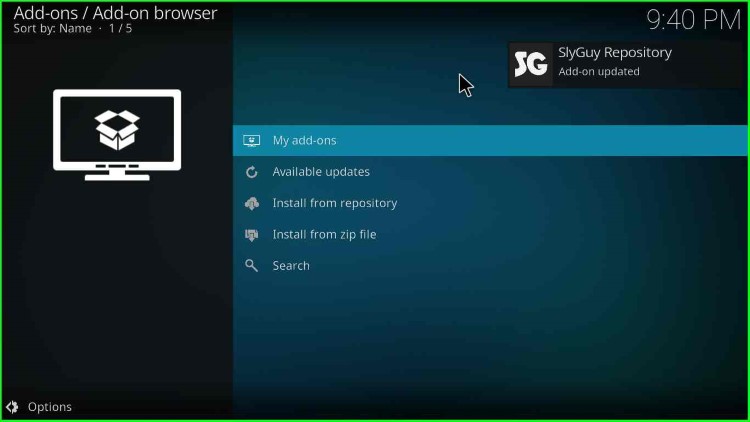
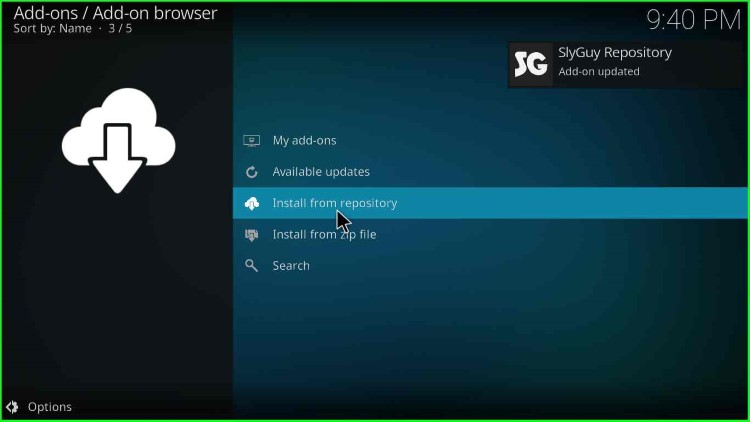
Disney Plus Add-on Install From Repository

22. After that, click on the Install from repository option

Install Disney+ From Repository

23. Click on the SlyGuy Repository shown on the screen

Slyguy Repository

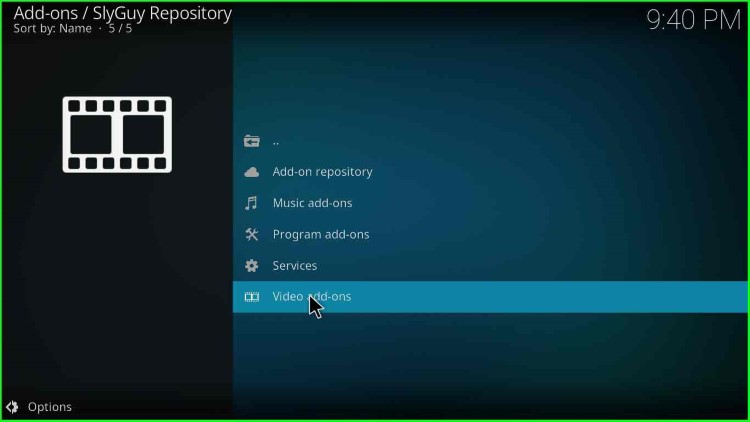
24. Click on the Video add-ons

Video Add-ons

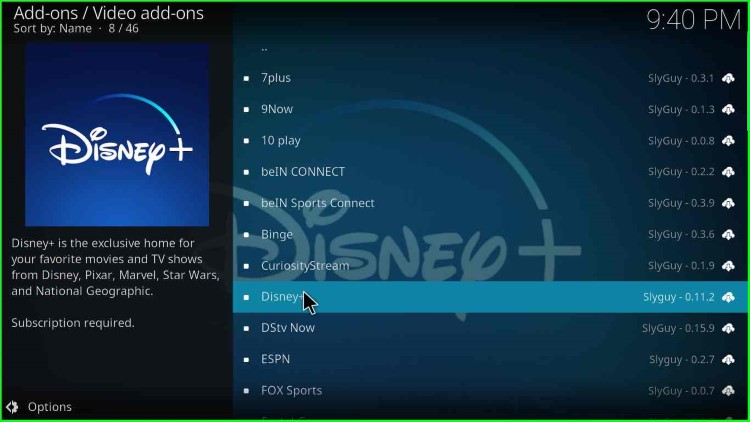
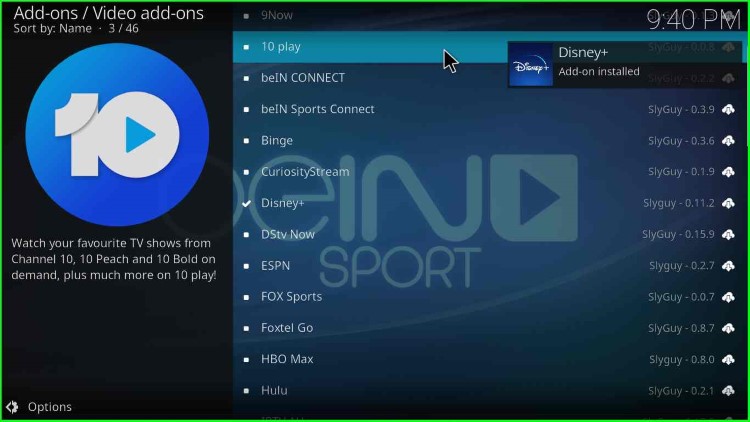
25. From the list of menus, choose the Disney+ option

Disney Plus

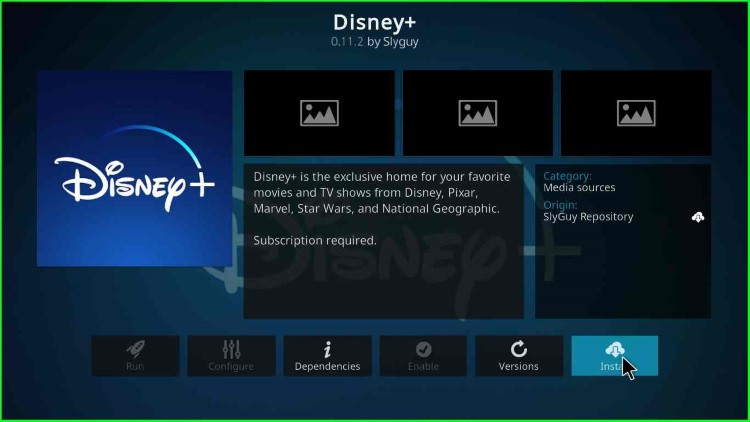
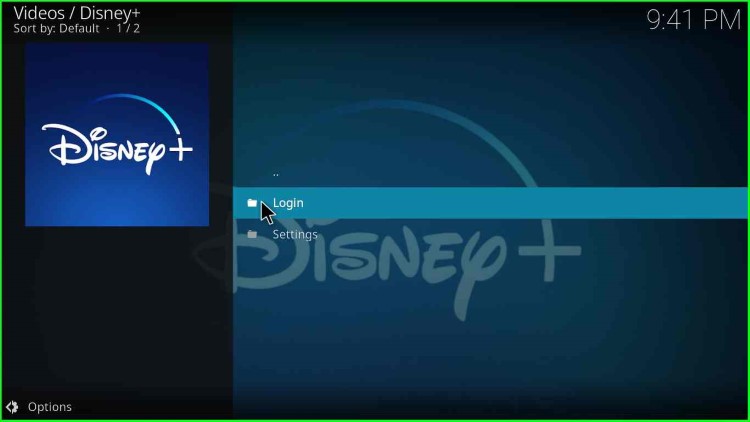
26. Click on the Install icon located at the bottom-right corner of the screen

Disney Plus Install Button

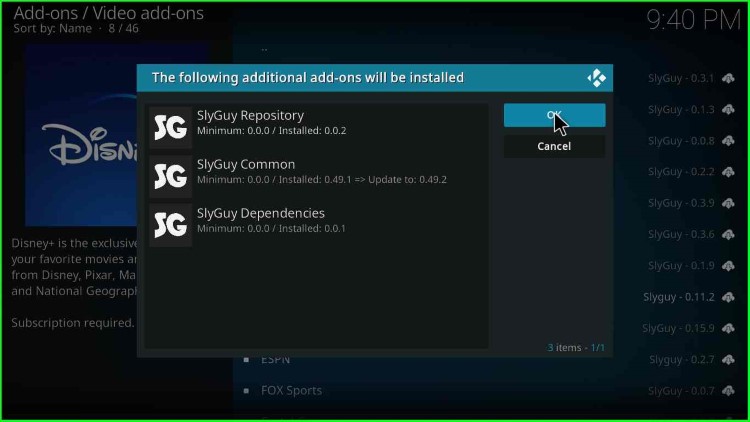
27. After that, A box will appear where you have to click on the OK button

Additional Add-ons

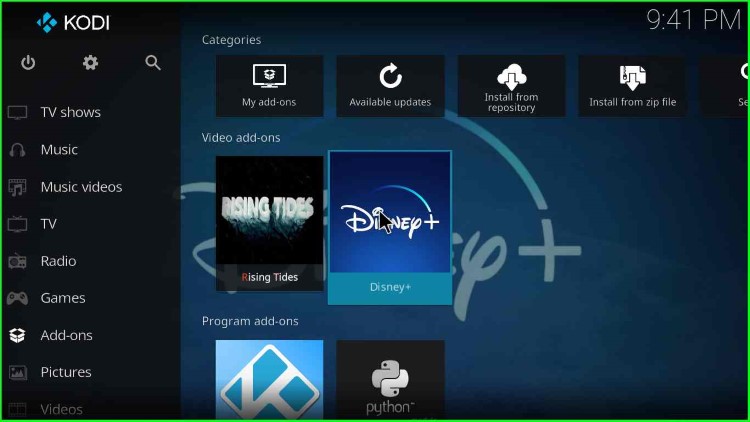
28. Wait until the Disney+ Add-on installed message appears on the screen

Disney Plus Add-on Installed

How to Use Disney+ Kodi Addon

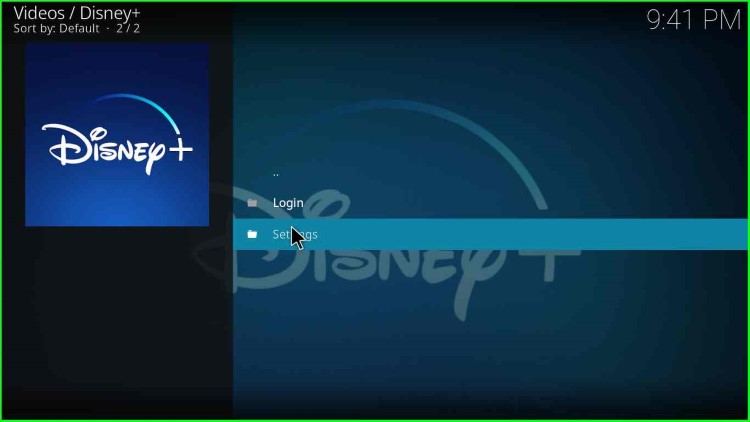
29. Select the Disney+ wizard from the Add-ons menu

Add-ons Disney Plus

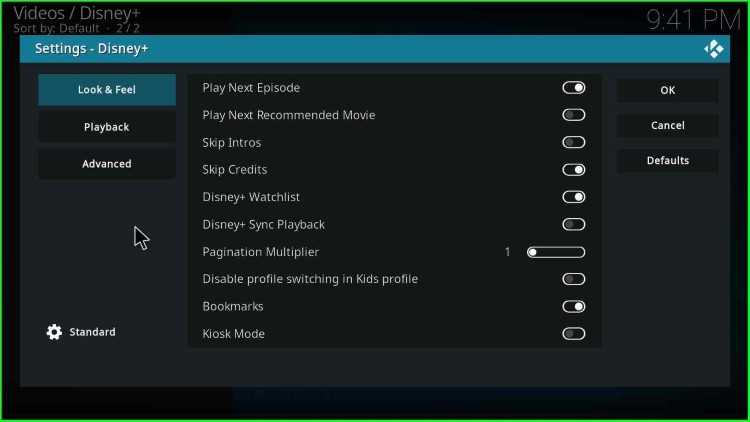
30. Choose the Settings option

Disney Plus Settings

31. After that, click on the Look & Feel option in the box

Disney Plus Look & Feel

32. Now, log in to the Disney+ Kodi Addon

Login Disney Plus on Kodi

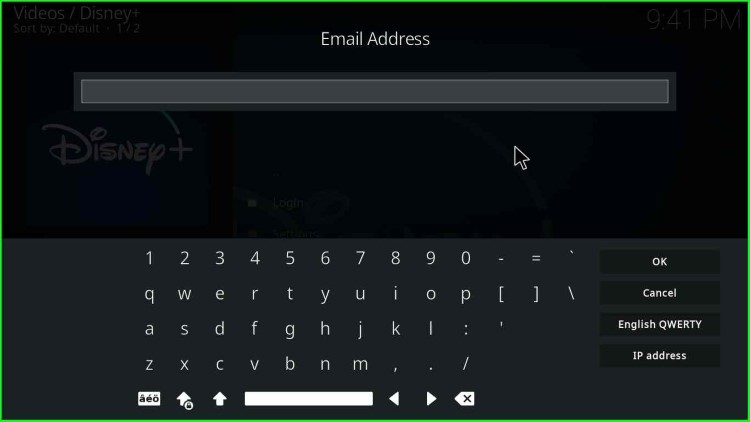
33. Enter your Email Address

Email Address

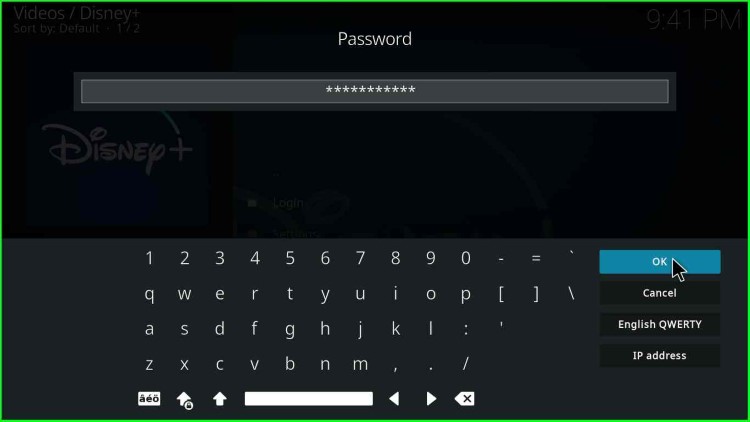
34. Then, Enter the required password and click OK

Disney Plus Password

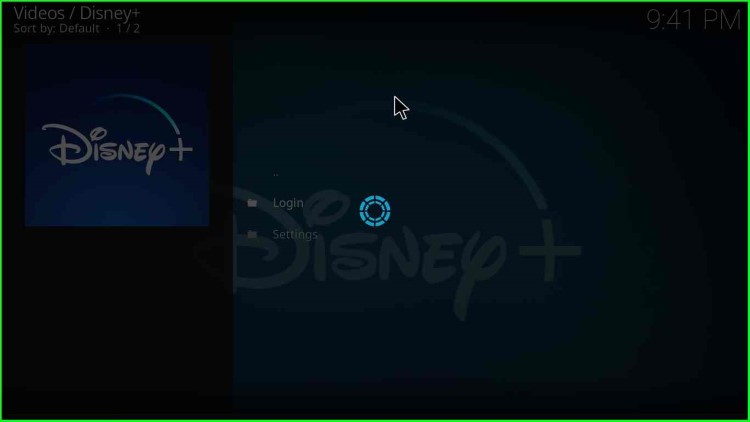
35. Wait for the Disney+ to load and enjoy streaming

Disney Plus Loading

Third-party developers have developed this add-on. So, watching copyrighted streams on this add-on is an illegal activity. Moreover, this add-on is not the official Kodi add-on.

Can I use Disney+ on Firestick?

Yes, you can install and use the Disney+ addon through Kodi.

How to watch Disney Plus on Kodi in Geo-Restricted Regions?

You must install a good VPN like IPVanish VPN to watch Disney Plus on Kodi in a geo-restricted area. After installing of IPVanish VPN, log in using your IPVanish VPN account and connect to the VPN with a location where you can stream a particular content.

Where is Disney+ available? Can you access it from anywhere?

Disney+ is available in many countries like Central America, North America, Europe, West Indies, South America, and South Pacific.

Yes, you can access it anywhere using IPVanish VPN.

How to Update Disney+ Kodi Add-on?

To update Disney+ Add-on on Kodi, follow the given steps:

  • First, right-click on the Disney+ add-on icon in the Kodi
  • Choose the Information option
  • Now, you will get all information about the Disney+ add-on.
  • At last of the overview, click on the Update button
  • Check for the latest updates; your System/Firestick will automatically update the Disney+ Kodi addon.

Should I use a VPN with the Disney Plus Kodi Add-on?

Yes, I strongly advise using a VPN to stream on Disney Plus Add-on. IPVanish VPN the best VPN for streaming on Disney+ Kodi Add-on to unblock geo-restricted content and provides better security.

Is Disney Plus available on Kodi?

Disney Plus add-on is available on Kodi for installation on Kodi devices, including Firestick, Windows, Android, Roku, Linux, iOS, Mac, Smartphones, Apple TV, and Nvidia Shield.

Related Guides:

Before you start streaming on Kodi, I would like to warn you once again that we do not know the source of Kodi Repositories, Wizards, Builds, and Addons and from where they fetch the streams.

The content you stream on Kodi may be copyrighted and may land you in legal trouble because ISPs, Government, and authorized companies may monitor your online activities like streaming copyrighted movies, videos, TV shows, live shows, animes, etc.

To stay protected, and to get an exceptional streaming experience, I suggest you use IPVanish which is the fastest, most secure, and military-grade encryption VPN on the planet. In addition, IPVanish hides your original IP address, and encrypts your internet connection, bypasses bandwidth throttling and geo-restrictions.

I have been personally using IPVanish for a couple of years and what I can say is IPVanish is the best VPN in all aspects for all devices. I did not face any problems with any app or device.

Note: VPNHacks.com does not support or encourage piracy and copyright infringements in any form. You should abide by the rules and regulations in your country. We just want to protect you because sometimes you may land up streaming copyrighted content unintentionally.

IPVanish Hot Deal: Subscribe for as low as $3.33/Month

Taking an IPVanish VPN Subscription is really simple.

1.       First, subscribe to IPVanish by clicking here.

Most of all IPVanish comes with a 30-day money-back guarantee. You can get a full refund if you are not satisfied (I do not think you will be) with IPVanish and they do not ask for any reason.

2.       Once you subscribe IPVanish, download the IPVanish app and open it. Enter your e-mail and password and click on the “Log In” button.

3.       Once you are signed in, select the VPN Server location that you want to connect to and click on the connect option.

4.       After that, you will see that your IP address has been changed. That’s all. Have a safe streaming. 

James is the Co-founder of VPNHACKS.COM. He is a Network security expert with hands-on experience on Server Administration, UTM Management, Datacentre Consolidation, Migration, etc. Also, He has Configured Proxy Servers and Implemented VPN tunnels. more...

2 thoughts on “Disney Plus Kodi Addon Installation Guide – May 2023”

  1. Try the following:-
    1. Restart the Kodi
    2. Check Wi-fi Internet Speed
    3. Turn on/off the VPN, if using any.
    4. Try clearing the Kodi cache
    5. Logout and login again
    6. Reinstall the add-on by strictly following the steps.

  2. I have installed everything correctly and entered my login details. When I try to open a video, I only hear the audio. The screen is black.

Leave a Comment

IPVanish VPN