Home » Kodi » How to Install Crazy Canucks Kodi Addon on Kodi 20.2 Builds

How to Install Crazy Canucks Kodi Addon on Kodi 20.2 Builds

Crazy Canucks Kodi Addon is a popular video addon that belongs to the Canucks Repository. This is the updated version of the Shadow addon. In addition, it contains a familiar layout with hands-on features that are easy to use. The add-on lets you stream a variety of content in separate sections.

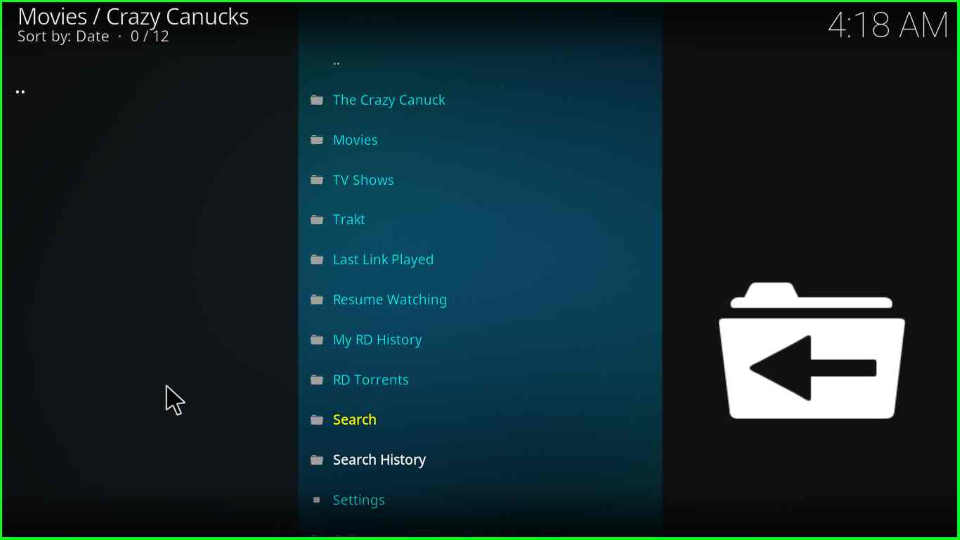
The section has many content genres like Movies, TV Shows, Last Link Played, and, Resume Watching. The movies are also available in different categories, including blockbusters, classical, trending, adventure, and, thriller.

Other alternatives for Crazy Canucks add-on are The Loop, Torque Lite, Catch Up TV & More, Fox Sports, No One, STIRR, and TubiTV.

You can easily install the Crazy Canucks addon on Kodi 20.2 Nexus and Kodi 19 Matrix. Like other add-ons, Crazy Canucks fetches HD links after integrating Real Debrid, AllDebrid, Linksnappy, or Premiumize on Kodi.

Attention! Before You Move Ahead.

I want to warn you that whatever you stream online is visible to the Government, ISPs, and Third Parties. Personally, I dislike someone snooping on my online activities.

Currently, your IP address 34.228.52.21 is visible to everyone.

Hence, I suggest using the most secure VPN, i.e. IPVanish VPN which has military-grade encryption. Also, IPVanish enables buffering-free streaming, hides your IP address and location, and bypasses geo-restrictions and bandwidth throttling.

Black Friday Offer: Save 81%: Only $2.49/Month

Note:- Streaming copyrighted content without a license is illegal and may land you in legal trouble. VPNHacks.com does not encourage piracy in any way.

Installation Steps

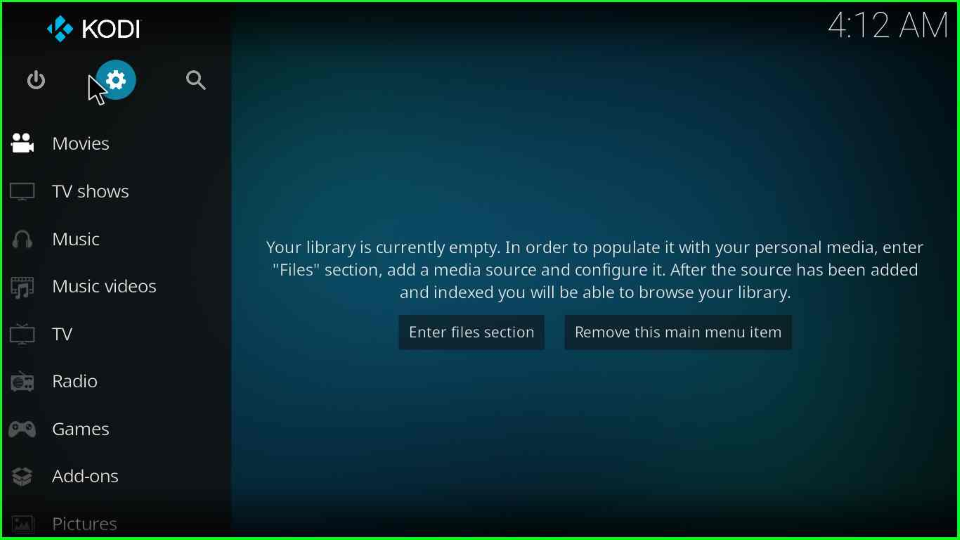
Open the Kodi app and click on “Settings” from the left side of the window.

Open gear icon Settings

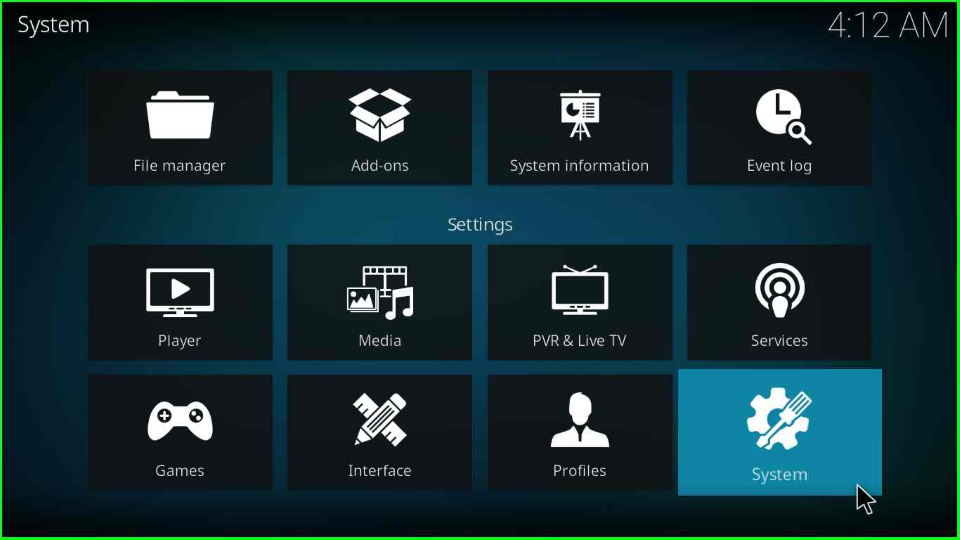
Select the “System” tab from the right side of the page.

Select System

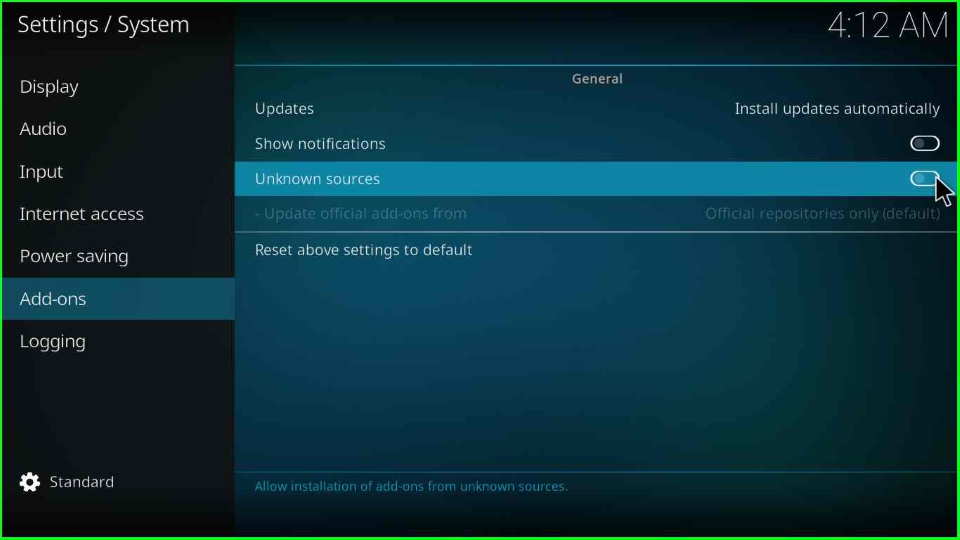
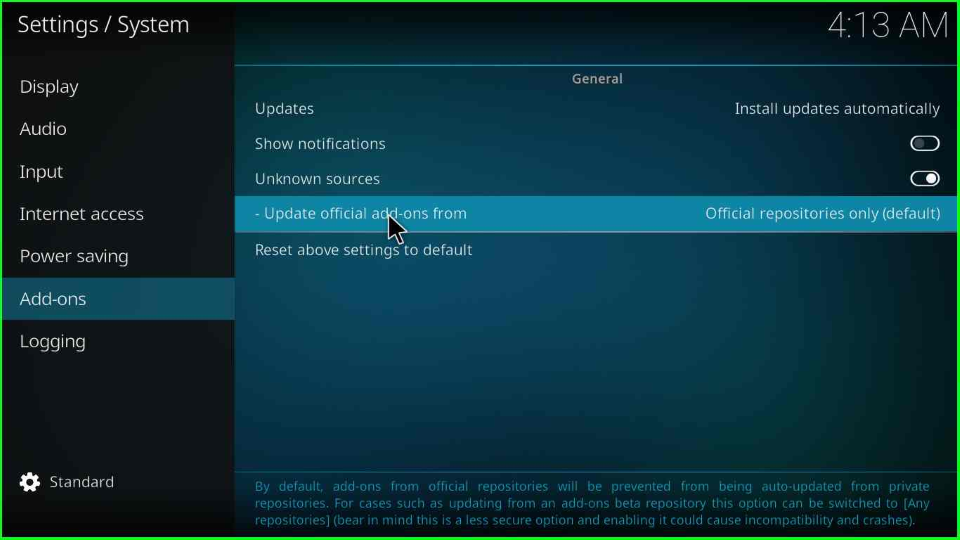
Scroll down the pointer, find the “Add-ons” label, and turn on the “Unknown sources” button.

on the Unknown sources

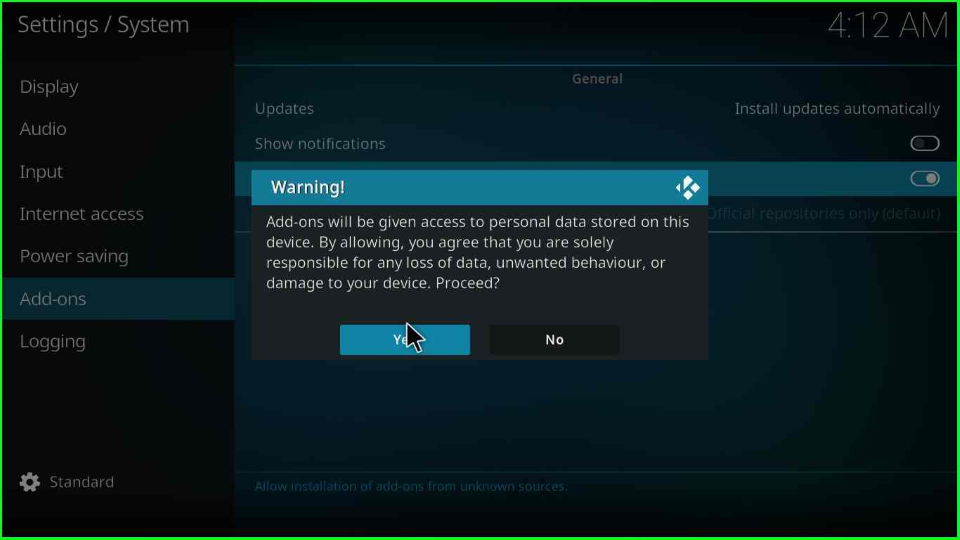
The screen shows the warning window; tap the “Yes” key.

Hit Yes

Change Update Official Add-ons From

Again, in the same window, choose the “-Update official add-ons from” option below the Unknown sources tab.

Click on official add-ons

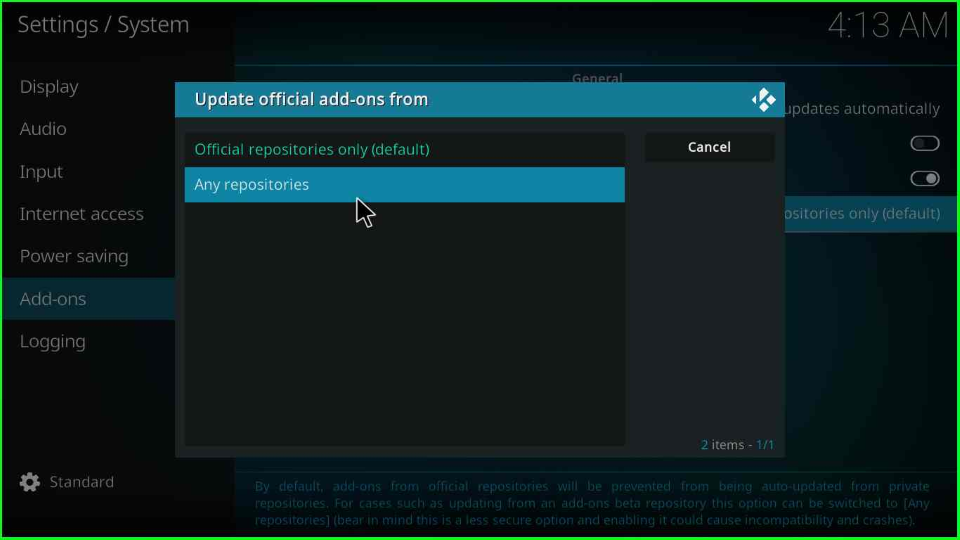
It displays a popup screen; select “Any repositories” and press Enter.

FInd Any repositories

Add Media Source and Repository

Go back to the System window and hover over the “File manager” icon.

Select File manager

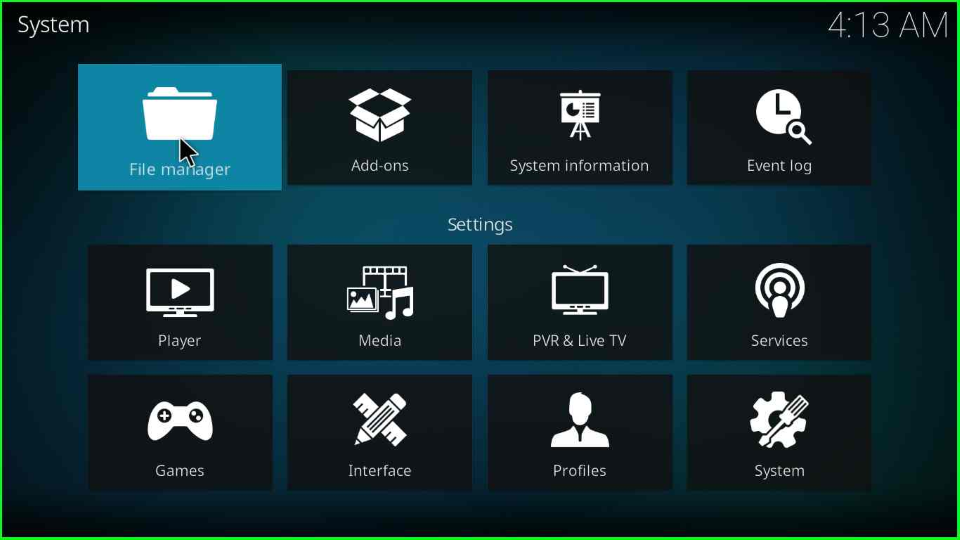
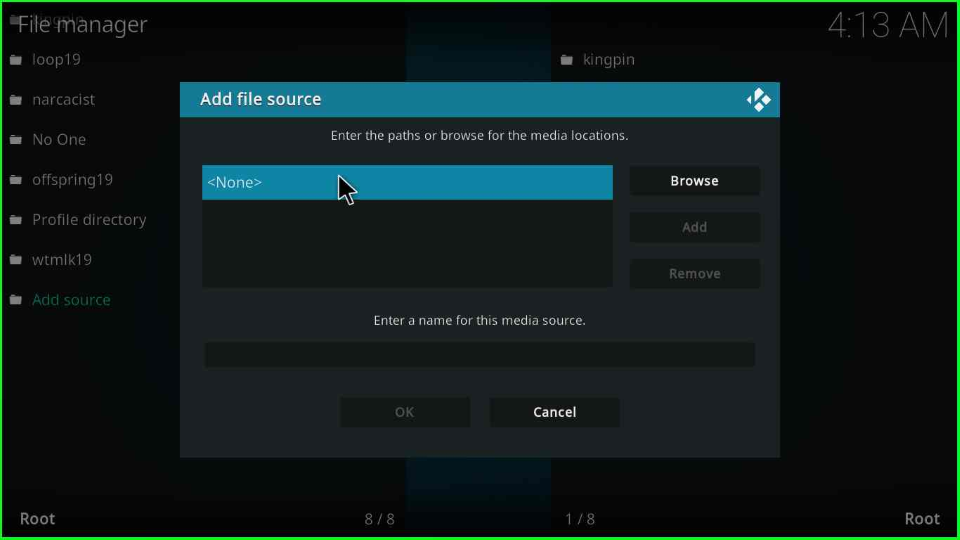
Find the “Add source” tab on the page.

Add Crazy Canucks source

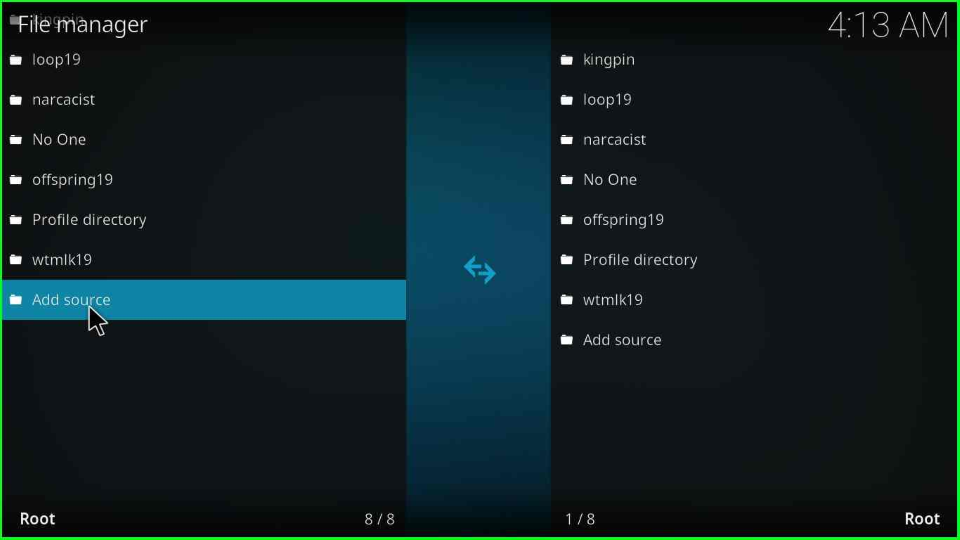
The page opens another popup window, where you must hit the “<None>” option.

Press None

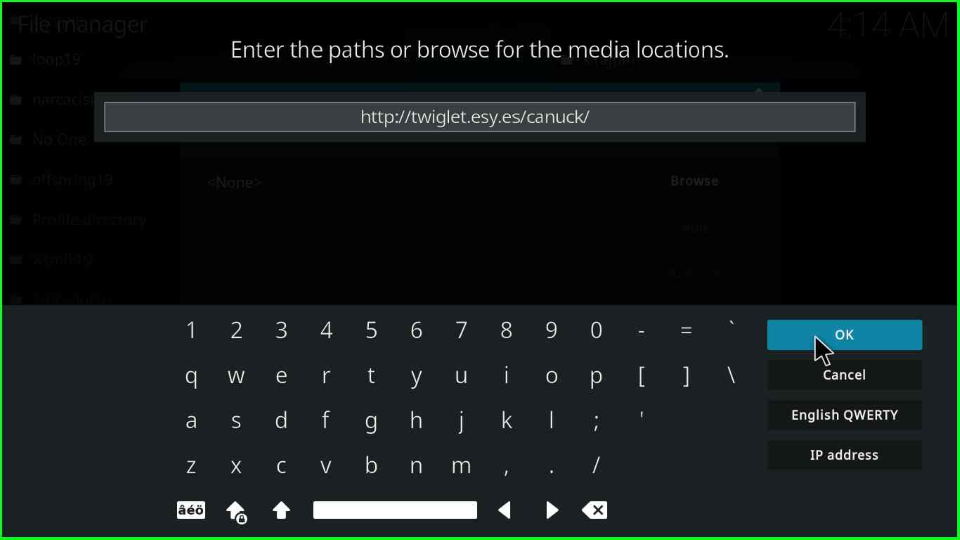
Enter the new media URL as “http://twiglet.esy.es/canuck/” and hit the “OK” button.

Type Crazy Canucks URL

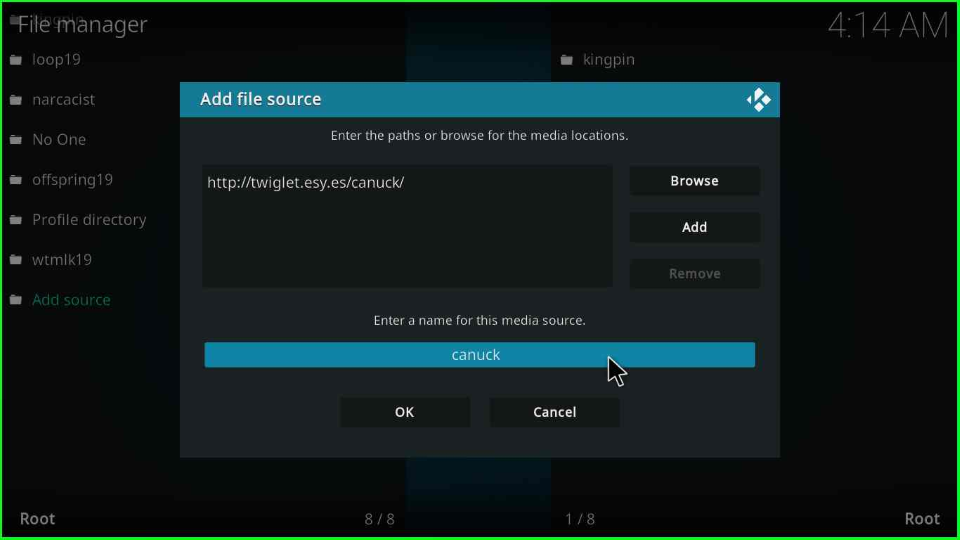
Keep the source name as “canuck”.

Write canuck

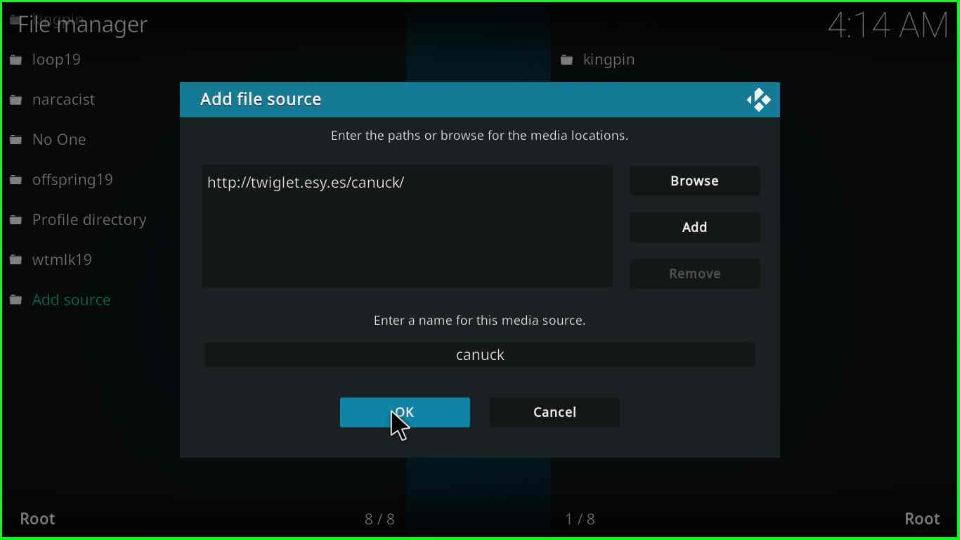
Check the entries and press “OK”.

Click OK

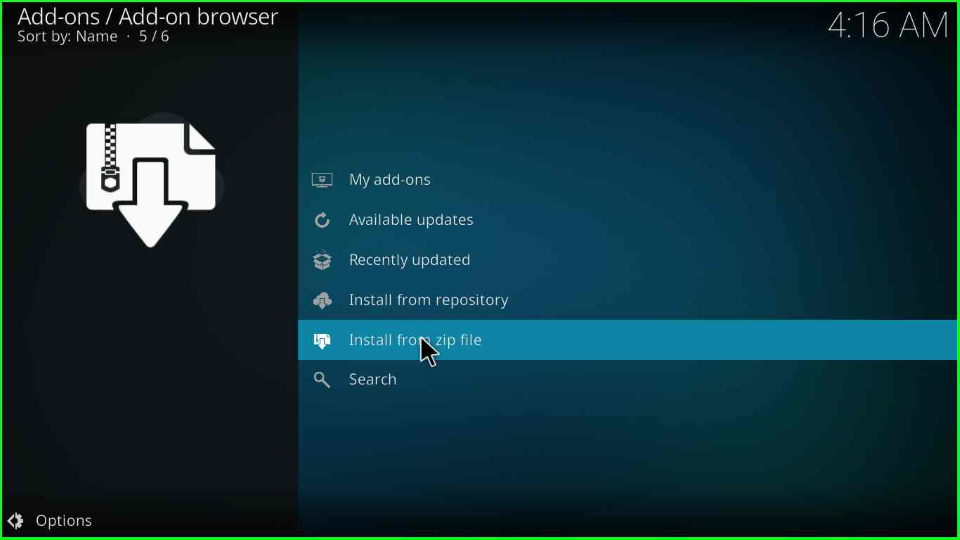
Install from Zip File

Visit the System page, and select the “Add-ons” option.

Open Add-ons

Tap the “Install from zip file” option.
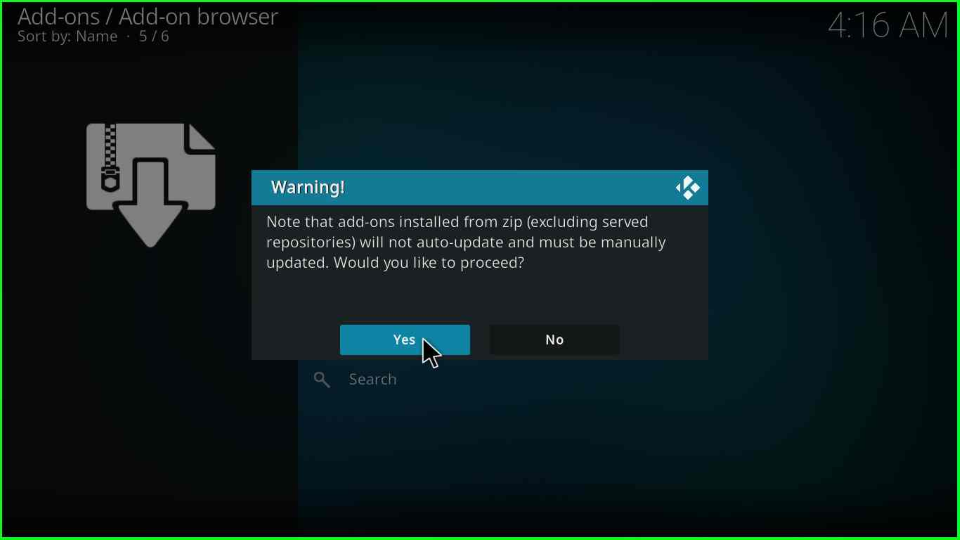
Select Install from zip file

A warning box with the message Note that the add-ons installed from the zip (excluding served repositories) will not auto-update and must be manually updated. Would you like to proceed , tap the “Yes” button.

Tap Yes

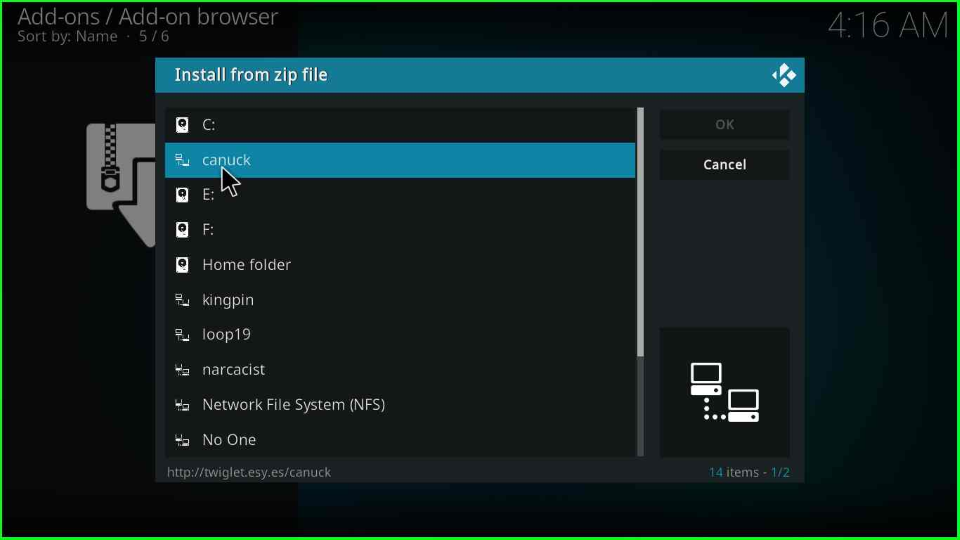
Select the “canuck” folder.

Choose canuck

Inside it, find the repository.canuck-x.x.x.zip file and hit enter.

choose canuck zip file

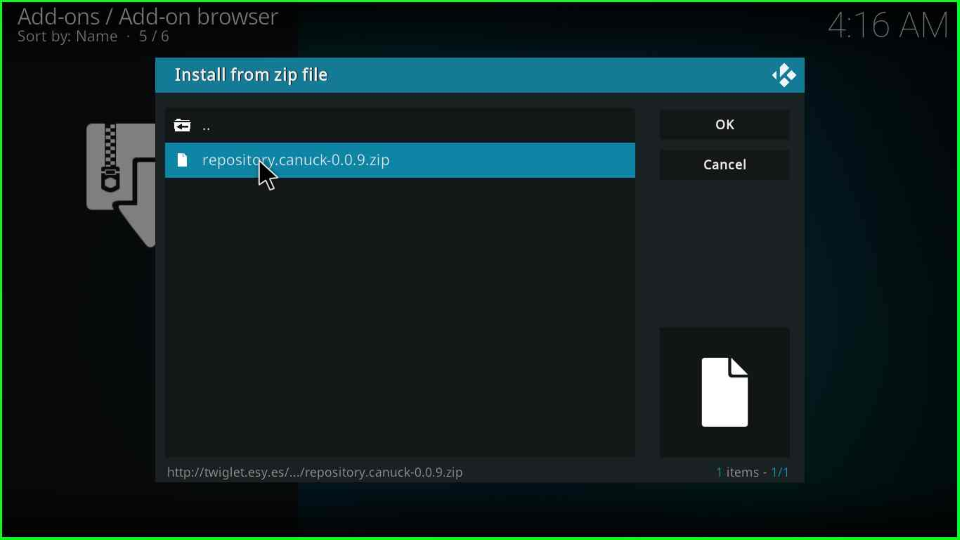
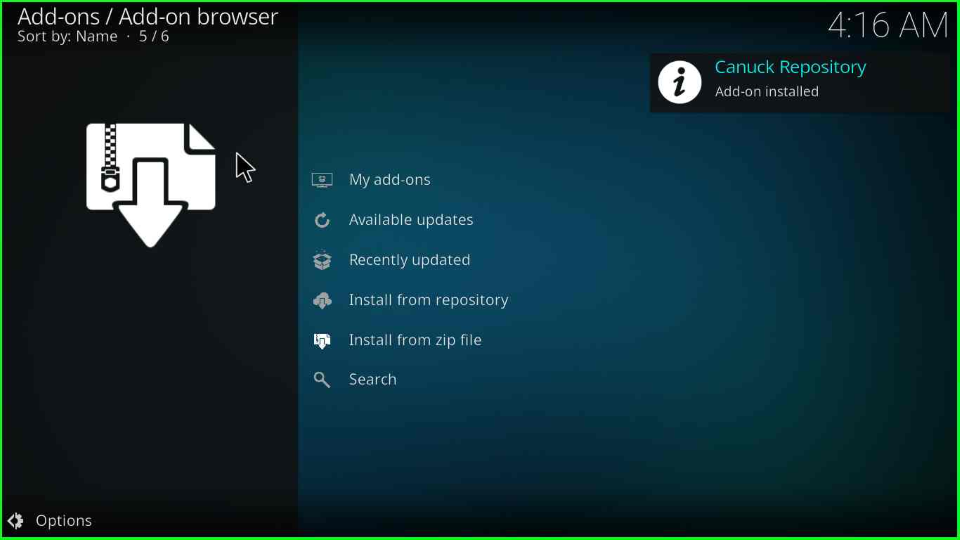
The repository will start downloading; wait for the installation notification “Canuck Repository Add-on installed“.

Wait for Canuck Repository installation

Install from Repository

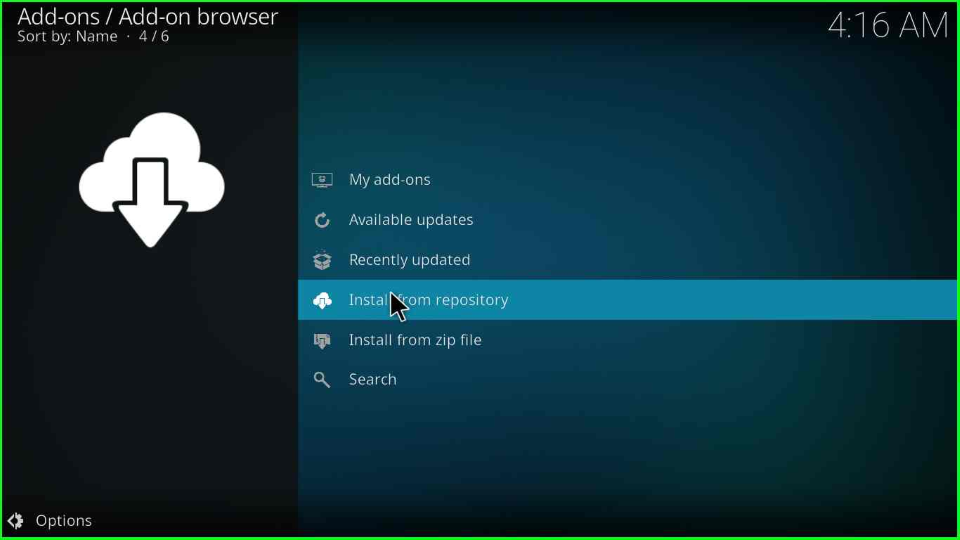
After installing the Canuck Repository, click on the “Install from repository” option.

Open Install from repository

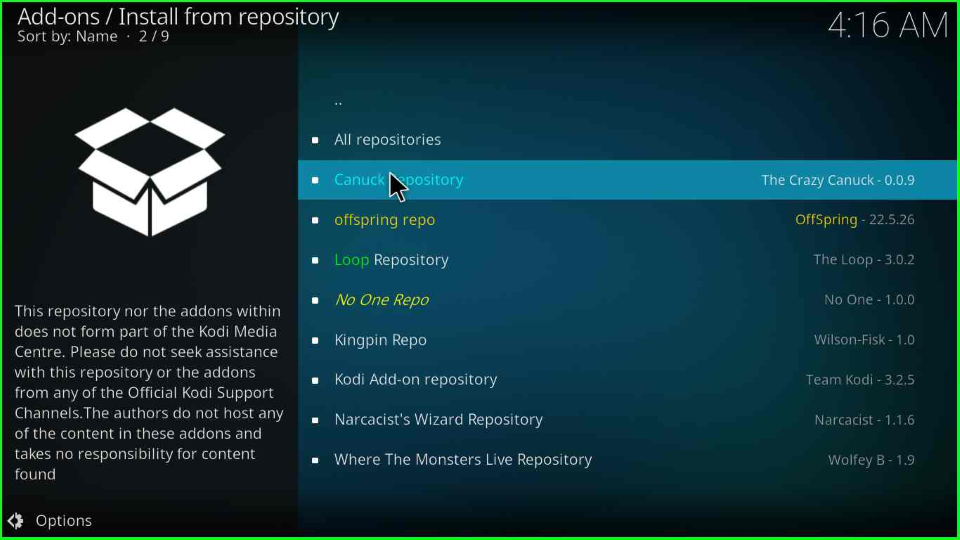
Choose the “Canuck Repository”.

Click on Canuck Repository

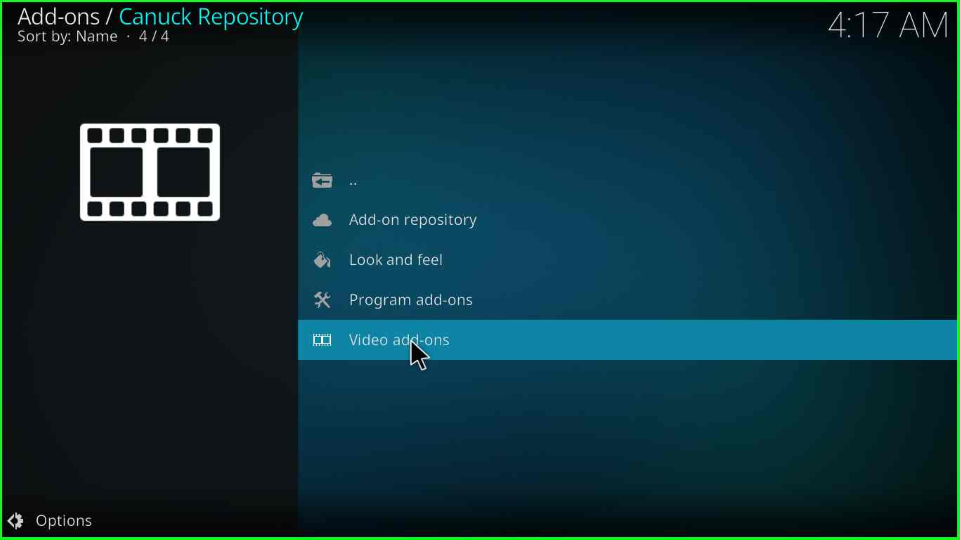
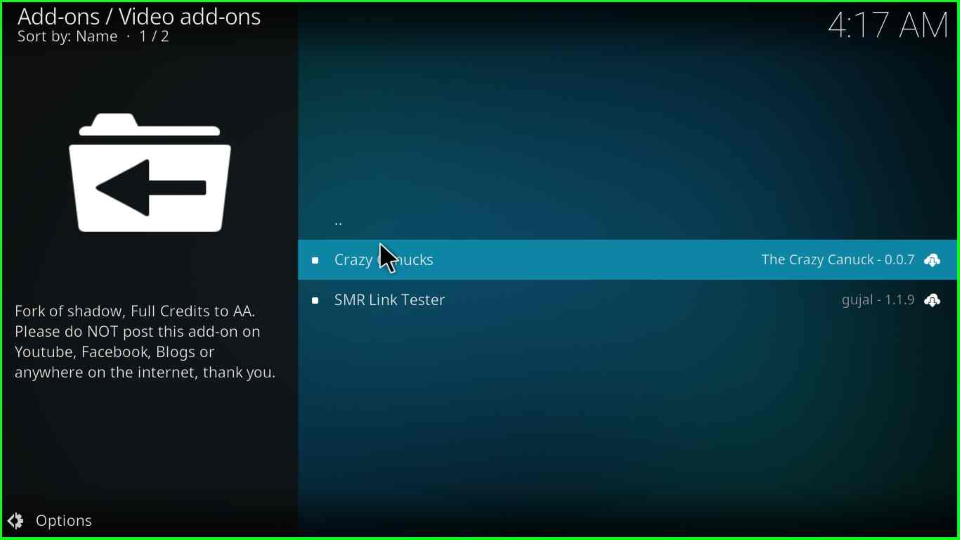
Select the option “Video add-ons” which is at last.

Select Video add-ons

Move to the next screen and open “Crazy Canucks”.

Open Crazy Canucks

The Crazy Canuck window will open; select the last tab, “Install”.

Tap Install

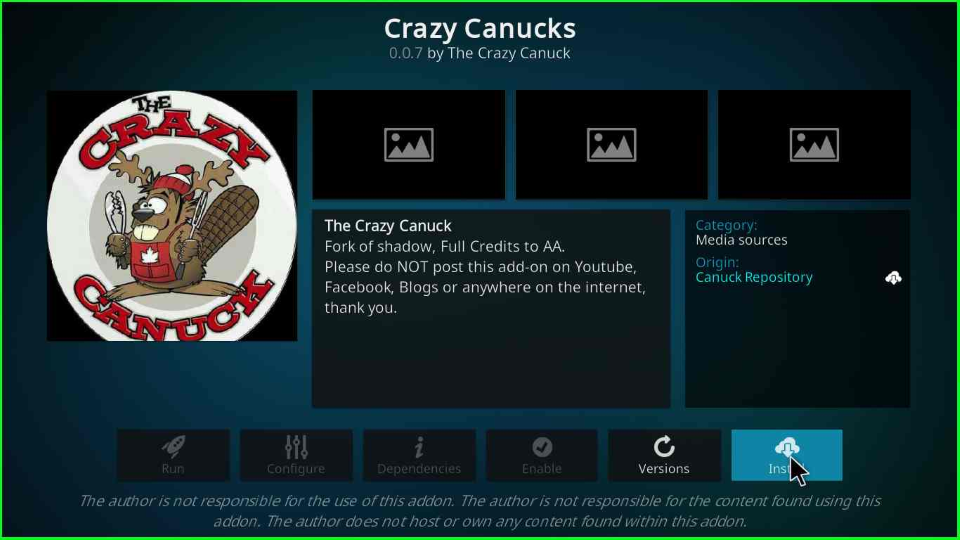
Wait for some moments until the downloading and installation process of “Crazy Canucks” completes.

Wait for Crazy Canucks installation

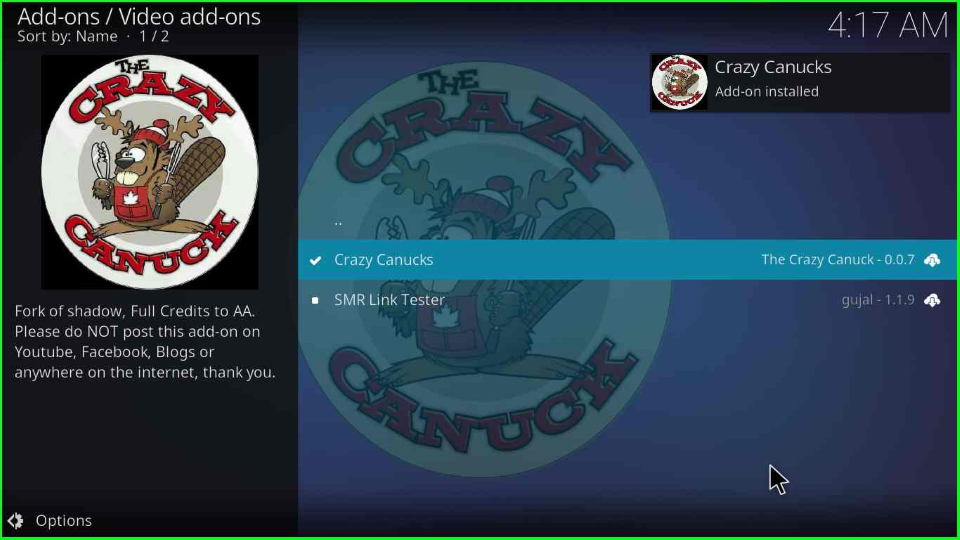
Now, click on the “Crazy Canucks” again.

Open Crazy Canucks

Hit the “Open” icon of the Crazy Canucks window.

Click on Open sign

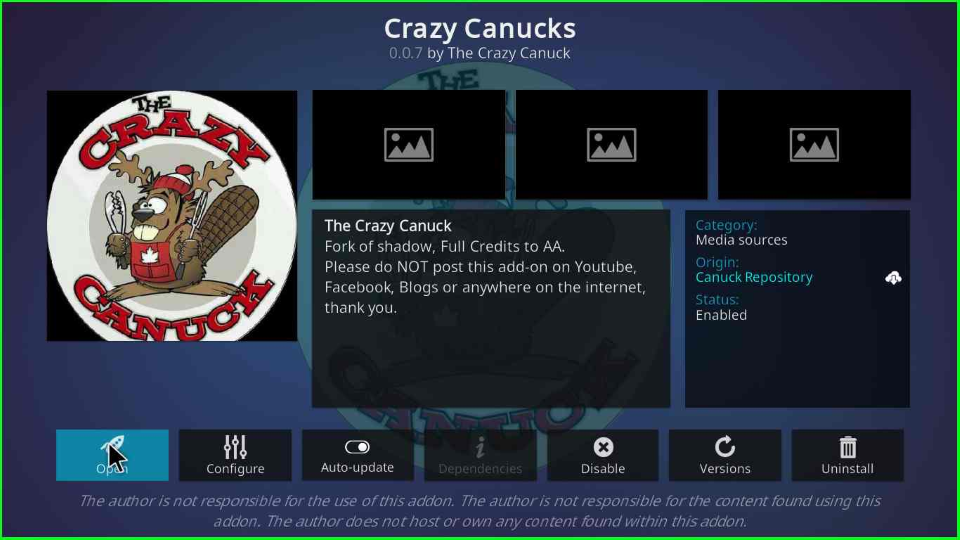
The “Crazy Canucks” window will open with lots of streaming sections.

Stream Crazy Canunks genres

Crazy Canucks Kodi Addon Questions

Can I install Crazy Canucks Kodi Addon on any platform?

You can install Crazy Canucks on Android, Windows, Mi Box, Mac, iOS, Nvidia Shield, and FireStick platforms.

Should I use IPVanish VPN with Crazy Canucks Kodi Addon?

Connecting the Crazy Canucks Addon with IPVanish VPN ensures your system’s data privacy and streaming services.

Wrap up

As discussed above, Crazy Canucks Kodi Addon is a great add-on for streaming movies and web shows. Try installing it on your device, and let us know if any problem or error occurs during installation or using the add-on.

Before you start streaming on Firestick Apps/Websites, I would like to warn you once again that we do not know from where these Apps, Websites, Kodi Repositories, Wizards, Builds, and Addons fetch the streams.

The content you stream on Firestick Apps may be copyrighted and may land you in legal trouble even if you stream them unintentionally. Most of all, ISPs, Government, and authorized companies may monitor your online activities like streaming copyrighted movies, videos, TV shows, live shows, animes, etc.

To stay protected, and to get an exceptional streaming experience, I suggest you use IPVanish which is the fastest, most secure, and military-grade encryption VPN for Firestick. In addition, IPVanish hides your original IP address, encrypts your internet connection, and bypasses bandwidth throttling and geo-restrictions.

I have been personally using IPVanish for a couple of years and what I can say is that IPVanish is the best VPN for Firestick Apps in all aspects for all devices because the VPN unlocks geo-restricted streams and enhances my streaming experience.

Disclaimer: VPNHacks.com does not support or encourage piracy and copyright infringements in any form. You should abide by the rules and regulations in your country. We just want to protect you because sometimes you may end up streaming copyrighted content unintentionally.

Save 81%: Only $2.49/Month

Taking an IPVanish VPN Subscription is really simple.

1.       First, subscribe to IPVanish by clicking here.

Most of all, IPVanish comes with a 30-day money-back guarantee. You can get a full refund if you are unsatisfied (I do not think you will be) with IPVanish, and they do not ask for any reason.

2.       Once you subscribe to IPVanish, download the IPVanish app and open it. Enter your e-mail and password and click the “Log In” button.

Login to IPVanish App

3.       Once you are signed in, select the VPN Server location that you want to connect to and click on the connect option.

Choose the VPN Location

4.       After that, you will see that your IP address has been changed. This way, you can protect your privacy and have an exceptional streaming experience.

Connect the Server

Save 81%: Only $2.49/Month

Related Guides:

Emma is a pro streamer with vast knowledge of Firestick, Roku, Google Chromecast, Nvidia Shield, Kodi, Plex, and Stremio. She is very much concerned about her privacy and has in-depth knowledge of VPNs like IPVanish, ExpressVPN, and PrivateInternetAccess. more...

Leave a Comment

IPVanish Black Friday Offer