Home » Kodi » How to Install Wolf Pack Kodi Addon on Kodi 20.2 Nexus

How to Install Wolf Pack Kodi Addon on Kodi 20.2 Nexus

In this guide, we will learn how to install the Wolf Pack Kodi add-on step by step. You can easily install this add-on on Kodi installed on Firestick, Chromecast, Nvidia Shield, Windows, macOS, Linux, Raspberry Pi, iOS, tvOS, etc.

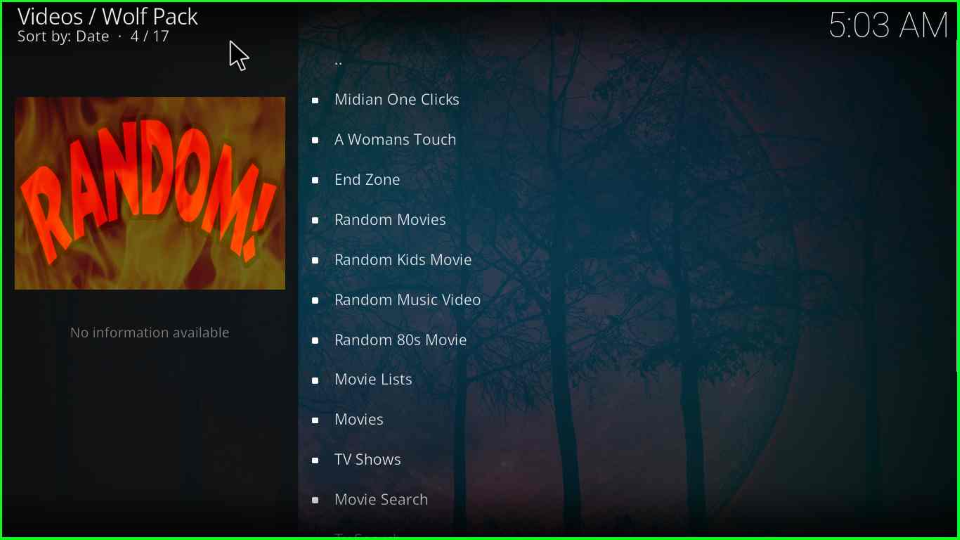
Wolf Pack Kodi addon is another great video addon available on the Where The Monsters Live Repository and can fetch the links from premium services like integrate Real Debrid, AllDebrid, Linksnappy, and Premiumize. It features many streaming sections like Anime, Midian One Clicks, A Woman’s Touch, Movies, USA Channel, Superman TV, TV Shows, and Labyrinth.

The best top alternatives for Wolf Pack add-on are The Loop, Torque Lite, Catch Up TV & More, Fox Sports, No One, STIRR, and TubiTV. However, TAZ19, Tempest, Theoath, Dejavu, TheCrew, Rising Tides, and Kingpin add-ons also give a tough fight to the Wolf Pack add-on.

Also, you can search every section through top filters like year, language, genre, country, top-rated, most popular, and high-rated.

Attention! Before You Move Ahead.

I want to warn you that whatever you stream online is visible to the Government, ISPs, and Third Parties. Personally, I dislike someone snooping on my online activities.

Currently, your IP address 34.228.52.21 is visible to everyone.

Hence, I suggest using the most secure VPN, i.e. IPVanish VPN which has military-grade encryption. Also, IPVanish enables buffering-free streaming, hides your IP address and location, and bypasses geo-restrictions and bandwidth throttling.

Black Friday Offer: Save 81%: Only $2.49/Month

Note:- Streaming copyrighted content without a license is illegal and may land you in legal trouble. VPNHacks.com does not encourage piracy in any way.

The steps to install the Wolf Pack Kodi addon are described below. In addition, all the below steps will be the same for Firestick, Windows, Fire TV, Smartphones, Android TV Box, Mi TV Stick, Android, iOS, and, Mac platforms.

Installation Steps

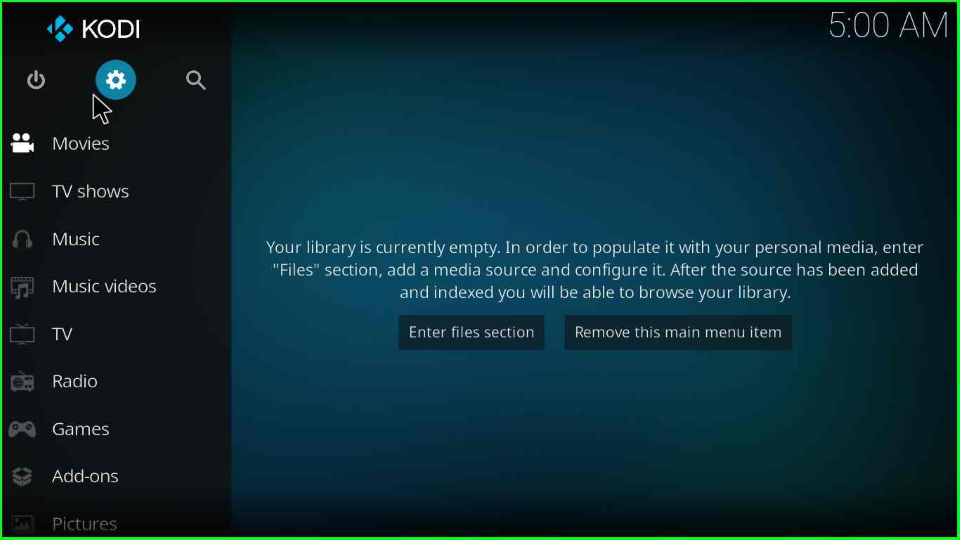
Launch Kodi from the Start menu and choose “Settings” from the right side of the window.

Open Settings

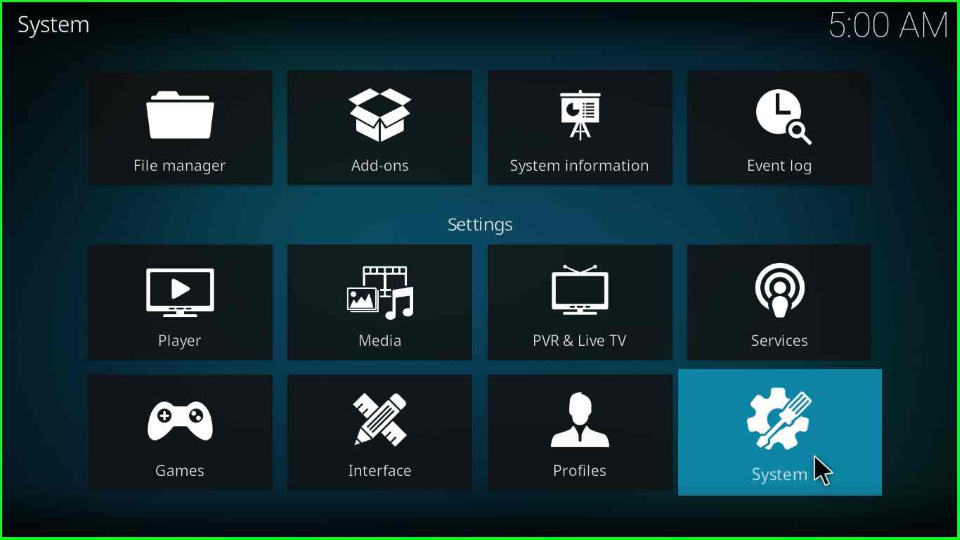
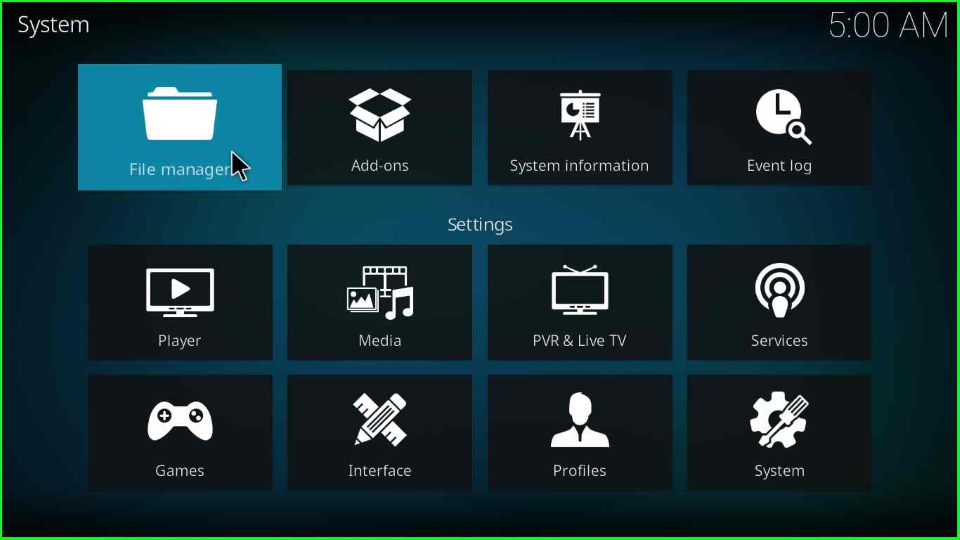
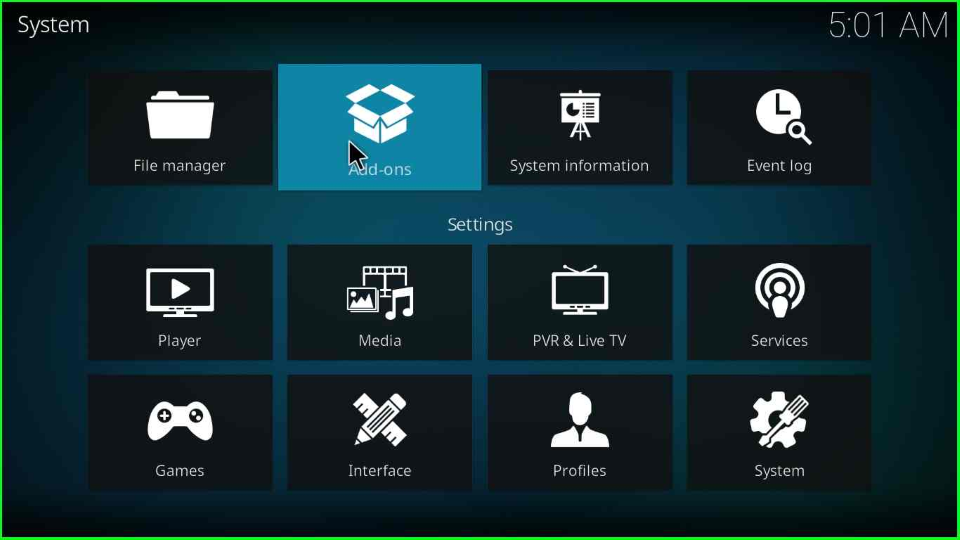
Take the cursor towards the “System” sign and press enter.

Select System

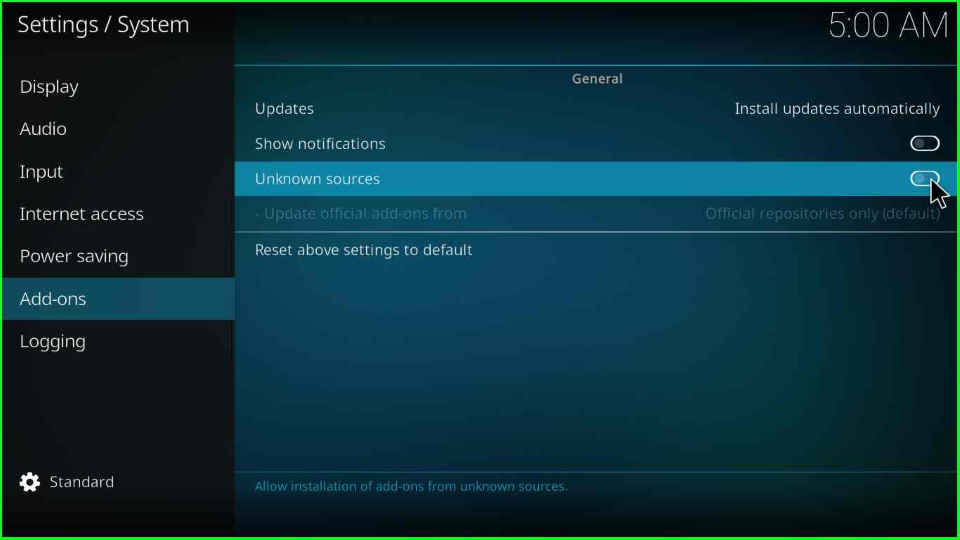
At the right side of the System page, find the “Add-ons” option and then enable “Unknown sources” for the Wolf Pack addon.

On Unknown sources

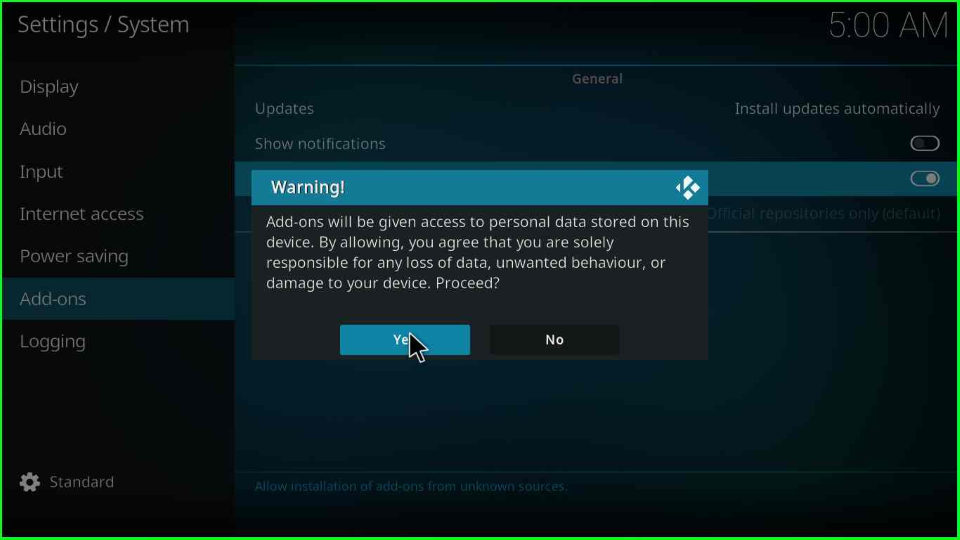
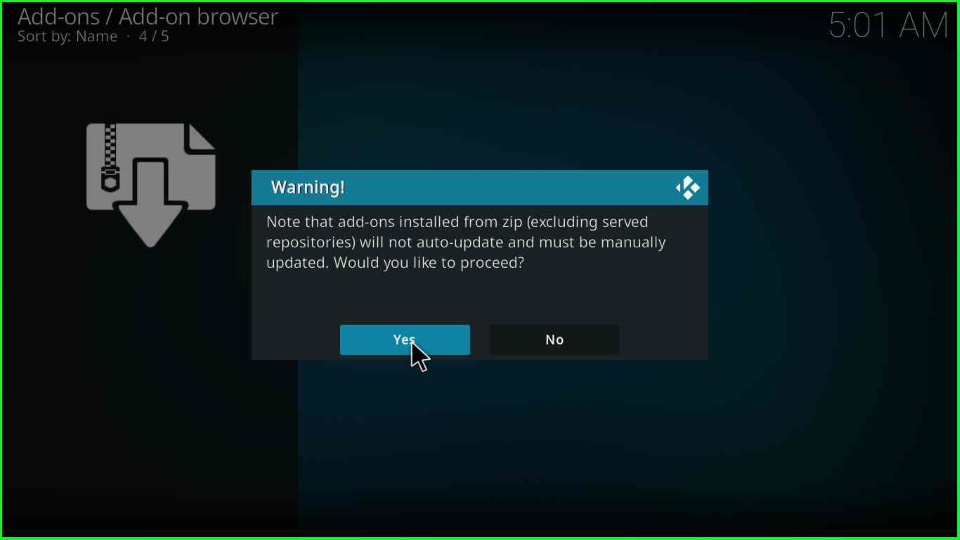
A warning message is displayed with two buttons, ‘Yes’ and ‘No’; click on the “Yes” to allow it on your device.

Hit Yes

Add Media Source and Repository

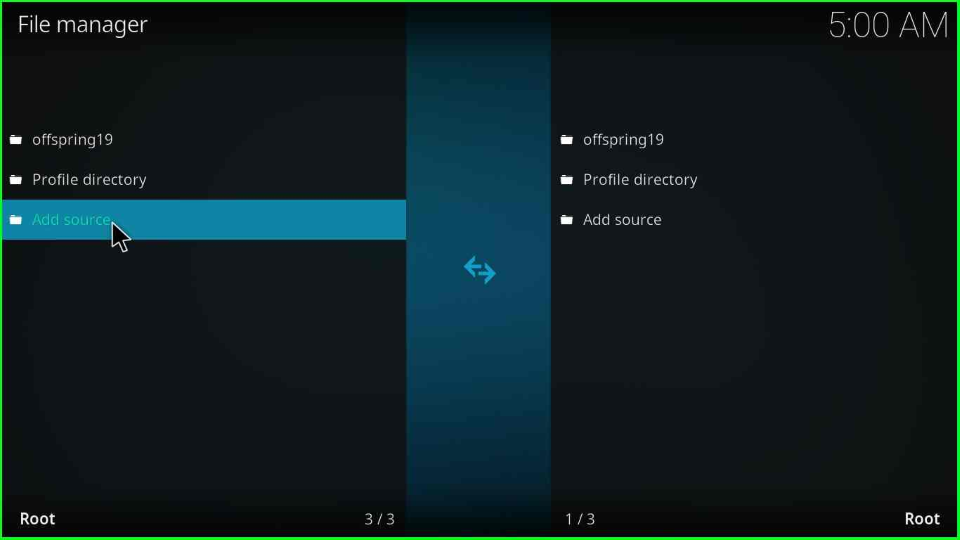
Navigate to the previous page and pick the “File manager” icon from the top of the System screen.

Choose File manager

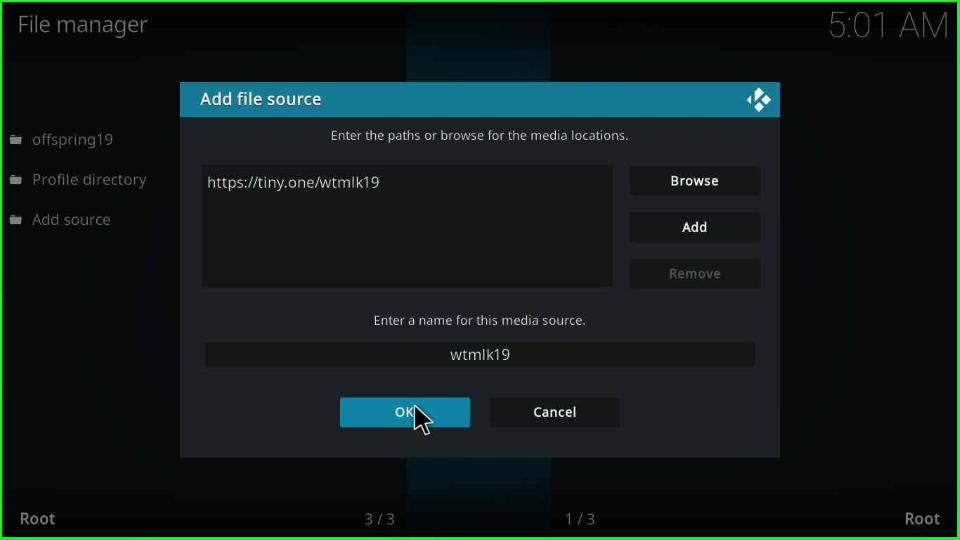
Add a source for Wolf Pack by selecting the “Add source” tab.

Add Wolf Pack source

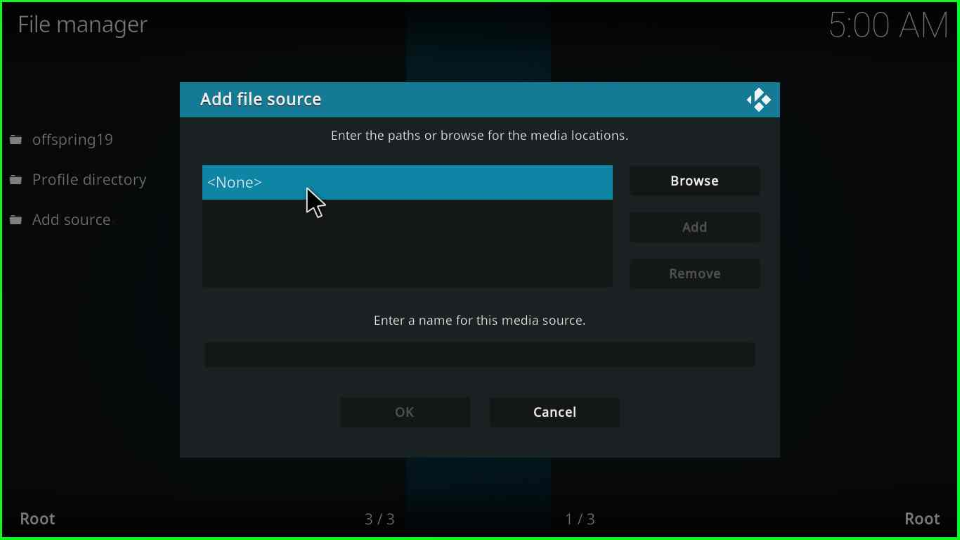
Open the “<None>” tag that appears on the Add file source window.

Tap None

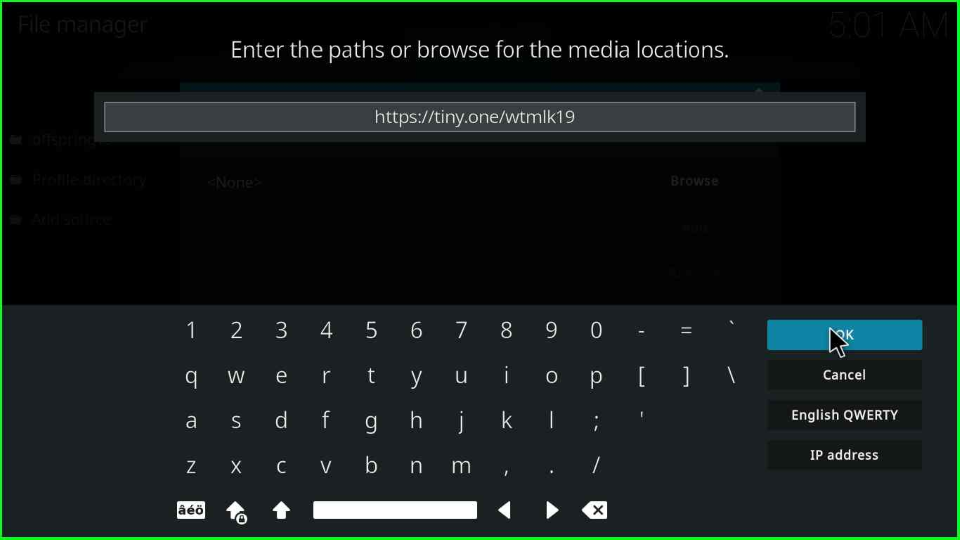
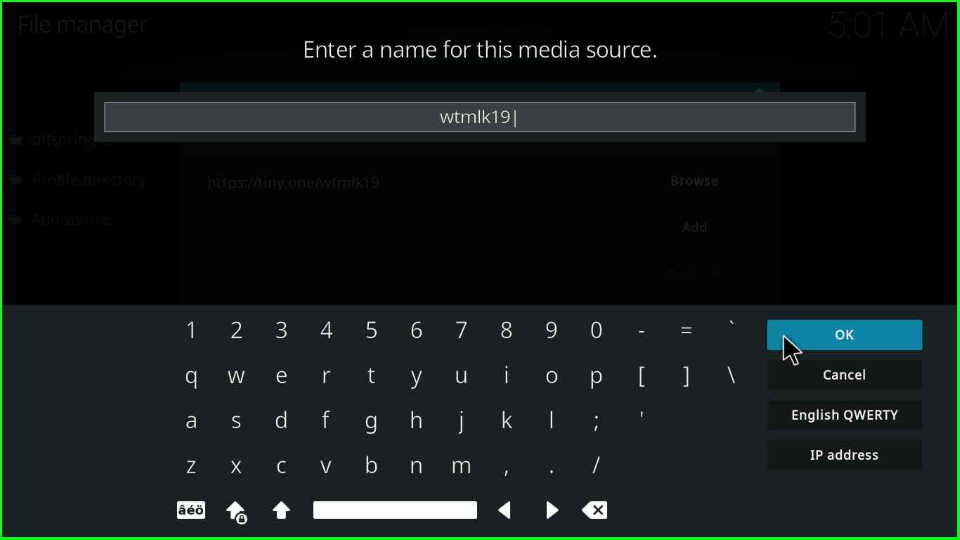
Write the Wolf Pack URL and press “OK”.

Type Wolf Pack URL

Add the source name as “wtmlk19” and click “OK”.

Enter source name wtmlk19

Double-check all the entered details and choose “OK”.

Tap OK

Install from Zip File

Switch to the System window and open the “Add-ons” package icon.

Open Add-ons

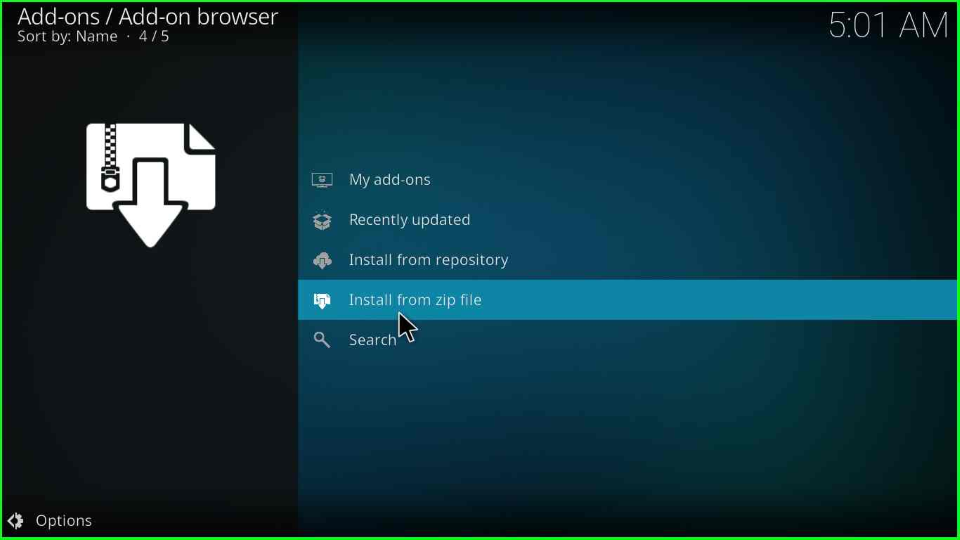
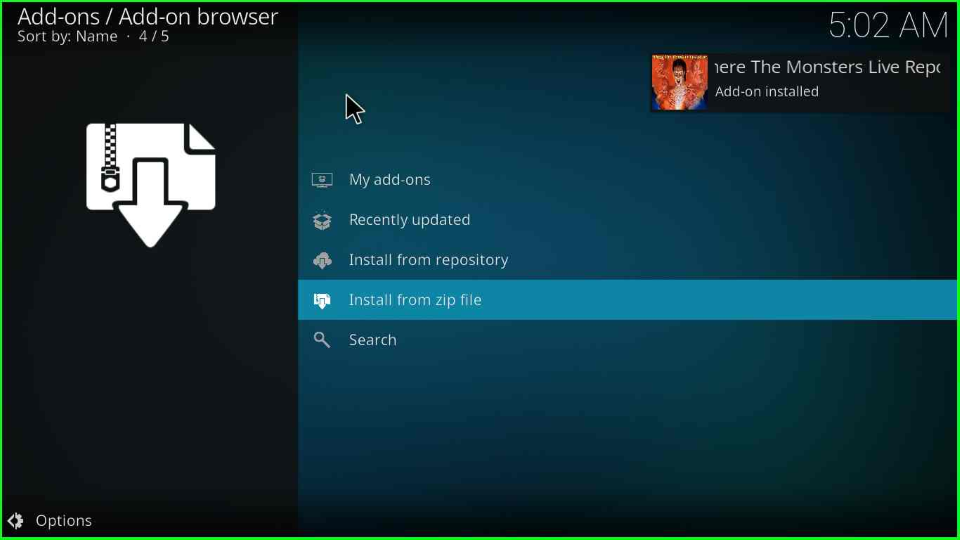
Choose the “Install from zip file” option above the Search tab.

Select Install from zip file

Click on “Yes” to move to the next step.

Hit Yes

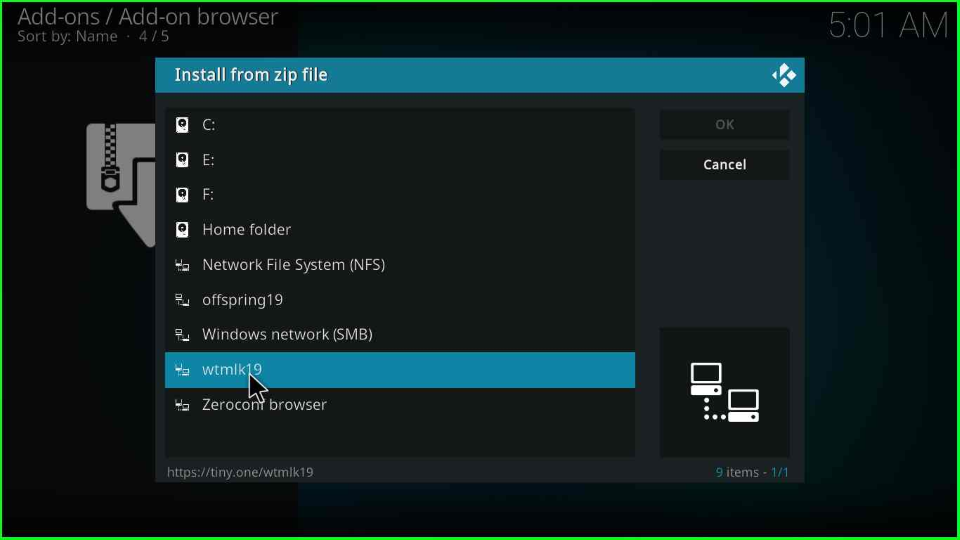
Select the media folder, “wtmlk19”.

Choose wtmlk19

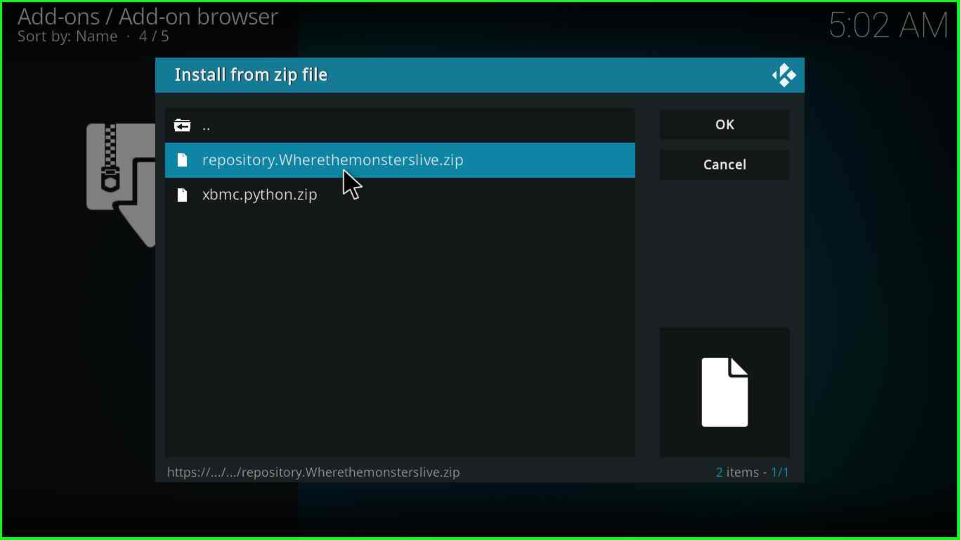
Tap on the “repository.Wherethemonsterslive.zip” file and press enter key.

Tap on repository.Wherethemonsterslive.zip file

Wait for the “Where The Monsters Live Repository Add-on installed” notification to appear on the screen.

Wait for Wolf Pack repo Installation

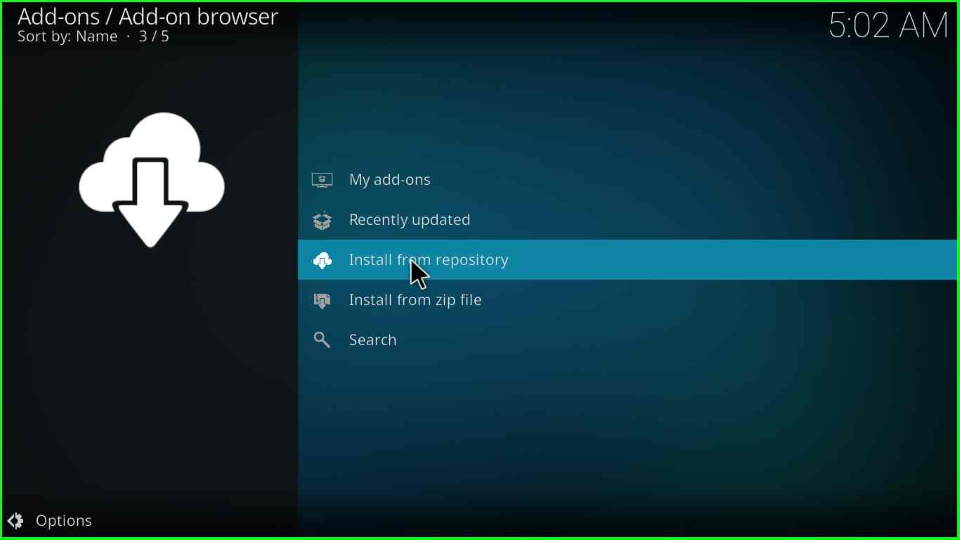
Install from Repository

Stay on the screen and select the other tab, “Install from repository”.

Tap Install from repository

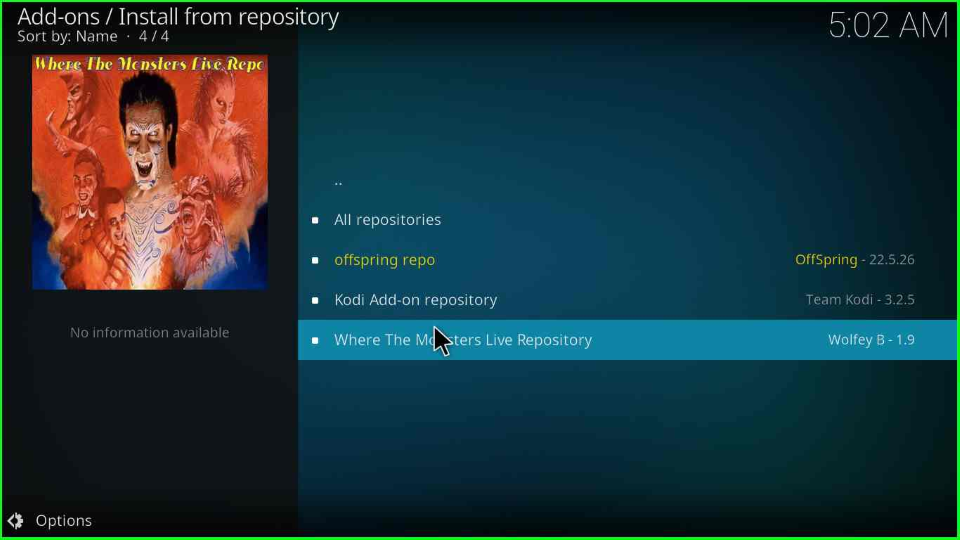
Inside the window, select the “Where The Monsters Live Repository”.

Select Where The Monsters Live Repository

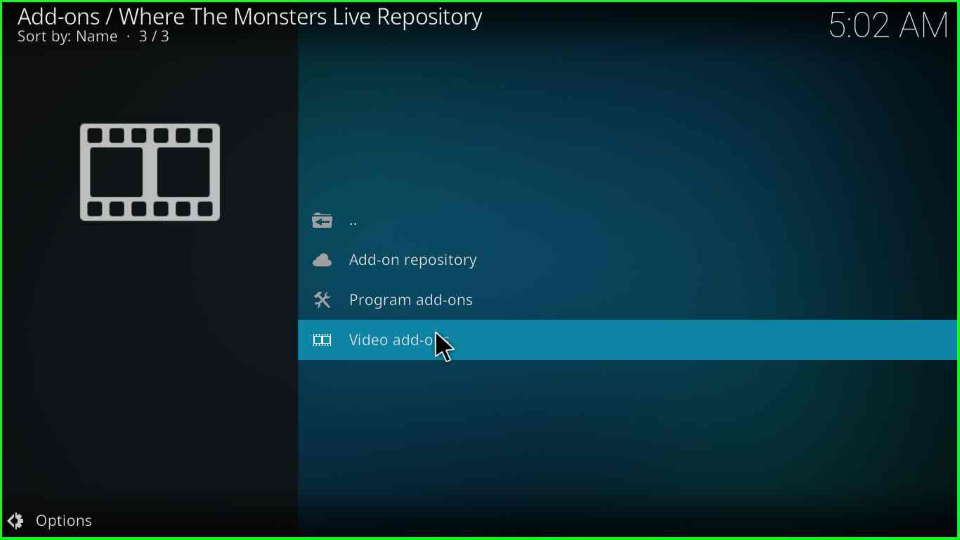
Place the pointer on the “Video add-ons” and hit enter.

Open VIdeo add-ons

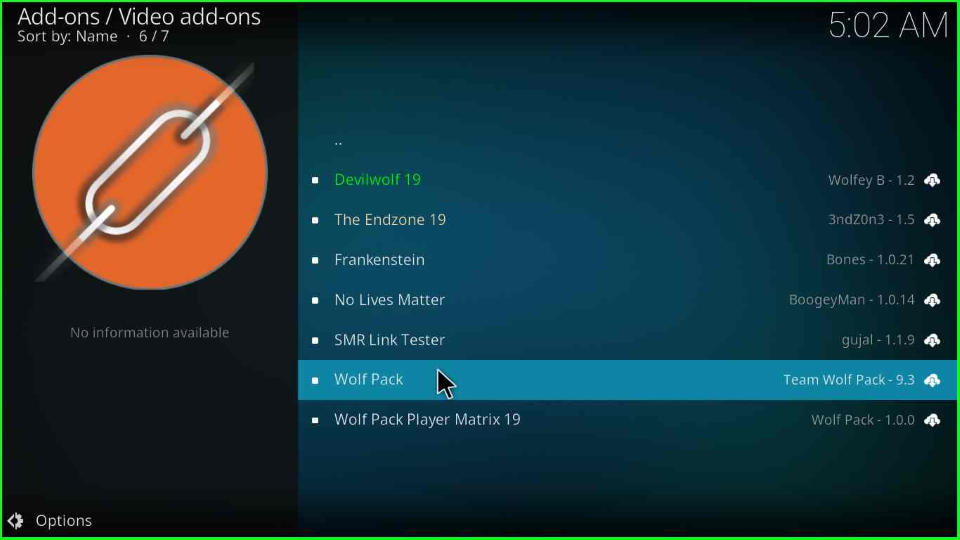
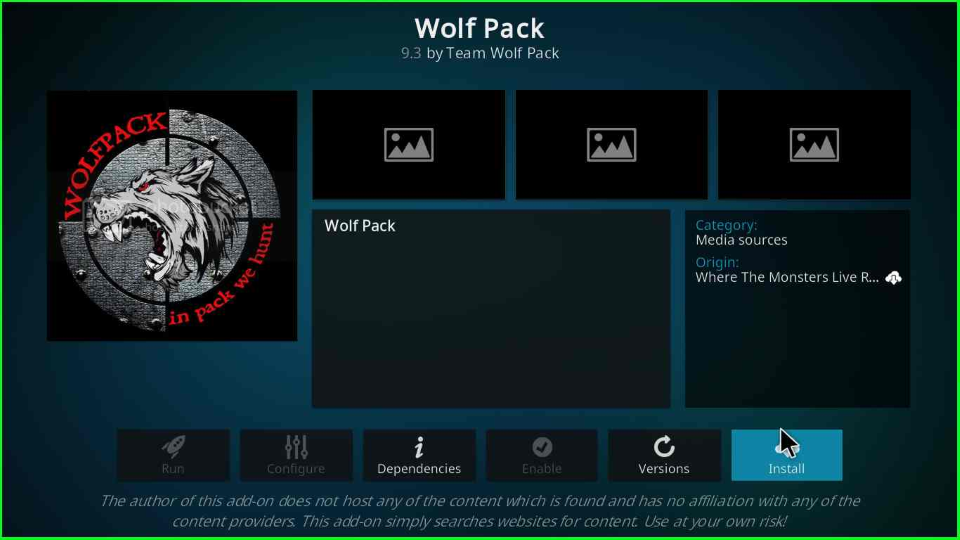
Select the “Wolf Pack” Kodi addon.

Choose Wolf Pack

Hit the “Install” key to install the Wolf Pack addon.

Select Install

Press “OK” that appears on the window.

Hit OK

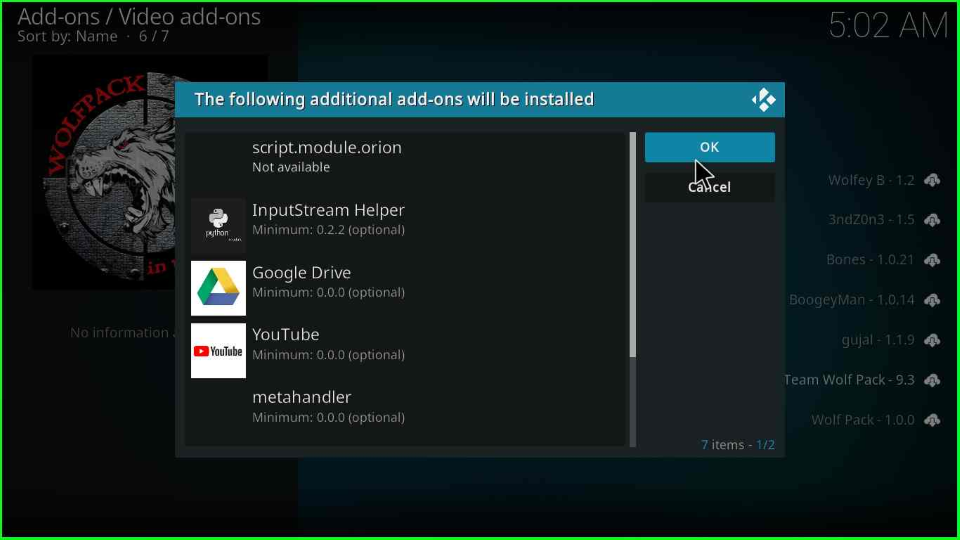
The Wolf Pack addon starts installing; wait for its successful installation message.

Wait for Wolf Pack Installation

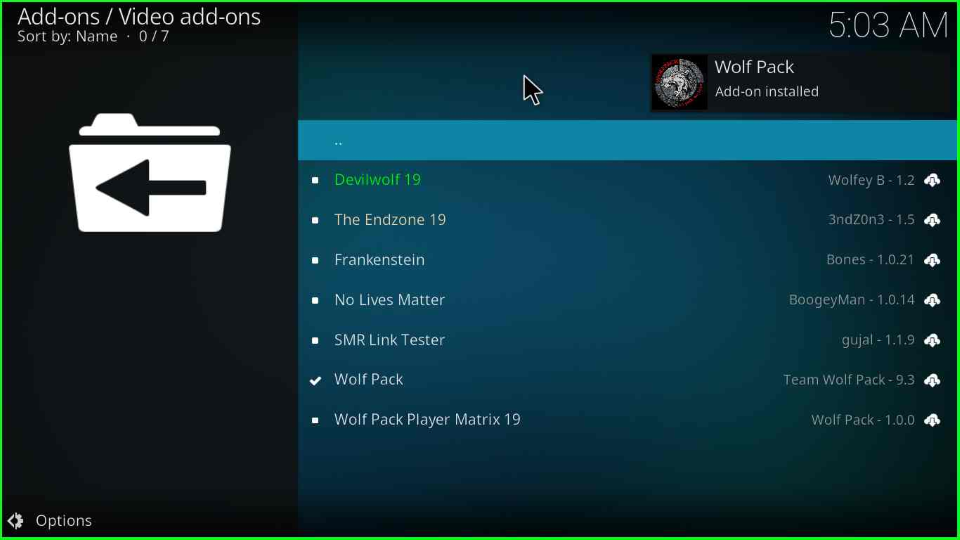
Again, click on the “Wolf Pack” Kodi add-on.

Click on Wolf Pack

Press the “Open” icon.

Open Wolf Pack

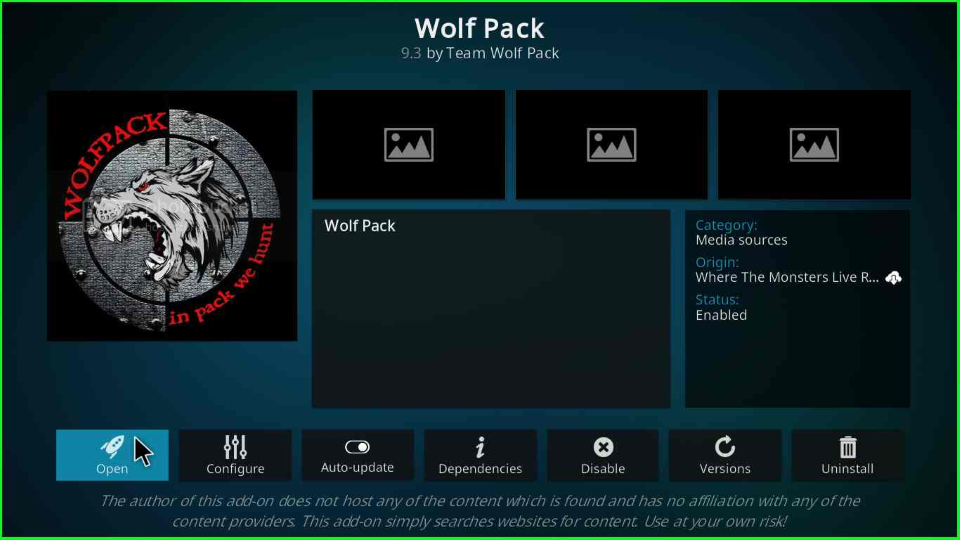
Here, you will see the Wolf Pack Kodi add-on with different streaming genres.

Stream Wolf Pack genres

FAQs Questions

How do I get the Wolf Pack addon on Kodi?

You can install the Wolf Pack addon from the “Where The Monsters Live” repository link.

Does Wolf Pack Kodi work with premium services like Real Debrid and AllDebrid?

The Wolf Pack add-on can fetch HD links from Real Debrid, Premiumize, Linksnappy, and AllDebrid to stream high-quality content.

Wrapping up

So, we have gone through the process of installing the Wolf Pack Kodi addon and discussed the related questions and answers. Drop your comments below for any errors during the installation of the Wolf Pack add-on.

Before you start streaming on Firestick Apps/Websites, I would like to warn you once again that we do not know from where these Apps, Websites, Kodi Repositories, Wizards, Builds, and Addons fetch the streams.

The content you stream on Firestick Apps may be copyrighted and may land you in legal trouble even if you stream them unintentionally. Most of all, ISPs, Government, and authorized companies may monitor your online activities like streaming copyrighted movies, videos, TV shows, live shows, animes, etc.

To stay protected, and to get an exceptional streaming experience, I suggest you use IPVanish which is the fastest, most secure, and military-grade encryption VPN for Firestick. In addition, IPVanish hides your original IP address, encrypts your internet connection, and bypasses bandwidth throttling and geo-restrictions.

I have been personally using IPVanish for a couple of years and what I can say is that IPVanish is the best VPN for Firestick Apps in all aspects for all devices because the VPN unlocks geo-restricted streams and enhances my streaming experience.

Disclaimer: VPNHacks.com does not support or encourage piracy and copyright infringements in any form. You should abide by the rules and regulations in your country. We just want to protect you because sometimes you may end up streaming copyrighted content unintentionally.

Save 81%: Only $2.49/Month

Taking an IPVanish VPN Subscription is really simple.

1.       First, subscribe to IPVanish by clicking here.

Most of all, IPVanish comes with a 30-day money-back guarantee. You can get a full refund if you are unsatisfied (I do not think you will be) with IPVanish, and they do not ask for any reason.

2.       Once you subscribe to IPVanish, download the IPVanish app and open it. Enter your e-mail and password and click the “Log In” button.

Login to IPVanish App

3.       Once you are signed in, select the VPN Server location that you want to connect to and click on the connect option.

Choose the VPN Location

4.       After that, you will see that your IP address has been changed. This way, you can protect your privacy and have an exceptional streaming experience.

Connect the Server

Save 81%: Only $2.49/Month

Related Guides:

Emma is a pro streamer with vast knowledge of Firestick, Roku, Google Chromecast, Nvidia Shield, Kodi, Plex, and Stremio. She is very much concerned about her privacy and has in-depth knowledge of VPNs like IPVanish, ExpressVPN, and PrivateInternetAccess. more...

1 thought on “How to Install Wolf Pack Kodi Addon on Kodi 20.2 Nexus”

Leave a Comment

IPVanish Black Friday Offer