Home » Kodi » Install Torque Lite Addon on Kodi 20.2 Nexus

Install Torque Lite Addon on Kodi 20.2 Nexus

Torque Lite Kodi Addon

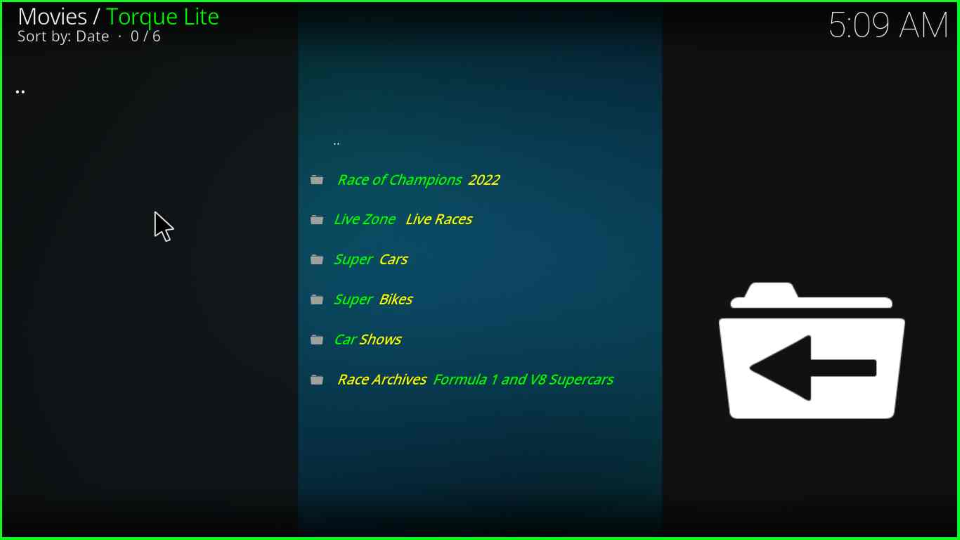
The Torque Lite Kodi addon is the Live sports addon from the Narcacist Wizard Repository. Here, you can stream many sports genres like Car Shows, Super Bikes, Live Zone, Racing Archives, and, Super Cards.

Also, you can explore racing events, including MotoGP, V8 Supercars, NASCAR, and, Formula 1. In addition, all racing and sports video are available from all over the world.

Also, if you like to stream racing games, you can choose the Torque Lite addon. This post discusses installing the Torque Lite Kodi addon on your device, viz Firestick, Android, Kodi Box, etc.

Attention! Before You Move Ahead.

I want to warn you that whatever you stream online is visible to the Government, ISPs, and Third Parties. Personally, I dislike someone snooping on my online activities.

Currently, your IP address 34.228.52.21 is visible to everyone.

Hence, I suggest using the most secure VPN, i.e. IPVanish VPN which has military-grade encryption. Also, IPVanish enables buffering-free streaming, hides your IP address and location, and bypasses geo-restrictions and bandwidth throttling.

Black Friday Offer: Save 81%: Only $2.49/Month

Note:- Streaming copyrighted content without a license is illegal and may land you in legal trouble. VPNHacks.com does not encourage piracy in any way.

So, let’s learn more about the Torque Kodi addon.

Installation Steps

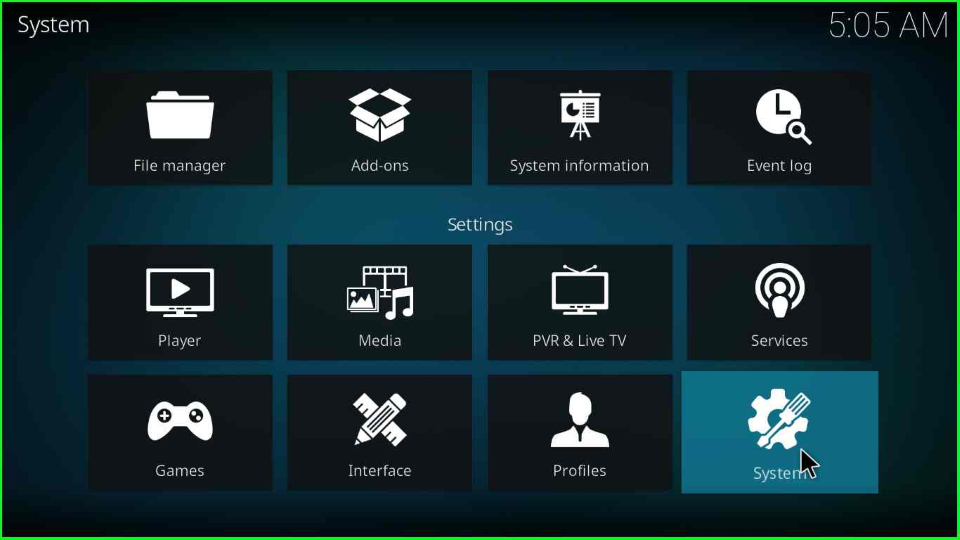
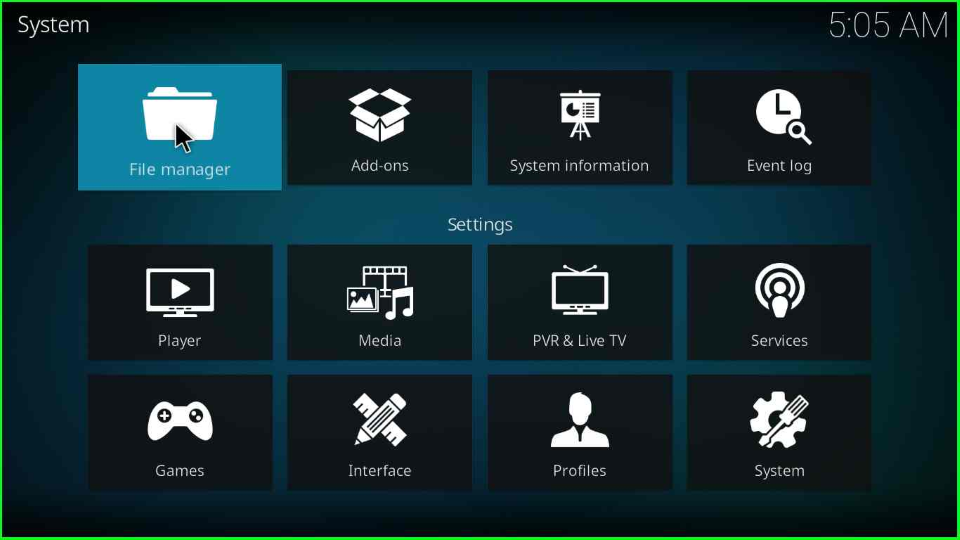
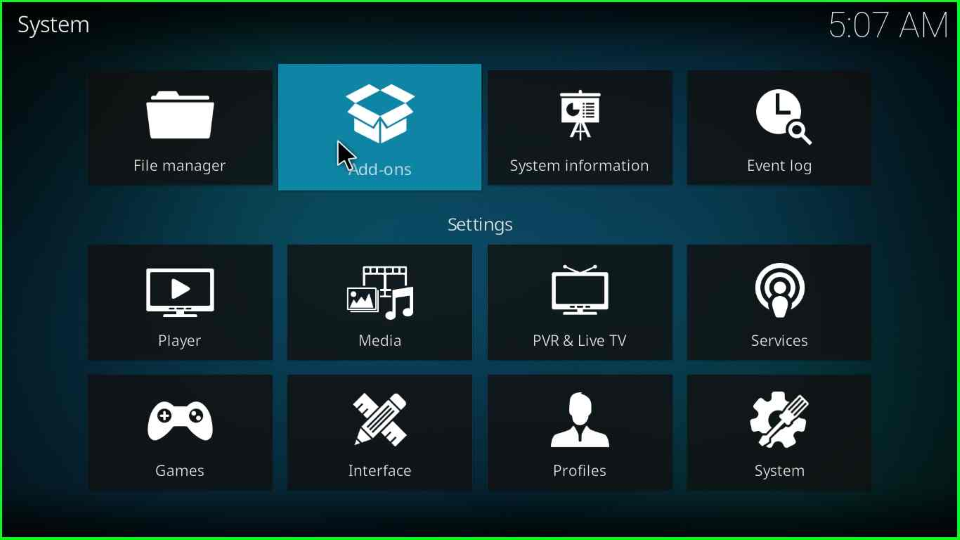
Open the Kodi app and press the “Settings” icon.

Click Settings

Hit the “System” tab inside the window.

Open System icon

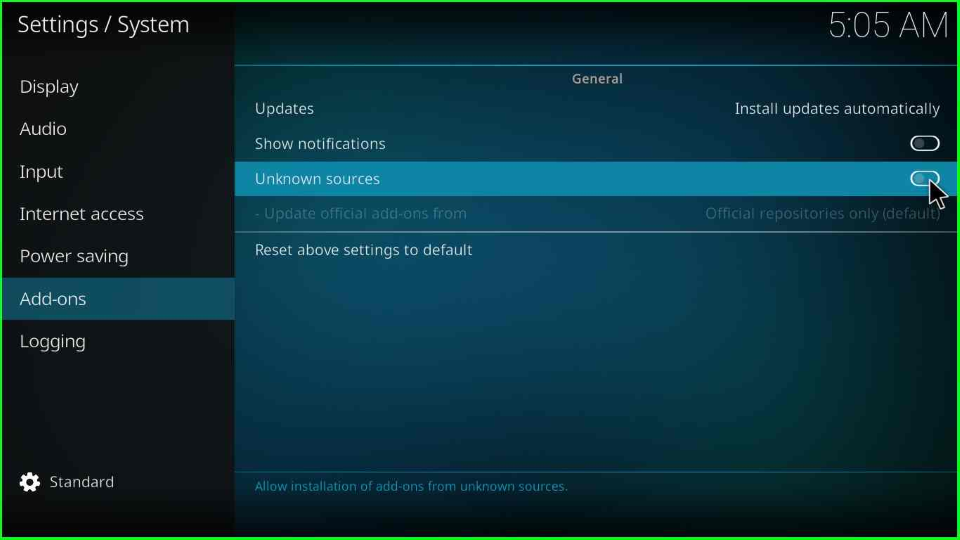
Click the “Add-ons” tab, and turn on the “Unknown sources” button.

On Unknown sources mode

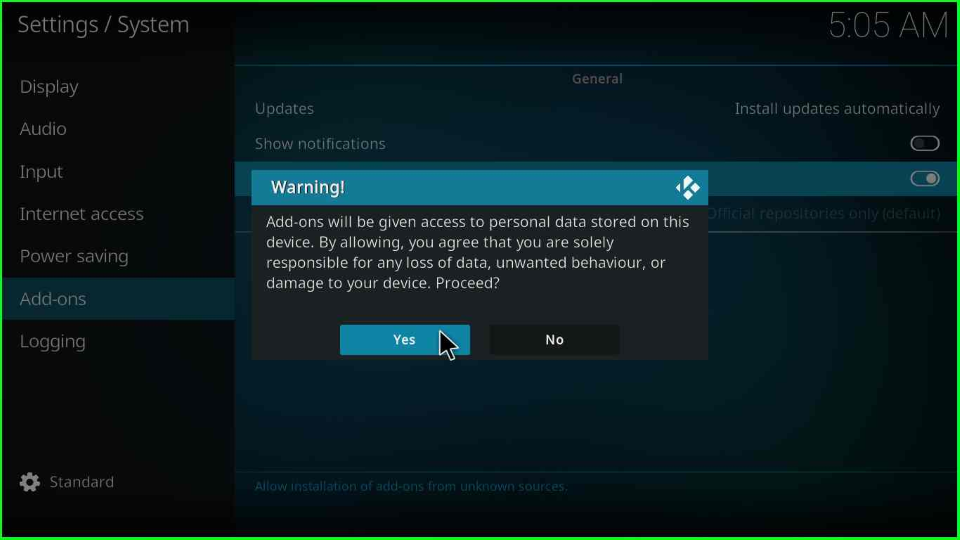
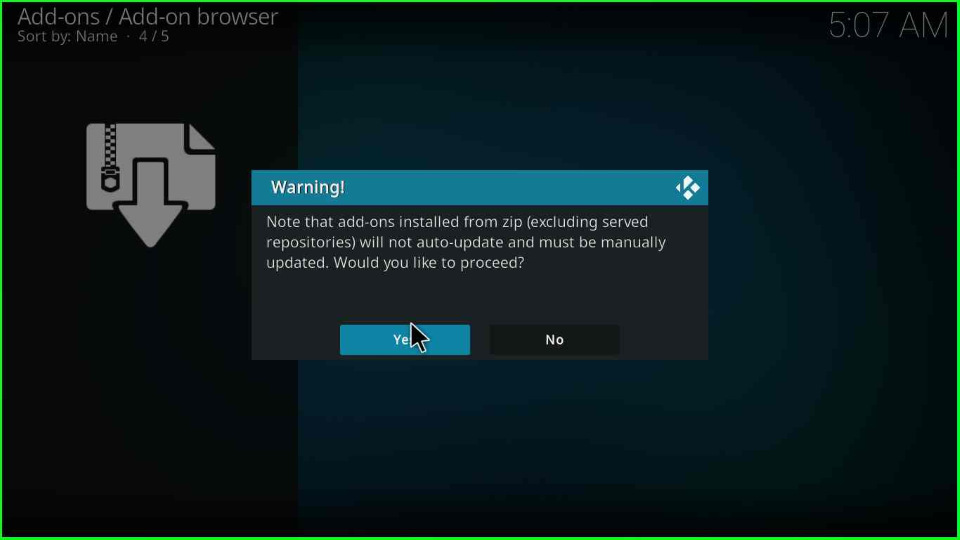
The screen will display the warning message to manually update the add-on later on; click the “Yes” button to confirm.

Choose Yes

Add Media Source and Repository

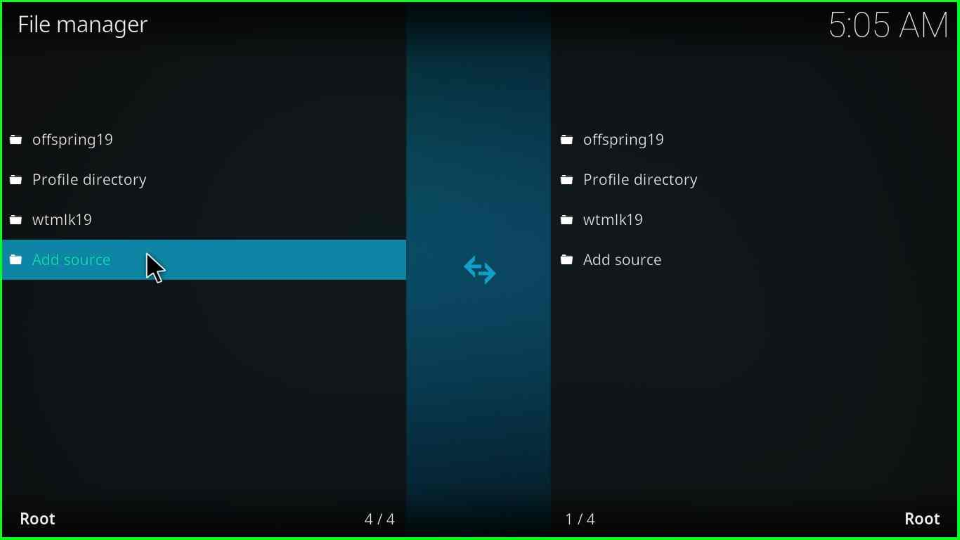
Again, go back to the Settings page, and search for the “File manager” icon from the right corner.

Open File manager

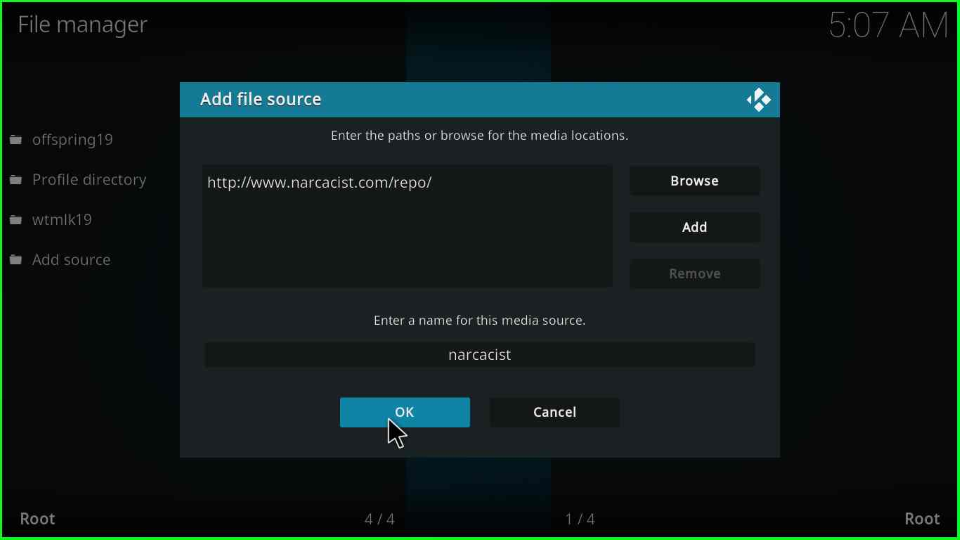
In the next screen, select the “Add source” tab to add a source for the Torque Lite addon.

Add Torque Lite source

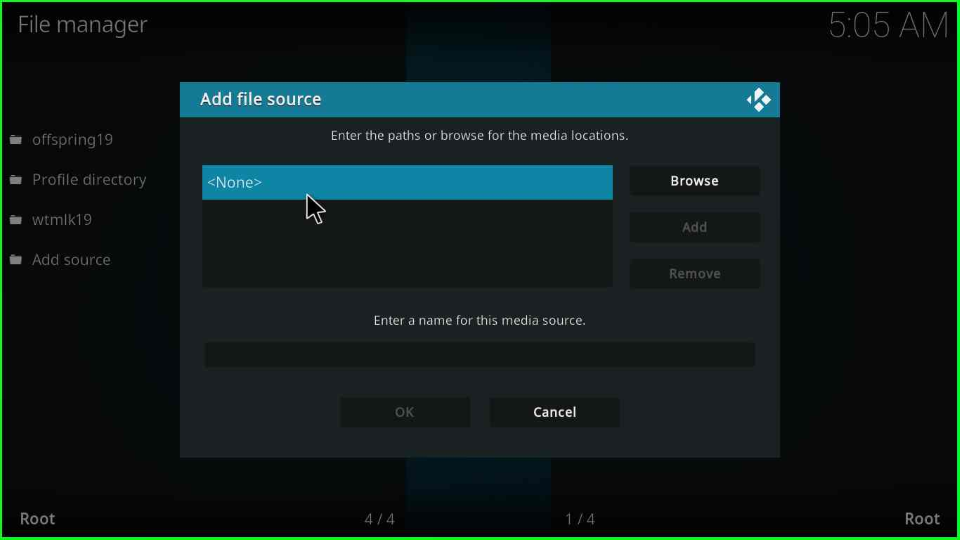
Choose <None> label.
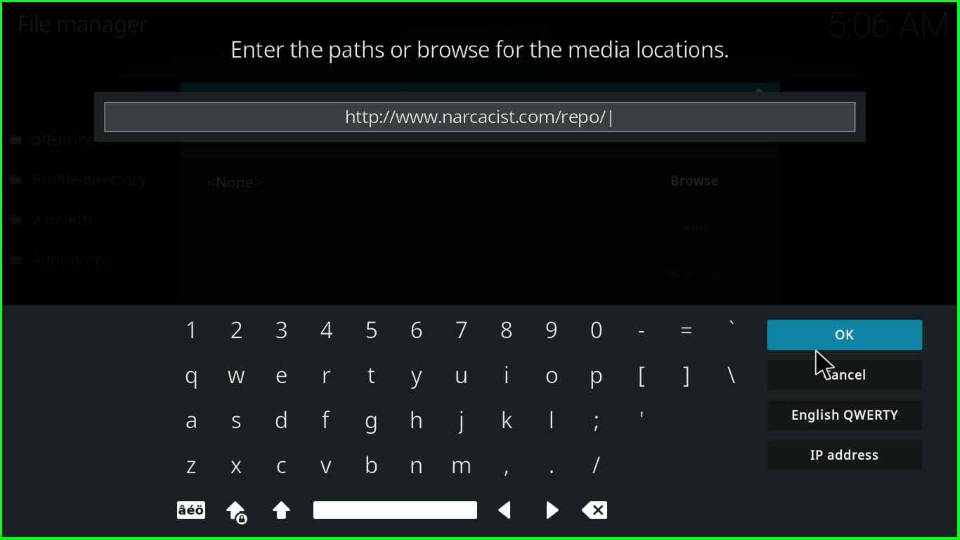
Click on None tag

Now, add the URL “http://www.narcacist.com/repo/” and select “OK”.

Type Torque Lite URL

Give the source name as “narcacist” and hit “OK”.

Add naracasist

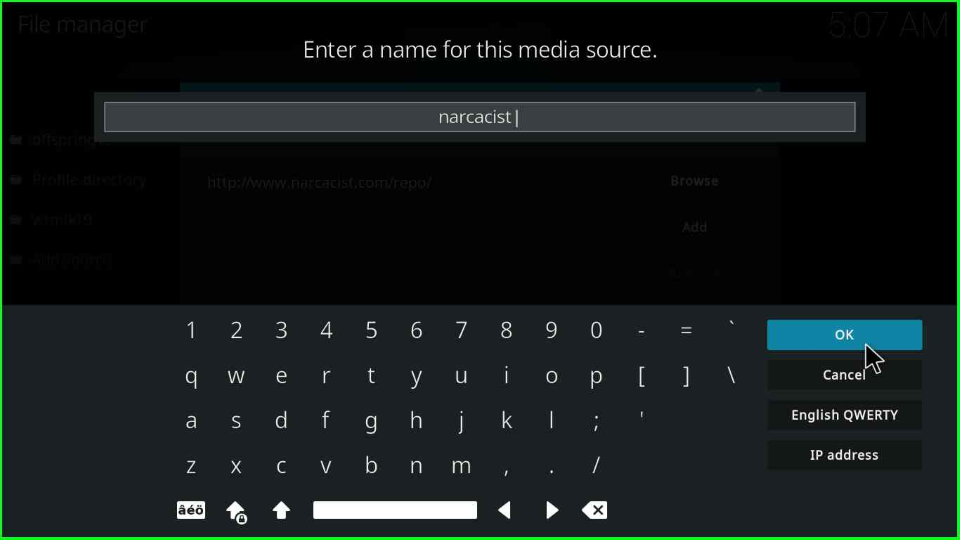
Verify all the entries and tap the “OK” button.

Click OK

Install from Zip File

Go to the Kodi Home window and select “Add-ons”.

Select Add-ons

Scroll down the cursor on the fourth option, “Install from the zip file”.

Open Install from zip file label

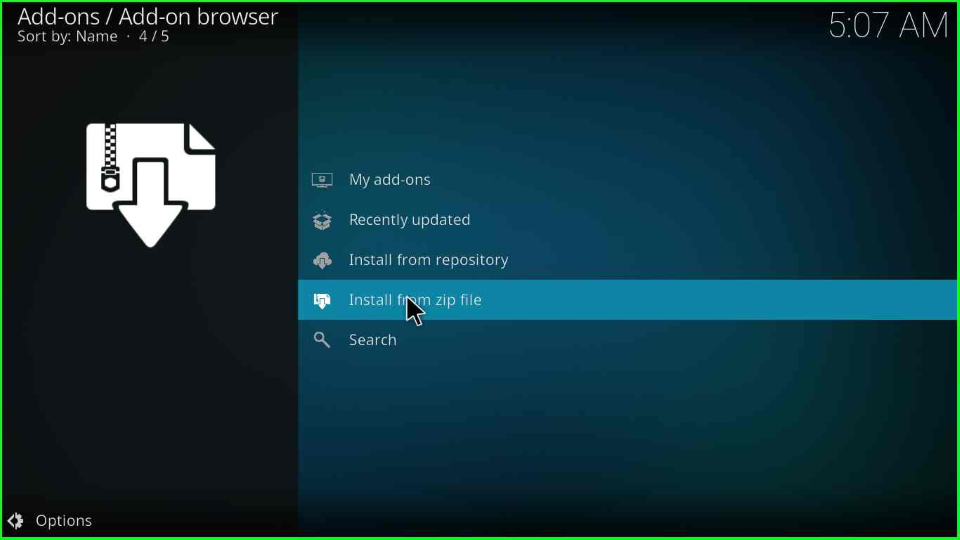
The display shows a warning window; tap “Yes” to move ahead.

Press Yes

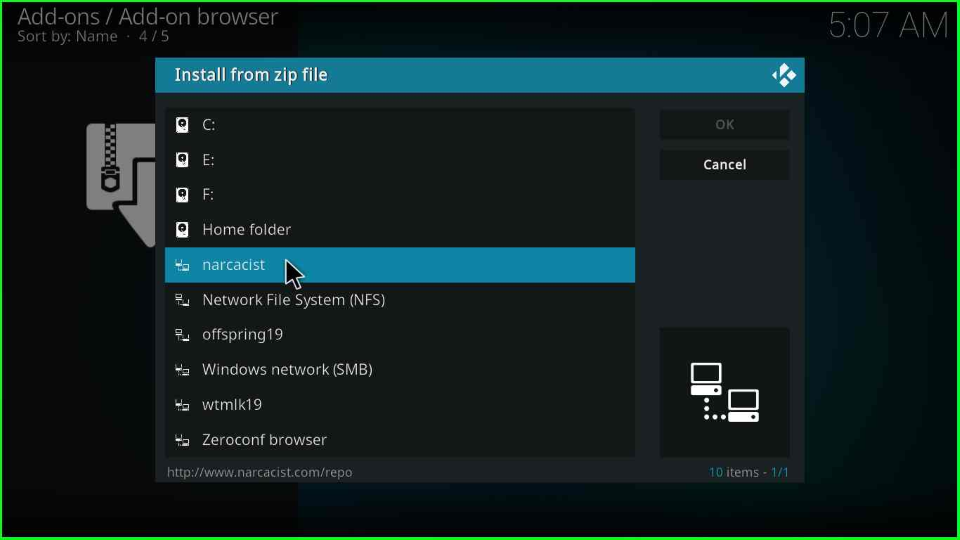
Click on the source folder, “narcacist”.

Choose narcacist

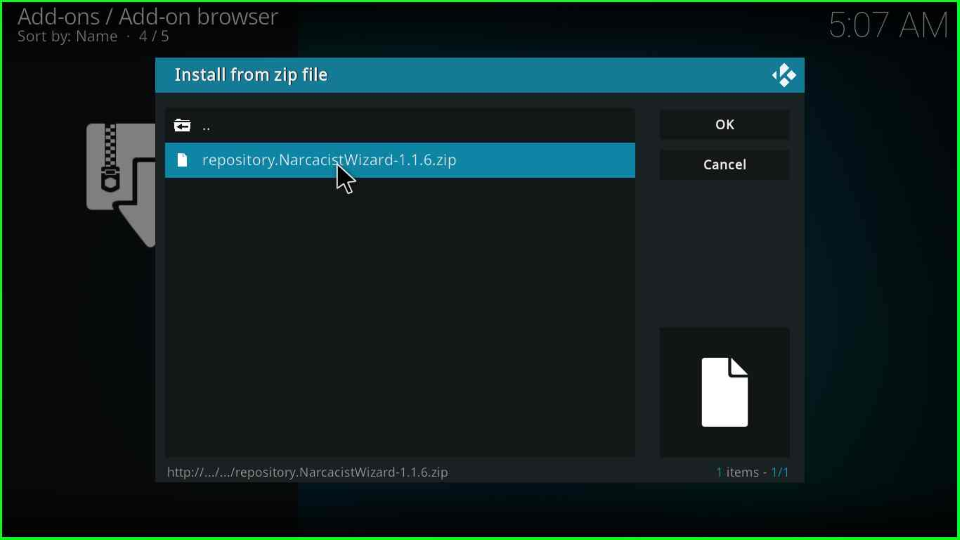
Tap on the “repository.NarcacistWizard-x.x.x.zip” zip file and hit enter.

Open zip file

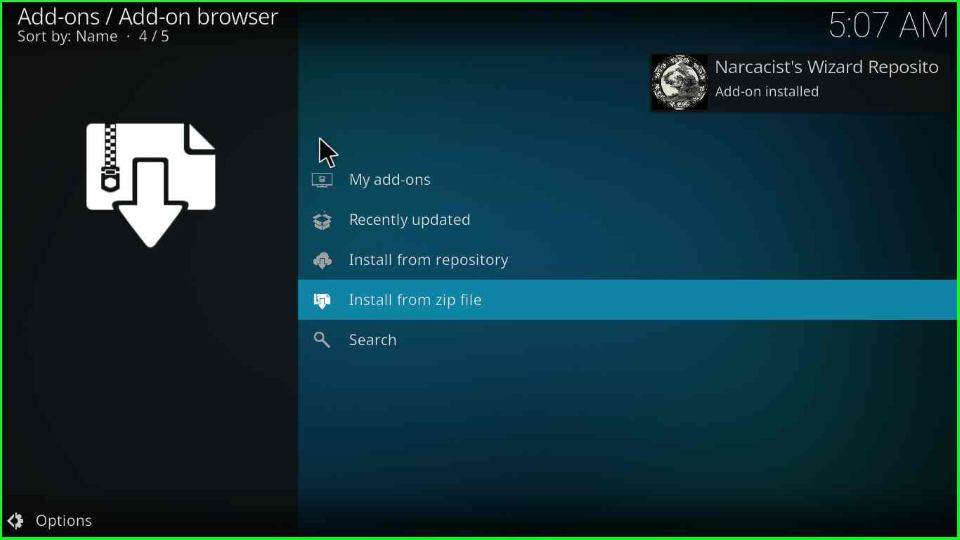
Wait for the “Narcacist’s Wizard Repository Add-on installed” message on the screen.

Wait for the Narcacist repo installation

Install from Repository

On the same screen, select the third option, “Install from repository”.

Select Install from repository

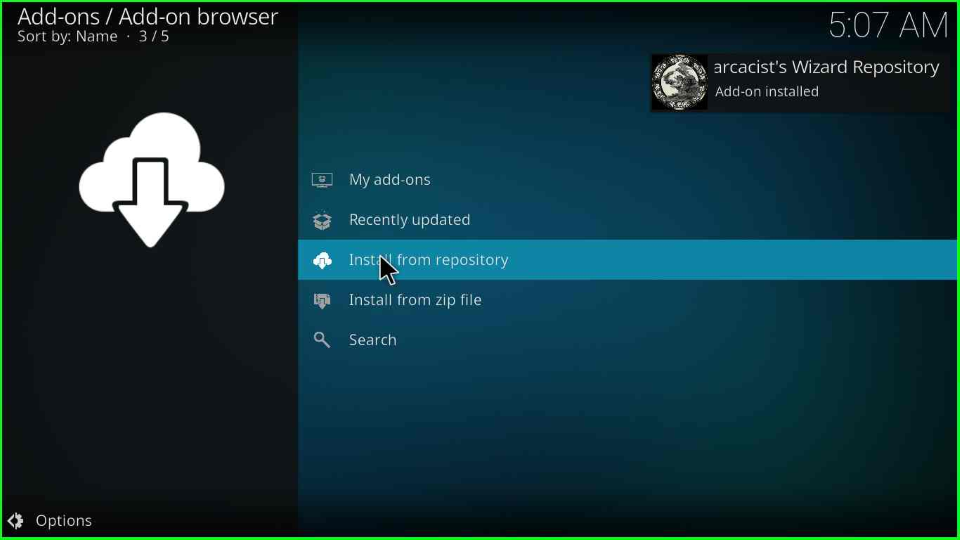
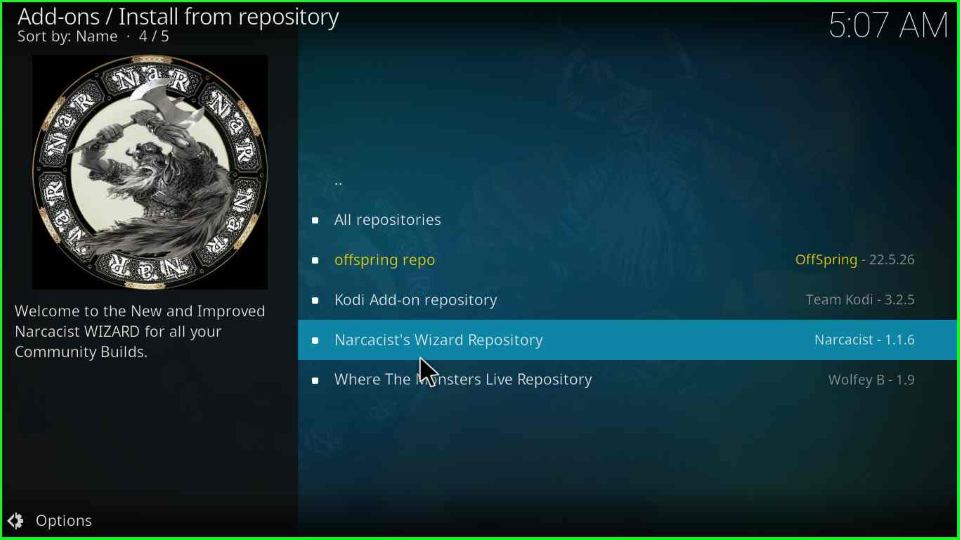
After that, select the “Narcacist’s Wizard Repository”.

Select Narcacist Wizard repo

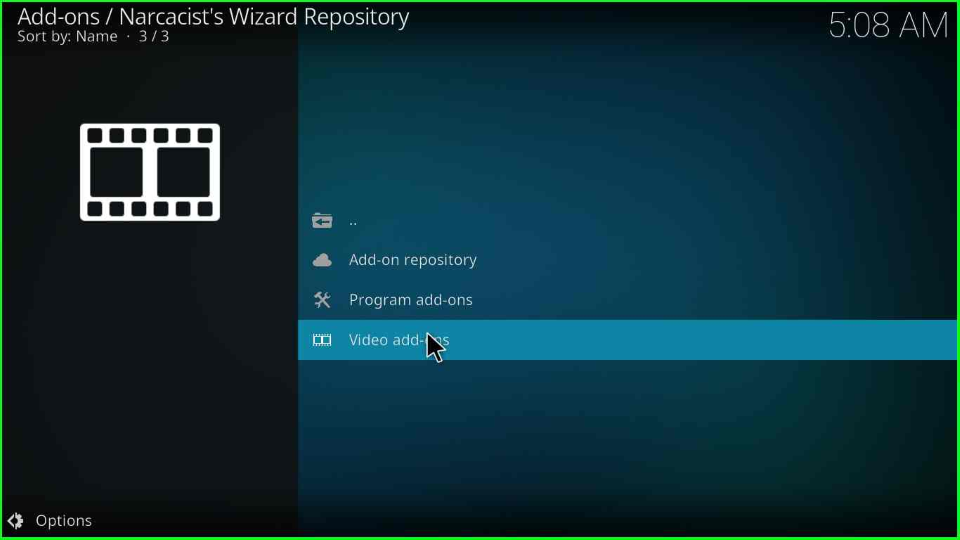
Put the cursor on the “Video add-ons”.

Open Video add-ons

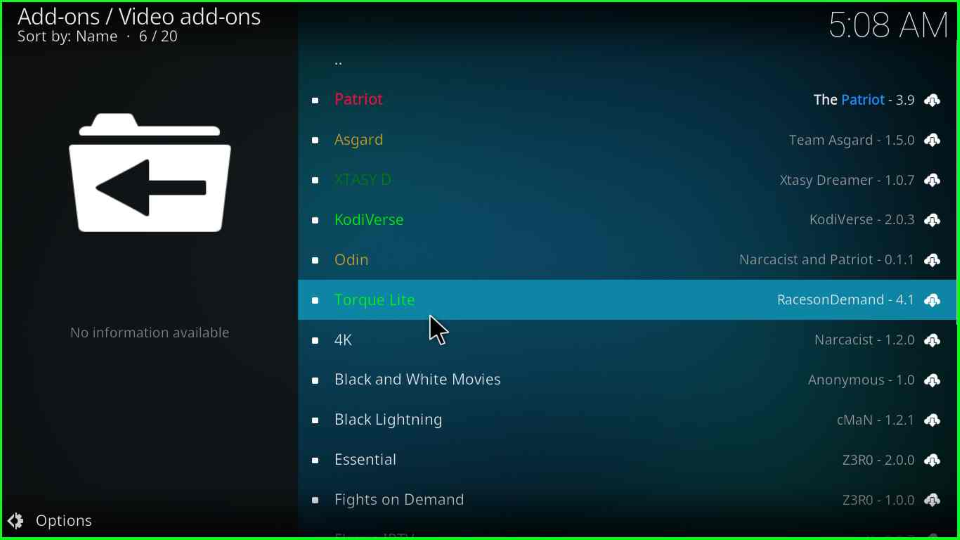
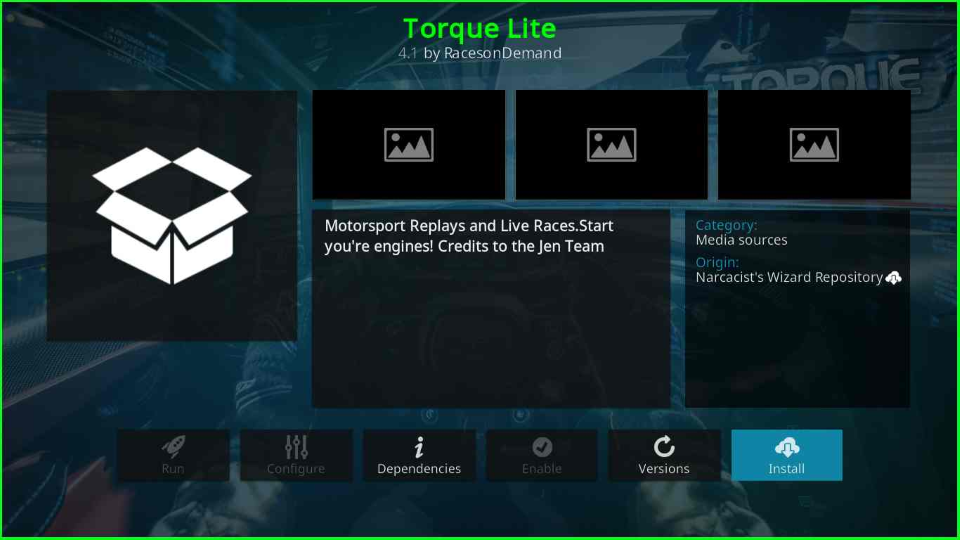
Click on the “Torque Lite” Kodi addon.

Tap Torque Lite

Install it by pressing the “Install” button on the Torque Lite Home page.

Select Install

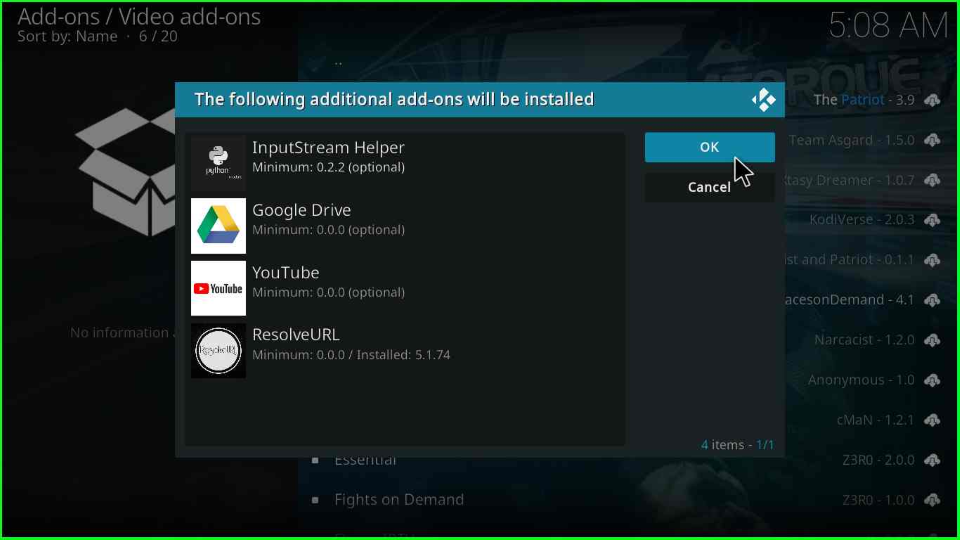
Select “OK” to install other additional add-ons of the Torque Lite.

Tap OK

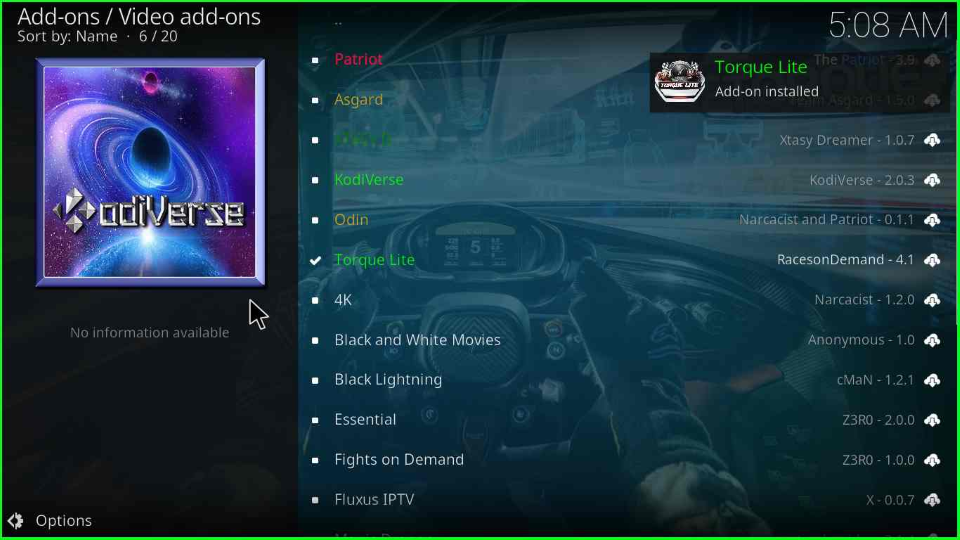
So the Torque Lite addon starts downloading; you should wait for the notification to appear on the window.

Wait for the installation of Torque Lite addon

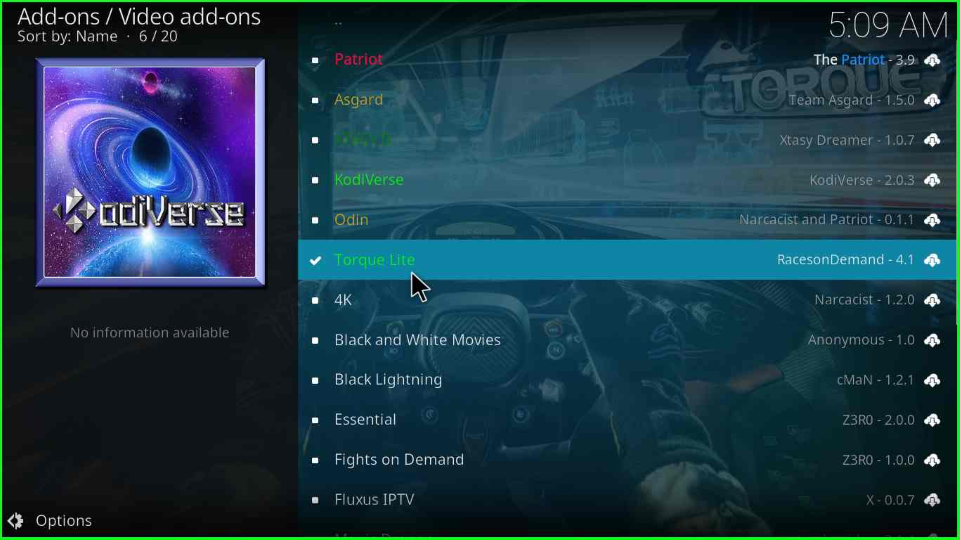
Re-enter the “Torque Lite” add-on.

Open Torque Lite

Now, choose the “Open” option.

Hit Open key

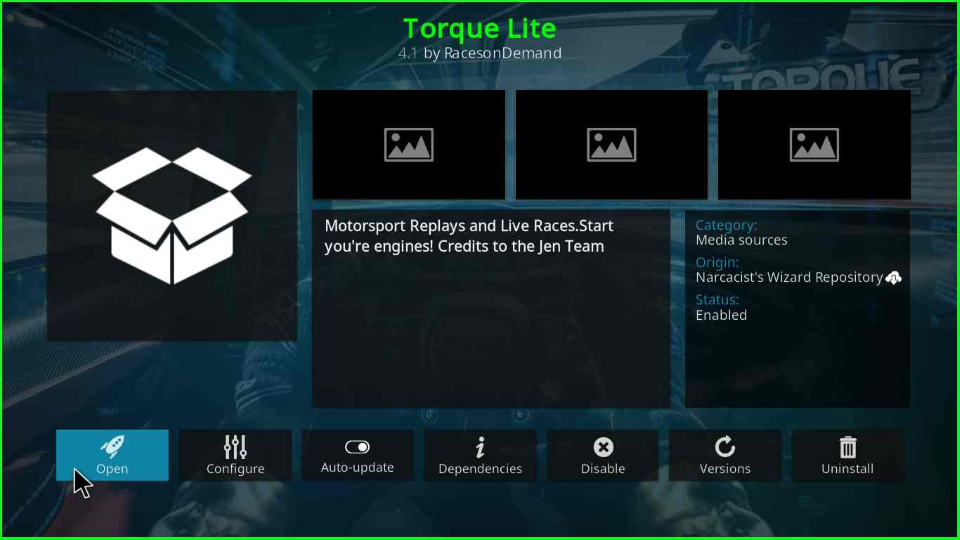
The Torque Lite main screen will appear with lots of streaming options.

Enjoy Torque Lite streaming

Torque Lite Kodi Addon Questions

Torque Lite video addon is available on which repository?

The add-on is available on the Narcacist Wizard Repository, EzzerMacs Wizard Repository, DejaVu Repository, and Gearheads Repository.

Does the Toque Lite Kodi addon support Real Debrid?

Yes, it supports Real Debrid, Debrid, Trakt, Premiumize, and Linksnappy premium plans.

Wrapping up

The steps discussed in the article apply to all platforms, including Android TV, FireStick, Mac, Chromecast, Windows, Android, iOS, and Nvidia Shield platforms. So, try it on your available device and share your experience with us.

Before you start streaming on Firestick Apps/Websites, I would like to warn you once again that we do not know from where these Apps, Websites, Kodi Repositories, Wizards, Builds, and Addons fetch the streams.

The content you stream on Firestick Apps may be copyrighted and may land you in legal trouble even if you stream them unintentionally. Most of all, ISPs, Government, and authorized companies may monitor your online activities like streaming copyrighted movies, videos, TV shows, live shows, animes, etc.

To stay protected, and to get an exceptional streaming experience, I suggest you use IPVanish which is the fastest, most secure, and military-grade encryption VPN for Firestick. In addition, IPVanish hides your original IP address, encrypts your internet connection, and bypasses bandwidth throttling and geo-restrictions.

I have been personally using IPVanish for a couple of years and what I can say is that IPVanish is the best VPN for Firestick Apps in all aspects for all devices because the VPN unlocks geo-restricted streams and enhances my streaming experience.

Disclaimer: VPNHacks.com does not support or encourage piracy and copyright infringements in any form. You should abide by the rules and regulations in your country. We just want to protect you because sometimes you may end up streaming copyrighted content unintentionally.

Save 81%: Only $2.49/Month

Taking an IPVanish VPN Subscription is really simple.

1.       First, subscribe to IPVanish by clicking here.

Most of all, IPVanish comes with a 30-day money-back guarantee. You can get a full refund if you are unsatisfied (I do not think you will be) with IPVanish, and they do not ask for any reason.

2.       Once you subscribe to IPVanish, download the IPVanish app and open it. Enter your e-mail and password and click the “Log In” button.

Login to IPVanish App

3.       Once you are signed in, select the VPN Server location that you want to connect to and click on the connect option.

Choose the VPN Location

4.       After that, you will see that your IP address has been changed. This way, you can protect your privacy and have an exceptional streaming experience.

Connect the Server

Save 81%: Only $2.49/Month

Related Guides:

Emma is a pro streamer with vast knowledge of Firestick, Roku, Google Chromecast, Nvidia Shield, Kodi, Plex, and Stremio. She is very much concerned about her privacy and has in-depth knowledge of VPNs like IPVanish, ExpressVPN, and PrivateInternetAccess. more...

Leave a Comment

IPVanish Black Friday Offer