Home » Kodi » No One Kodi Addon Installation on Kodi 20.2 Nexus

No One Kodi Addon Installation on Kodi 20.2 Nexus

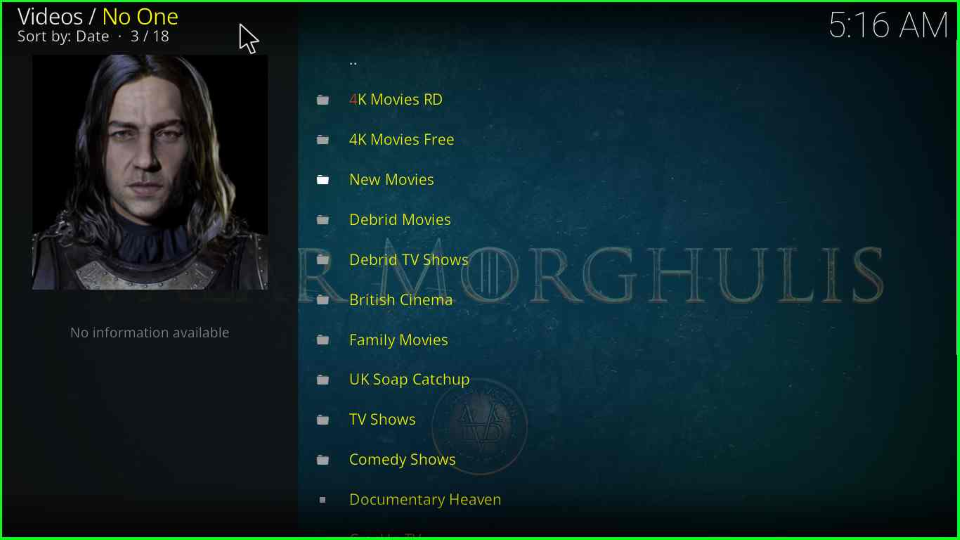
No One is a great Kodi addon that offers a vast collection of the latest streams in HD video quality. The addon has various sections, including 4K Movies RD, 4K Movies Free, New Movies, Debrid TV Shows, Family Movies, British Cinema, and Comedy Shows.

No One add-on competitors are STIRR, 4K, Alvin, Wolf Pack, TheOath, Dejavu, Insomnia, Crazy Canucks, Asgard, Taz19, Magic Dragon, etc.

You can steam free content on the No One add-on and use premium services like Premiumize, Real Debrid, Linksnappy, and All Debrid for streaming using HD links. No One add-on is from the popular No One repository.

You can install the No One add-on on all Kodi-supported devices, viz. Android, Chromecast, Mac, iOS, and Linux devices.

Dedicated anime add-ons, sports add-ons, live TV add-ons, and adult add-ons. make the Kodi an ultimate streaming choice for cord-cutters.

Attention! Before You Move Ahead.

I want to warn you that whatever you stream online is visible to the Government, ISPs, and Third Parties. Personally, I dislike someone snooping on my online activities.

Currently, your IP address 34.228.52.21 is visible to everyone.

Hence, I suggest using the most secure VPN, i.e. IPVanish VPN which has military-grade encryption. Also, IPVanish enables buffering-free streaming, hides your IP address and location, and bypasses geo-restrictions and bandwidth throttling.

Black Friday Offer: Save 81%: Only $2.49/Month

Note:- Streaming copyrighted content without a license is illegal and may land you in legal trouble. VPNHacks.com does not encourage piracy in any way.

Here are the installation steps for the No One add-on on Firestick, Laptop, or PC.

Installation Steps

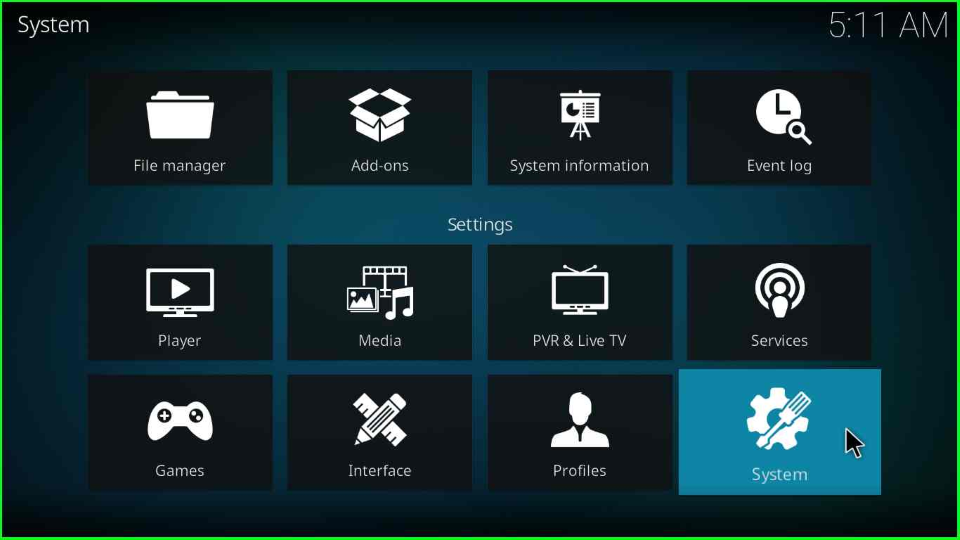
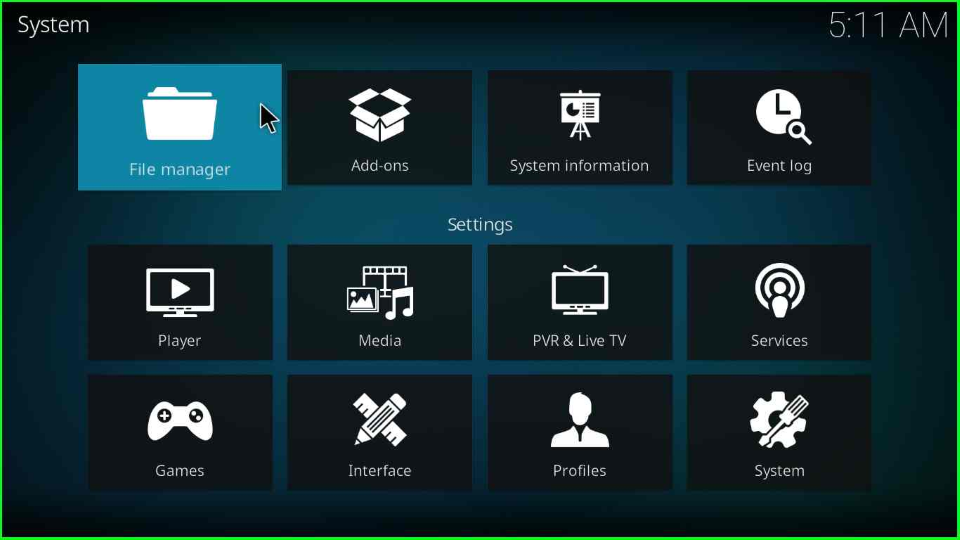
Launch the Kodi app on your PC and hit the “Settings” icon.

Tap Settings

Elect the last icon, “System”.

Open System

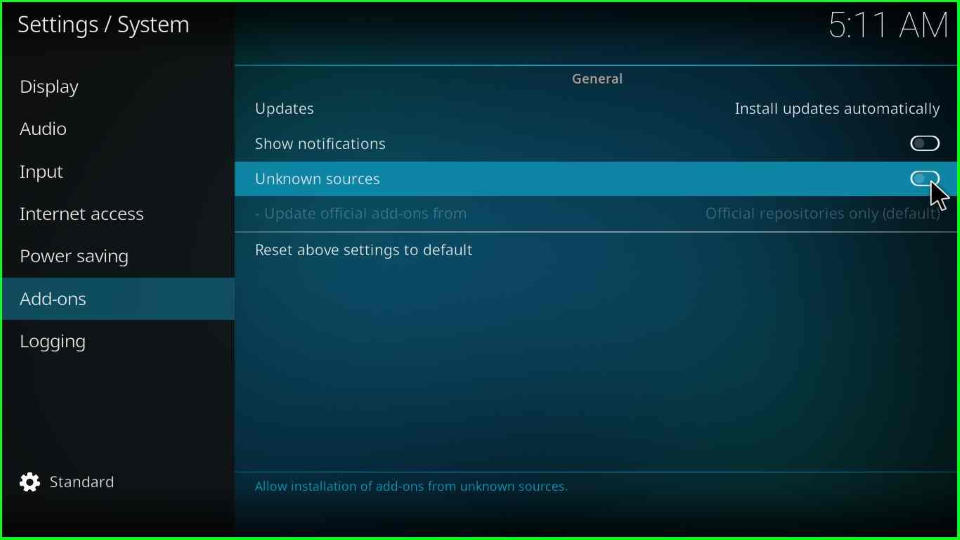
From the left side of the page, choose the second last option, “Addons”, and enable the “Unknown sources” button.

On Unknown sources

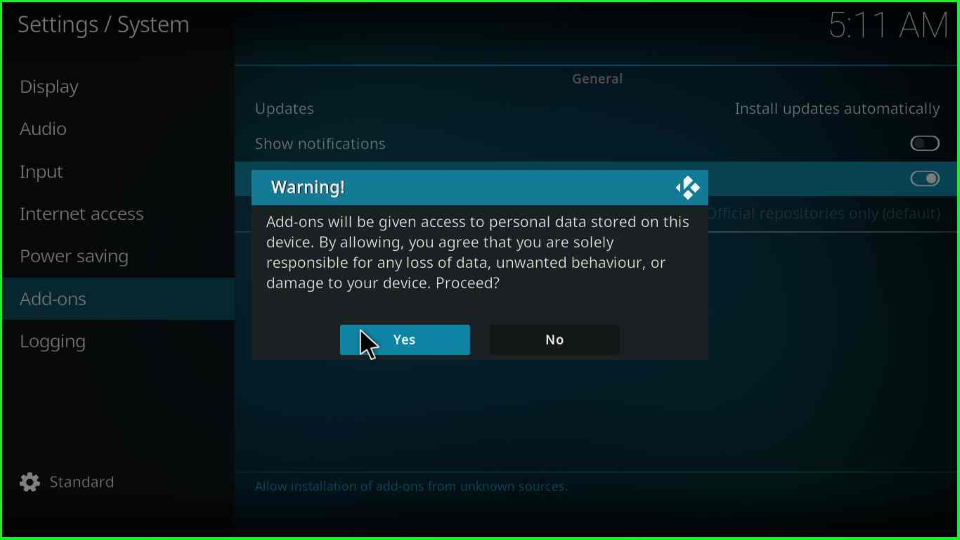
The page will show a warning box; click on the “Yes” tab.

Click Yes

Add Media Source/ Repository

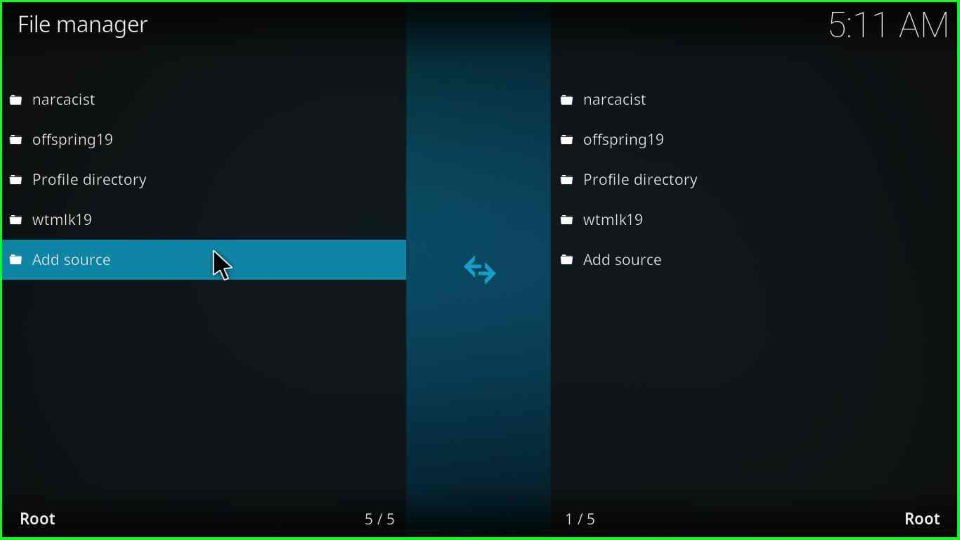
Again, open the Settings icon and tap on the “File manager” symbol.

Select File manager

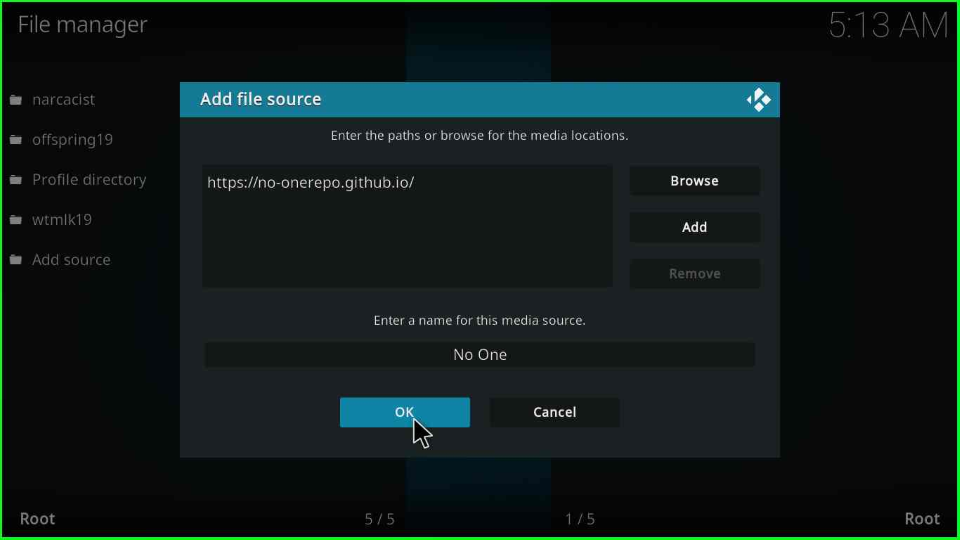
The File Manager window will open; select the “Add source” option.

Tap to Add No One source

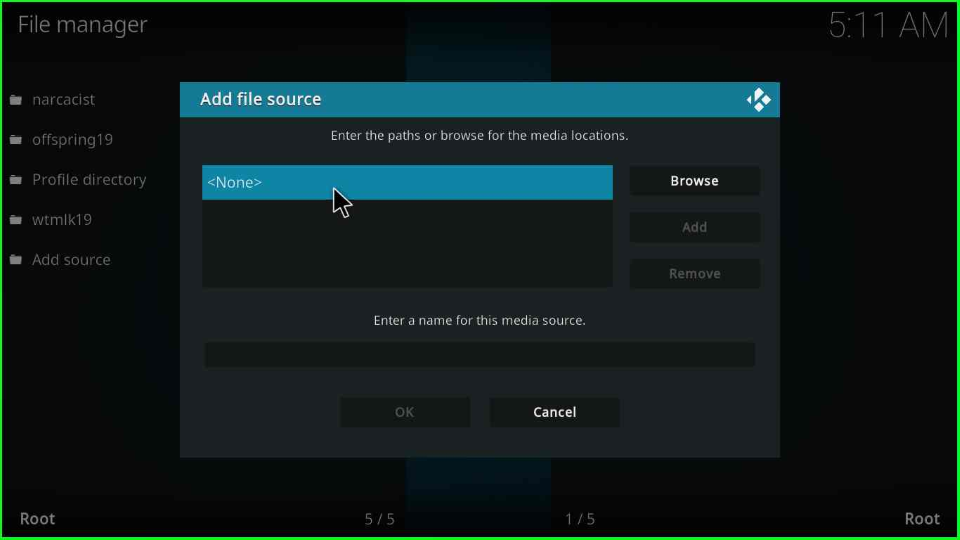
Click on the “<None>”.

Select None

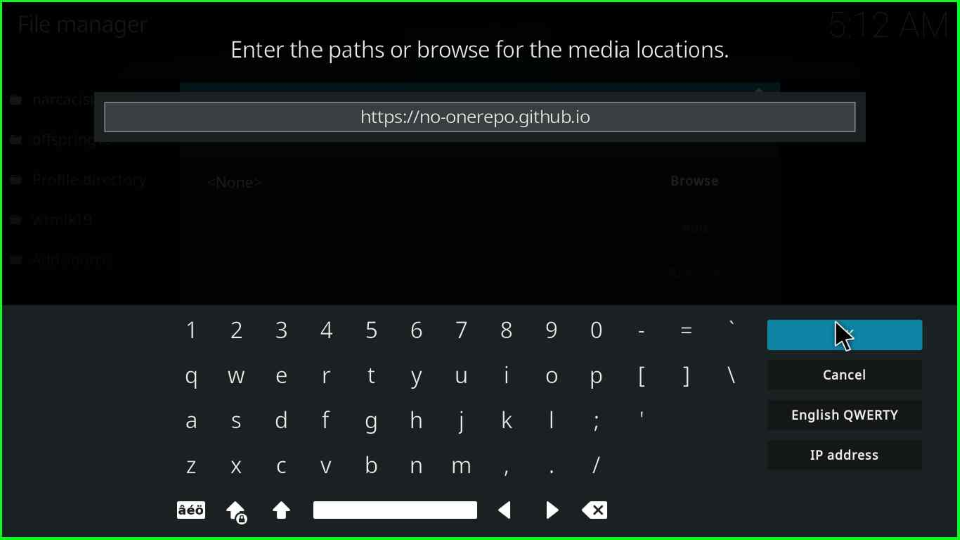
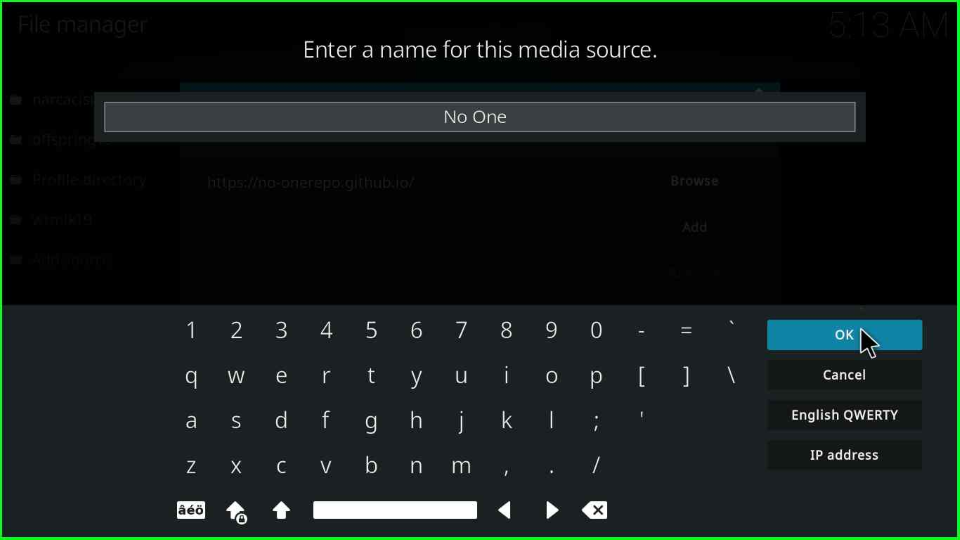
Write a source URL, “https://no-onerepo.github.io,” and press the “OK” key.

Enter No One URL

Then, enter the name “No One” in the media source and click the “OK” button.

Type No One

Verify all the particulars and press the “OK” button.

Click OK

Install No One from Zip File

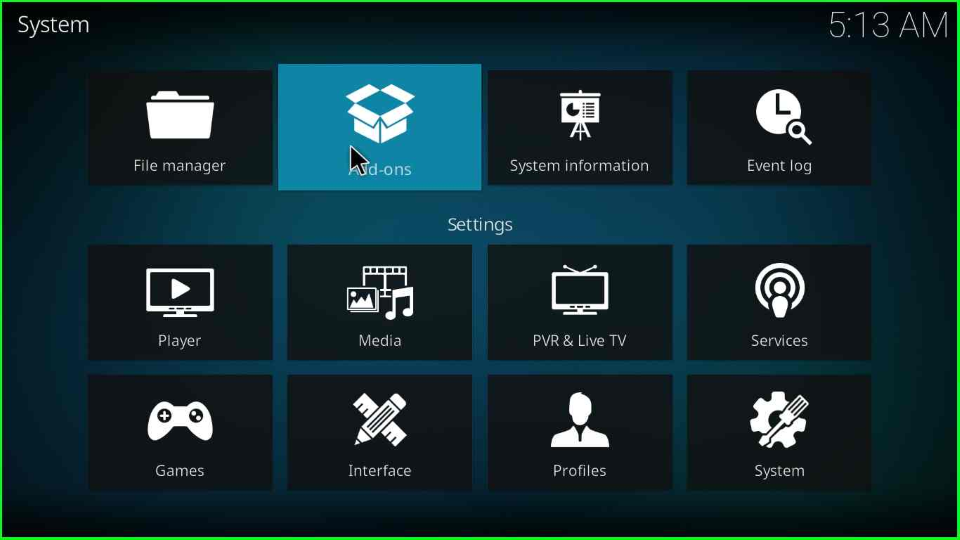
Return to the previous screen and tap on the package icon “Addons”.

Open Addons

Open the “Install from zip file” label.

Select Install from zip file

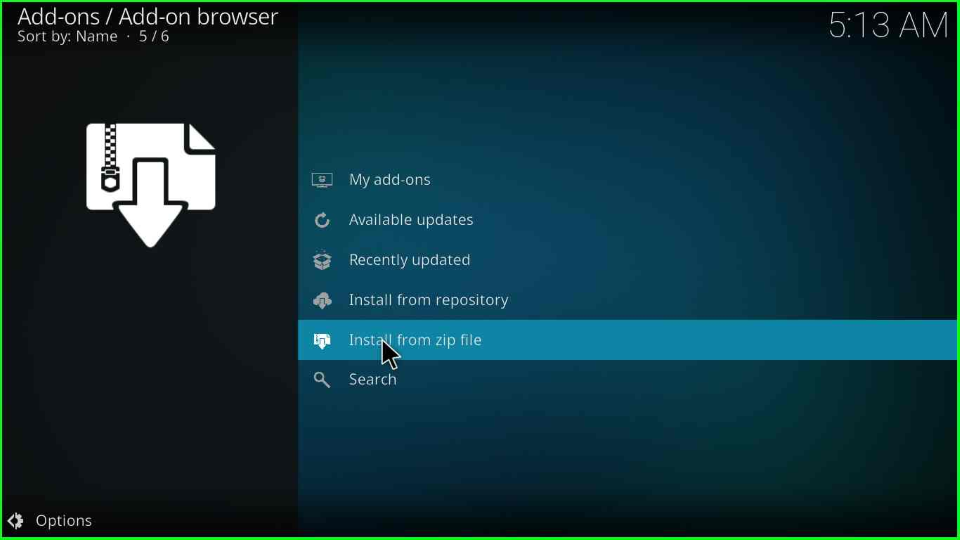
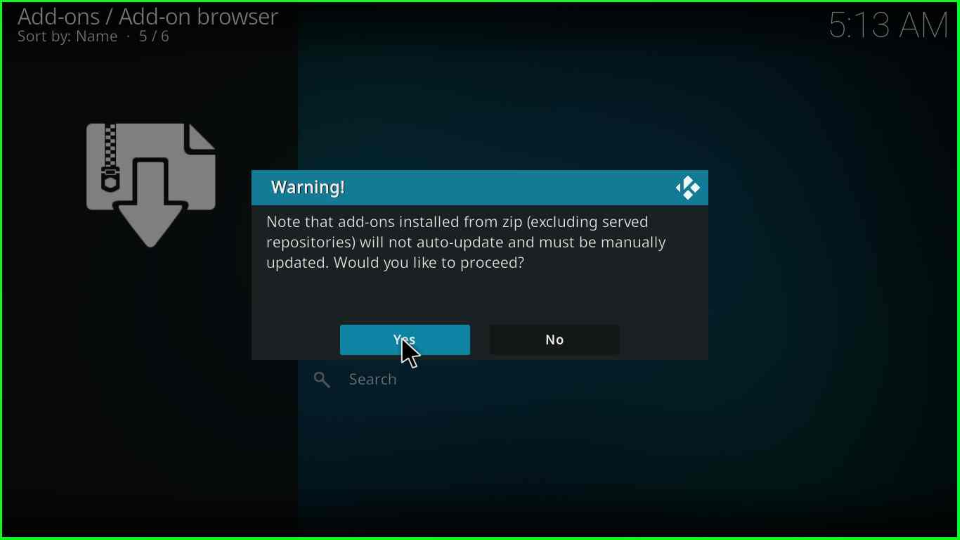
Push the “Yes” button that appears in the warning window.
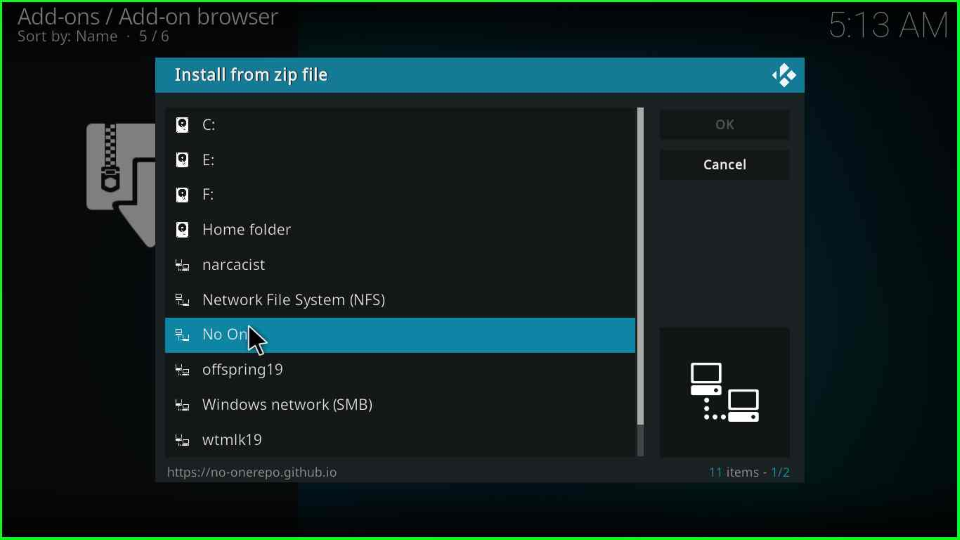
Select Yes

Inside it, open up the media folder No One.

Open No One

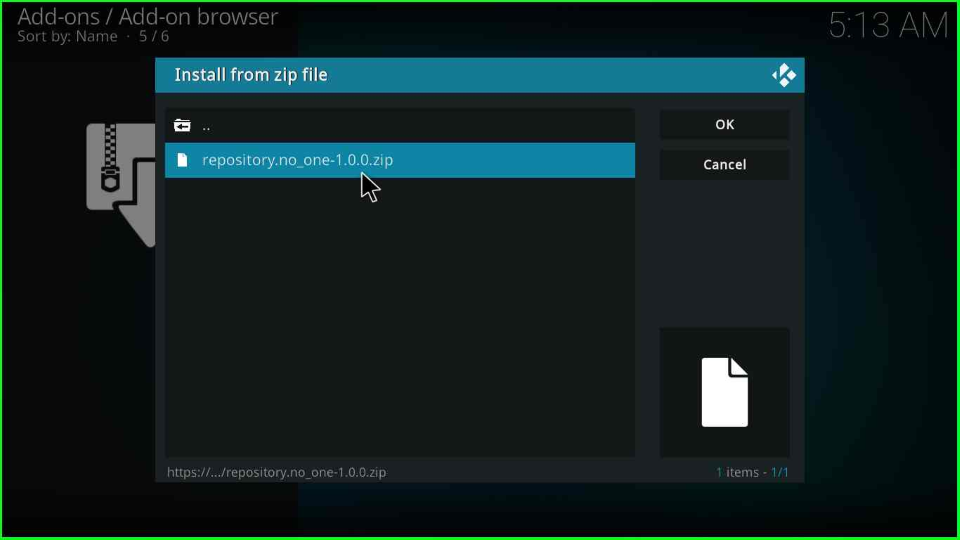
Point to the “repository.no_one-x.x.x.zip” file and press enter key.

Select zip file

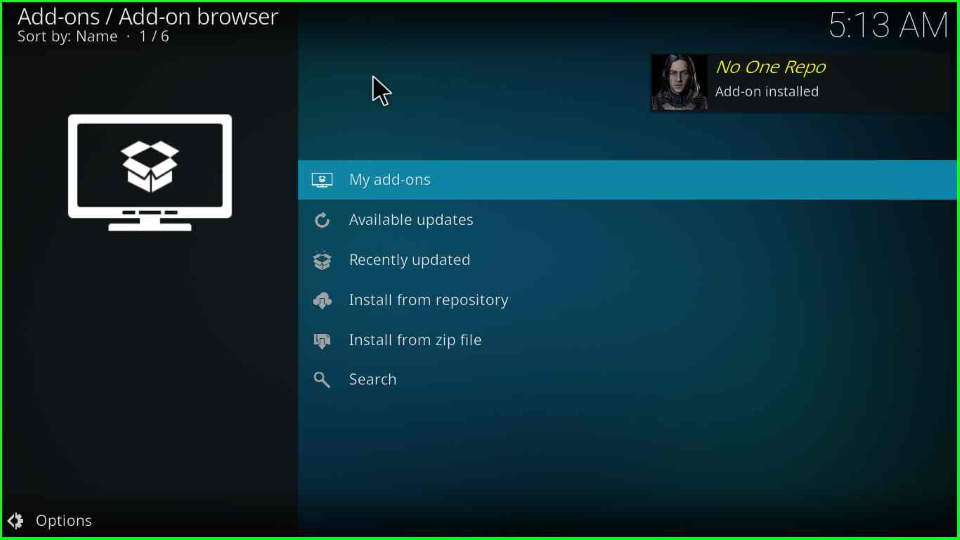
Hold on to the page until the successful No one repo installation message appears.

Wait for installation

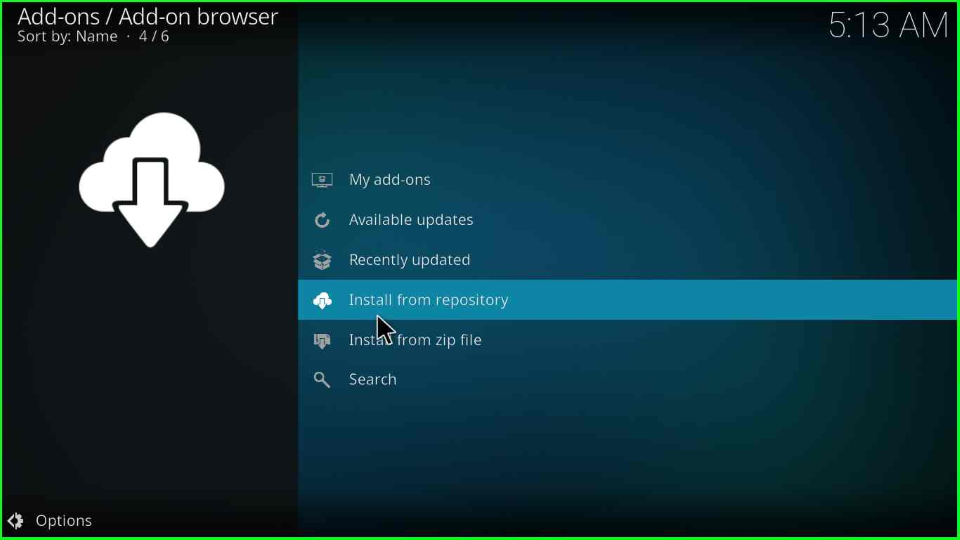
Install from Repository

Now, proceed to the other page and find the “Install from repository”.

Open Install from repository

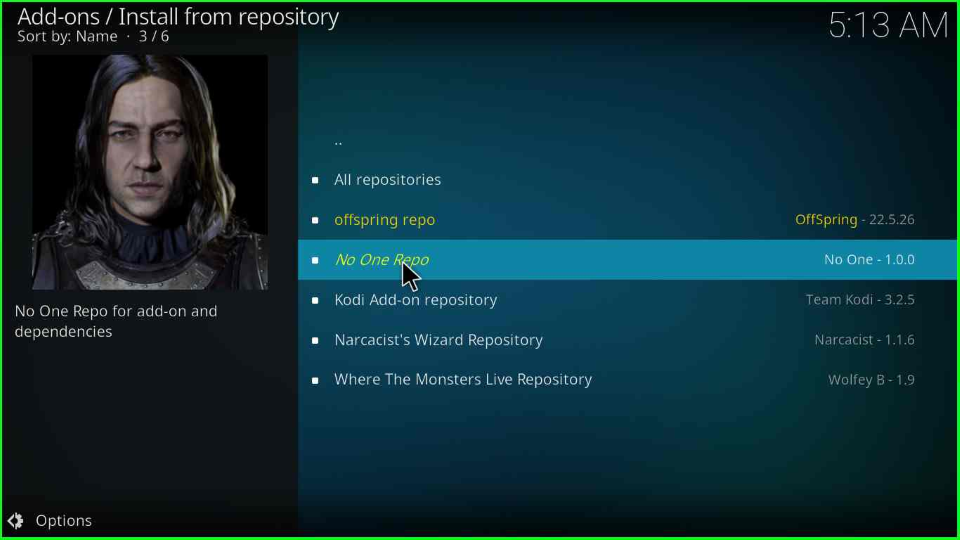
Select the “No One Repo” option.

Select No One Repo

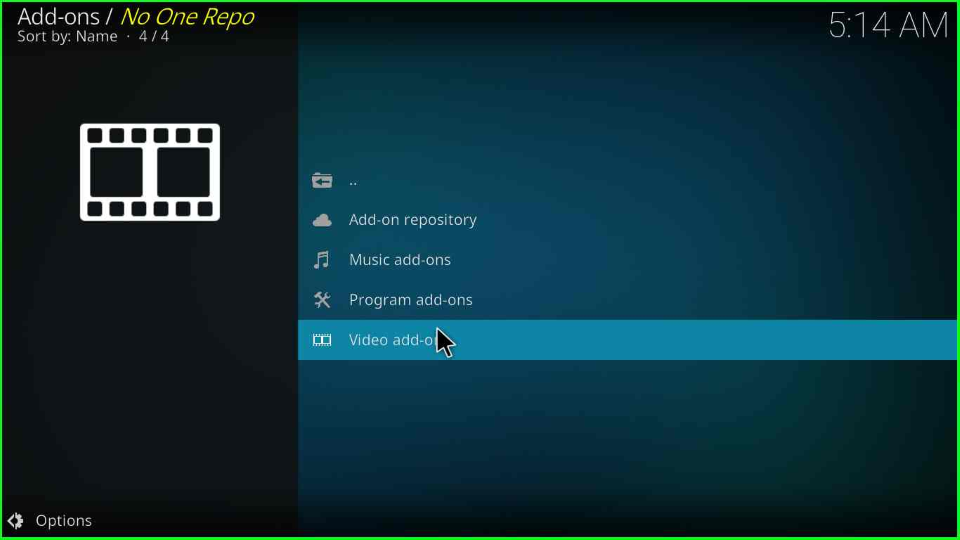
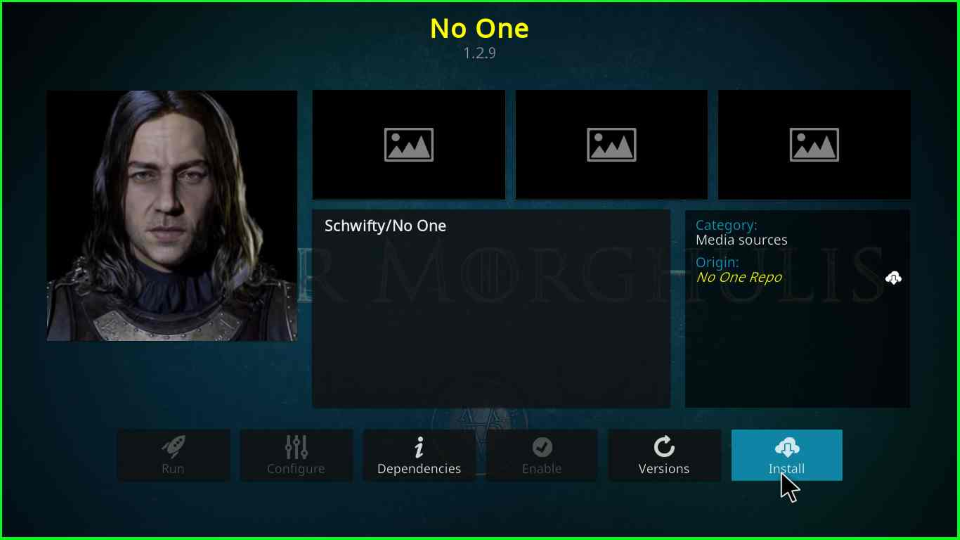
Here, you will look “Video add-ons” option; select it.

Open Video add-ons

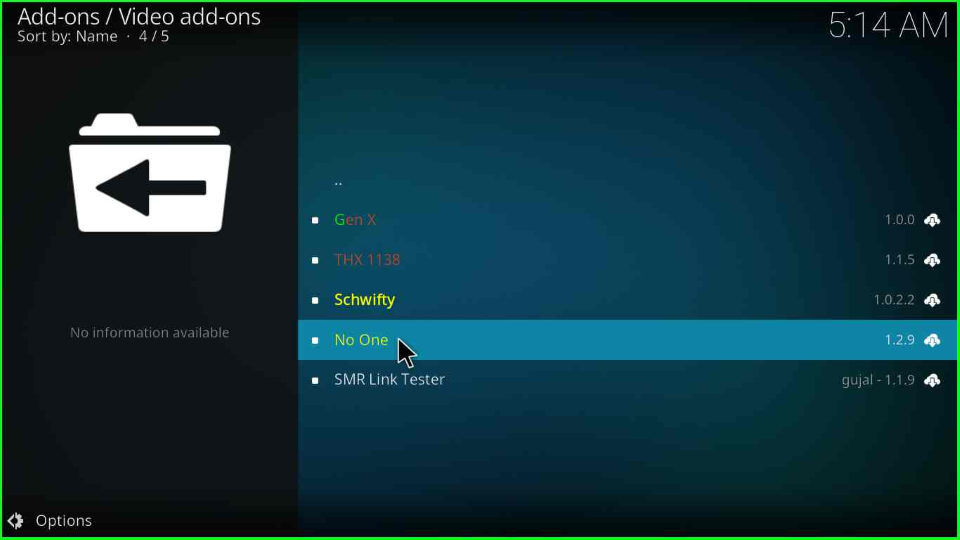
Open the “No One addon”.

Tap No One

Press the “Install” button.

Select Install

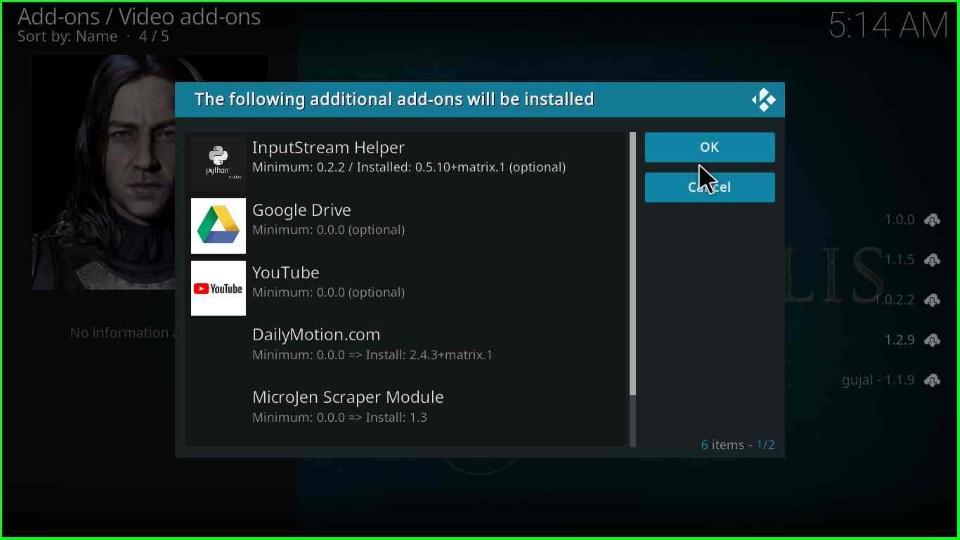
Hit the “OK” key to install the No One addon’s additional addons (InputStream Helper, Google Drive, Youtube, DailyMotion.com).

Press OK

After some time, the No One Addon installed message displays on the screen.

Wait for No One installation

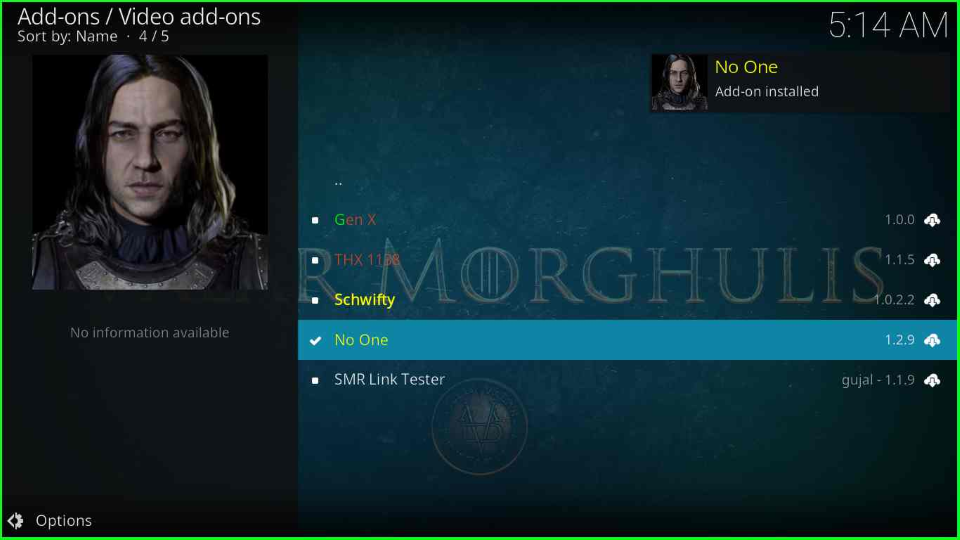
Tap on the “No One addon” again.

Open No One

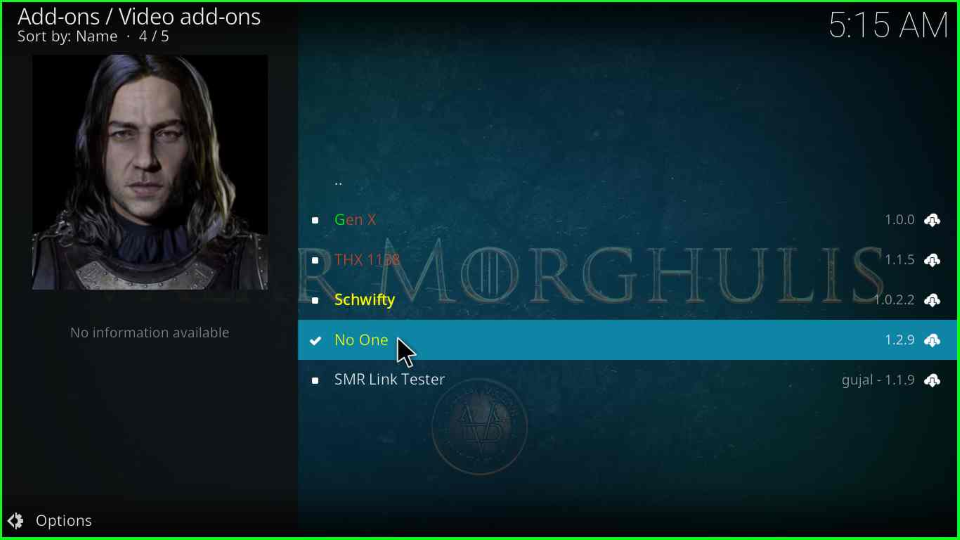
Find the “Open” symbol and hit enter.

Hit Open icon

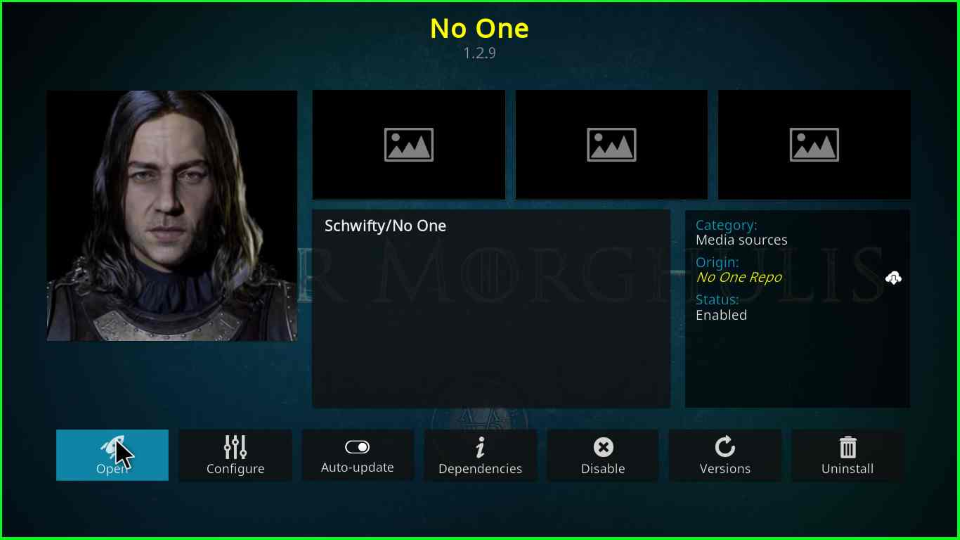
No One add-ons will open with the huge streaming library.

Choose the genres

What are the No One Kodi addon alternatives?

There are many alternatives to No One Kodi addons like Stirr, Fox Sports, Insomnia, Kingpin, The Oath, Tubi, Crackle, and, Taz19.

How to Fix a “Failed Install From a Zip File” Error

Time needed: 2 minutes

To rectify the “Failed install from a zip file,” ensure the following:

  1. Kodi is connected to the Internet

  2. Install the Zip file once more

  3. Unknown Sources Mode is on

  4. Install the Latest Version of the Addon

  5. Reinstall the Kodi App

  6. Update Kodi Version

  7. Clear Cache and App Maintenance Data

Wrapping up

This article discusses installation steps for the No One Kodi add-on and some related questions. The comment section is open for discussion on No One add-on installation errors.

Before you start streaming on Firestick Apps/Websites, I would like to warn you once again that we do not know from where these Apps, Websites, Kodi Repositories, Wizards, Builds, and Addons fetch the streams.

The content you stream on Firestick Apps may be copyrighted and may land you in legal trouble even if you stream them unintentionally. Most of all, ISPs, Government, and authorized companies may monitor your online activities like streaming copyrighted movies, videos, TV shows, live shows, animes, etc.

To stay protected, and to get an exceptional streaming experience, I suggest you use IPVanish which is the fastest, most secure, and military-grade encryption VPN for Firestick. In addition, IPVanish hides your original IP address, encrypts your internet connection, and bypasses bandwidth throttling and geo-restrictions.

I have been personally using IPVanish for a couple of years and what I can say is that IPVanish is the best VPN for Firestick Apps in all aspects for all devices because the VPN unlocks geo-restricted streams and enhances my streaming experience.

Disclaimer: VPNHacks.com does not support or encourage piracy and copyright infringements in any form. You should abide by the rules and regulations in your country. We just want to protect you because sometimes you may end up streaming copyrighted content unintentionally.

Save 81%: Only $2.49/Month

Taking an IPVanish VPN Subscription is really simple.

1.       First, subscribe to IPVanish by clicking here.

Most of all, IPVanish comes with a 30-day money-back guarantee. You can get a full refund if you are unsatisfied (I do not think you will be) with IPVanish, and they do not ask for any reason.

2.       Once you subscribe to IPVanish, download the IPVanish app and open it. Enter your e-mail and password and click the “Log In” button.

Login to IPVanish App

3.       Once you are signed in, select the VPN Server location that you want to connect to and click on the connect option.

Choose the VPN Location

4.       After that, you will see that your IP address has been changed. This way, you can protect your privacy and have an exceptional streaming experience.

Connect the Server

Save 81%: Only $2.49/Month

Related Guides:

William is a technical geek and crazy about VPN, Kodi, IPTV, Netflix with huge hands-on experience in technical writing. His management, out of the box thinking, and teamwork makes him the perfect Entrepreneur. more...

IPVanish Black Friday Offer